In Microsoft Excel, grouping cells involves combining one or more cells in a spreadsheet. Grouping cells can help to read data more accurately and even automate some additions within the outline. Establishing and maintaining a well-organized funding model requires grouping rows and columns in Excel. Microsoft Excel makes it simple to categorize data into groups. In this article, we will demonstrate different ways to group cells in Excel.
Grouping Data in Excel: 6 Effective Examples
Spreadsheets with a variety of information might be intimidating at times, and it can even be tough to understand them properly. We can generate an outline if we have a list of data to arrange and summarize.
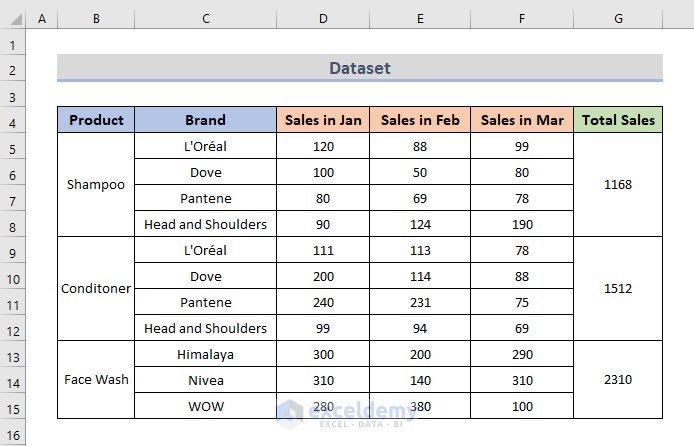
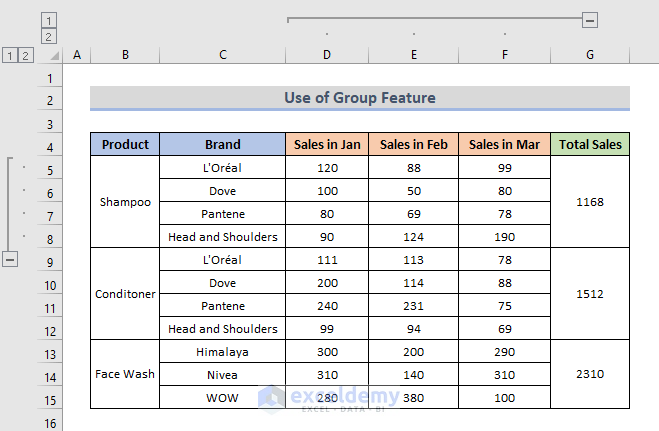
To group cells in Excel, we are going to use the following dataset. The dataset contains some products B, the name of the brand of those products in column C, also sales in January, February, and March respectively in columns D, E, F, and the total sales of each product in column G.
Suppose, we don’t need the individual sales in individual months and also don’t need the sales for separate brands. So we can group them. Let’s go through the methods to group those cells in Excel.
1. Grouping Cells Using Excel Group Feature
The benefit of utilizing group features in Excel is to hide cells and icons are added to the sheet to make it evident that they are hidden. With this group feature, we can group cells just by following some simple and easy steps.
STEPS:
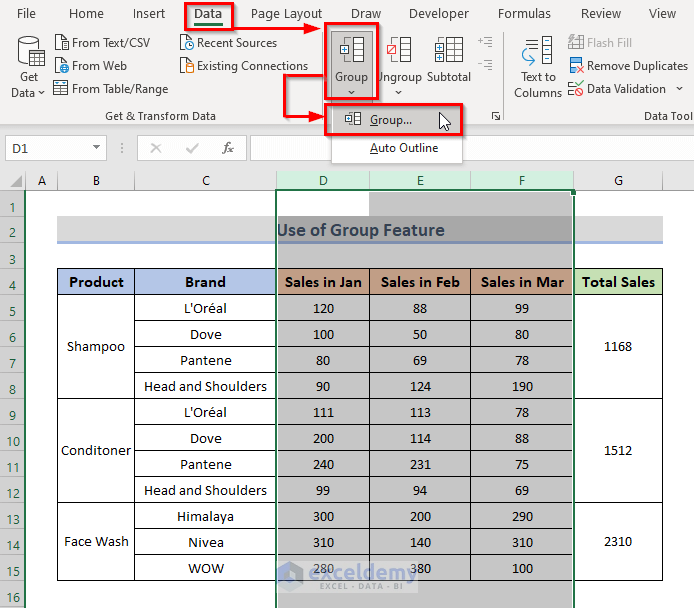
- Firstly, select the data that will be used to group the cells. So we are selecting the data cells from columns D, E, and F.
- Secondly, go to the Data tab from the ribbon.
- After that, click on the Group drop-down menu.
- Further, choose the Group option in the outline toolbar as illustrated in the screenshot below.
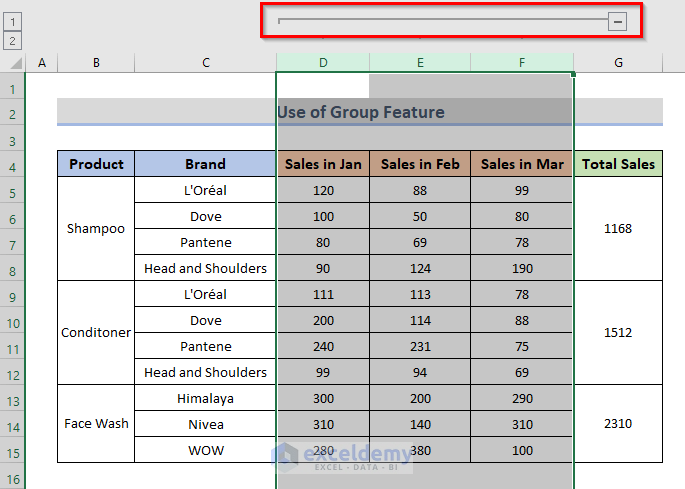
- This will add a minus sign symbol to the outline above the selected cells and we will be able to group the cells in our Excel spreadsheet.
- By the same token, assume that now we want to group the cells of rows 5, 6, 7, 8. So, we select cells of rows 5, 6, 7, 8.
- Furthermore, go to the Data tab in the Excel toolbar and then select the Group option.
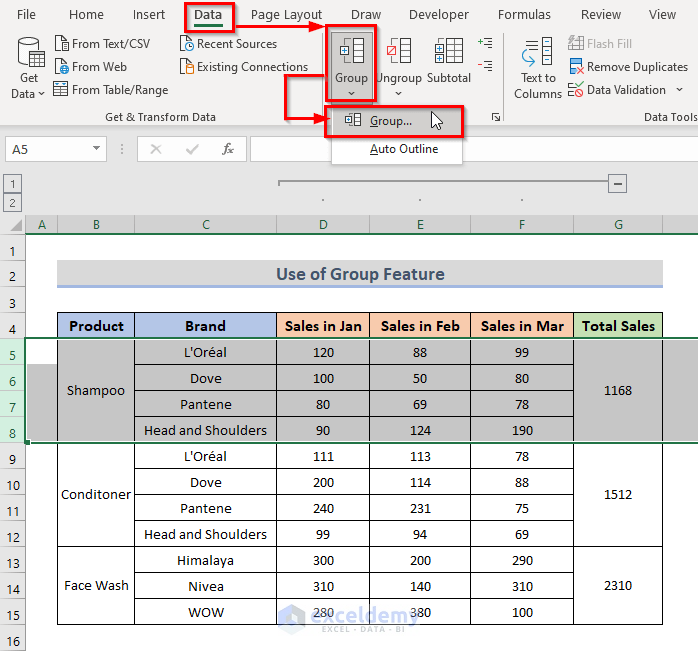
- And, that’s it! Now, when you want to hide those cells you can easily do that, cause those cells are in a group now.
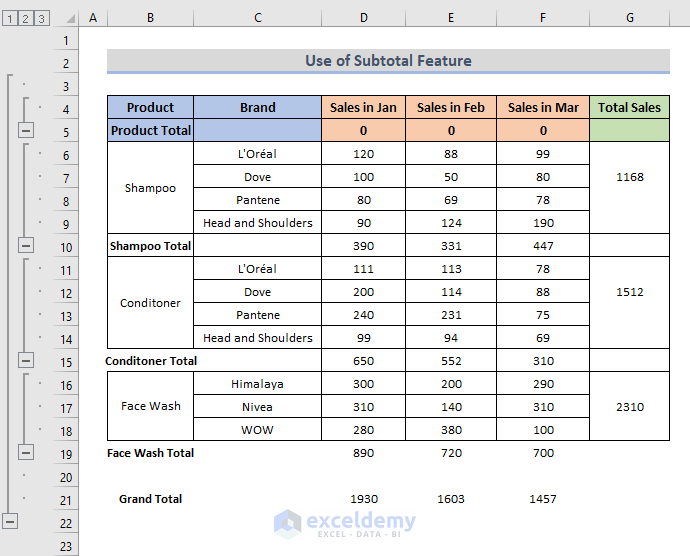
2. Apply Subtotal Command to Group Cells
The Excel subtotal tool aids in the analysis of the data. The subtotal option permits constructing groups and then also using sum, average, etc, and other Excel functions on the grouped cells. Let’s have a look at the procedure below to group cells in Excel using the subtotal tool.
STEPS:
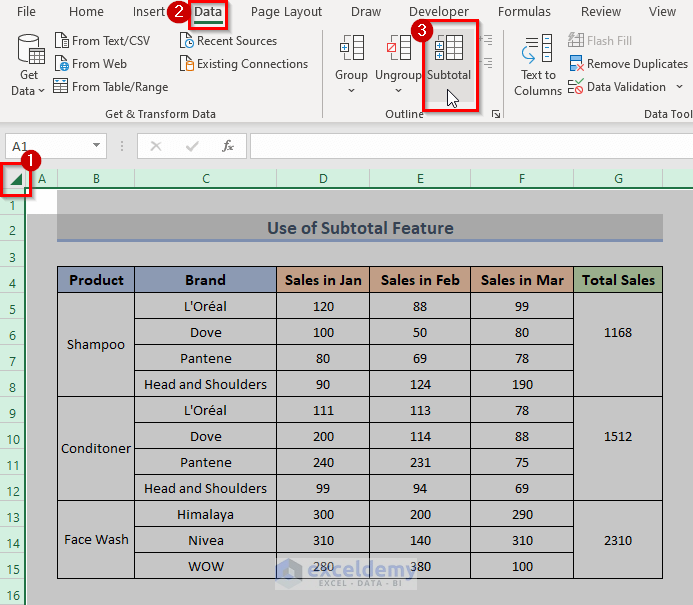
- In the beginning, select the whole sheet by clicking on the green triangle at the top of the left corner of the Excel sheet.
- Next, go to the Data tab on the ribbon.
- After that, click on the Subtotal option under the Outline category.
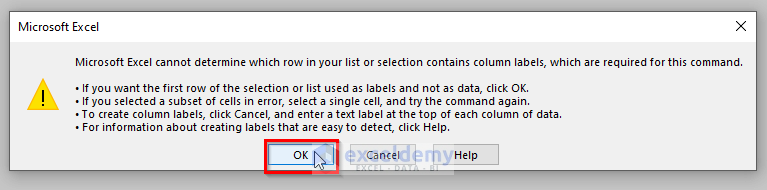
- A Microsoft Excel pop-up window will appear. Simply click on the OK button.
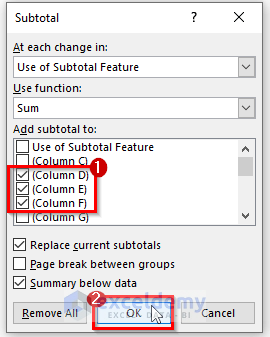
- Then, you will be able to see the Subtotal dialog box.
- After that, select the columns that you want to group.
- Now, click OK.
- This will create new rows after every product, and those are the total sales for every month.
- And, if you look at the left side of the spreadsheet, you can see that the cells of the products are in a group now.
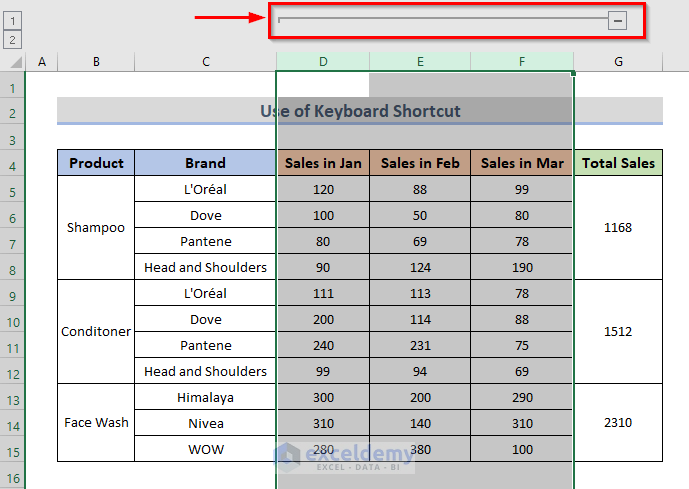
3. Keyboard Shortcuts to Group Cells in Excel
Using the keyboard shortcuts rather than the mouse increases productivity and allows one to complete more activities. We can use the keyboard shortcut to group cells. For this, we need to follow the simple and quick steps below.
STEPS:
- First, select the cells that you want to group. So, we select columns D, E, and F.
- Second, press Shift + Alt + Right Arrow.
- And, that’s it. You can now see that the cells are in a group now.
4. Use the Auto Outline Option to Group Cells with the Same Value
The Auto Outline tool in Excel swiftly allows seeing only the summarized data. Only the headers and summarizing cells are visible when using this feature. To use this tool, we need to add extra rows after every product, naming them the total of each product. Now, we can use this tool to group cells. For this, let’s go through the procedure.
STEPS:
- Likewise the previous methods, in the first place, select the whole data cells.
- In the second place, go to the Data tab from the ribbon.
- Thirdly, go to the Group drop-down menu under the Outline category.
- Next, click on the Auto Outline command.

- And, there you go! Now, the individual products are in a group as shown in the following picture.

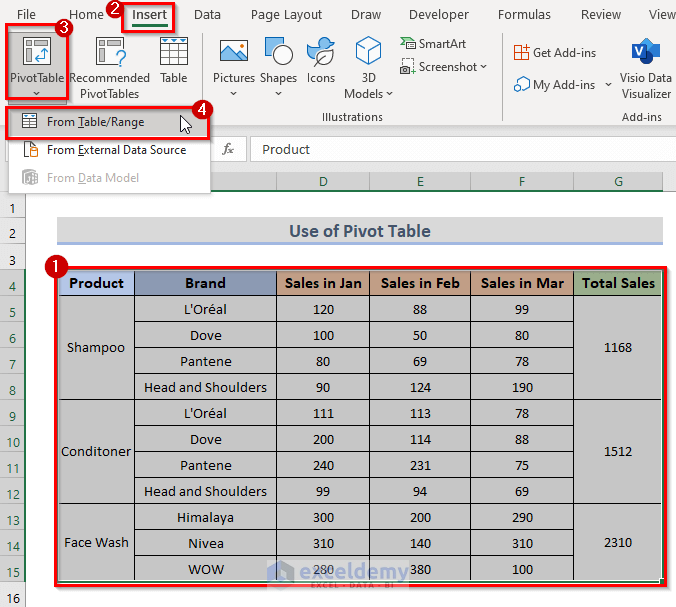
5. Apply Pivot Table to Group Cells with the Same Value
To organize and summarize the data in the spreadsheet, Pivot Table is one of the best tools in Excel. We can use Excel Pivot Table to group the data and we can change the group at any time when we need them to group in another way. Now, let’s have a look at the procedure to group cells in Excel using the Pivot Table.
STEPS:
- Firstly, in the same way as before, select the whole data as we want to group them in our desired manner.
- Secondly, go to the Insert tab.
- Thirdly, in the Tables category, go to the PivotTable drop-down menu and click on the From Table/Range.
- This will open the PivotTable from table or range dialog box.
- Now, select the New Worksheet and click on the OK button.
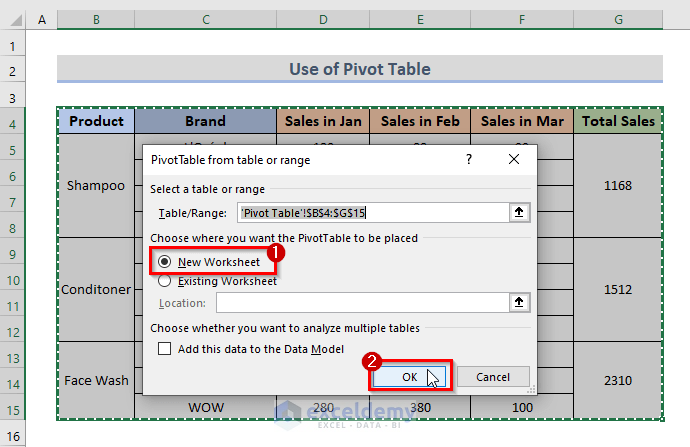
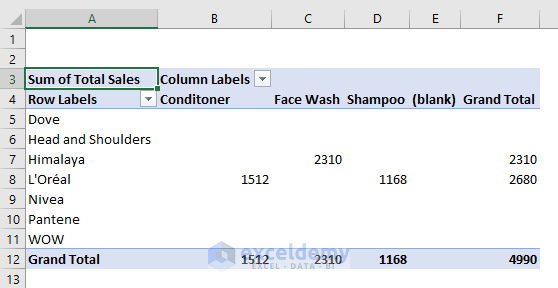
- By doing this, a PivotTable will appear in a new worksheet.
- Now, from the PivotTable Fields settings dialog box, group the data as you wish. So, we put the Product information in the Columns section, the Brand in the Rows section, and the Total Sales in the Values.
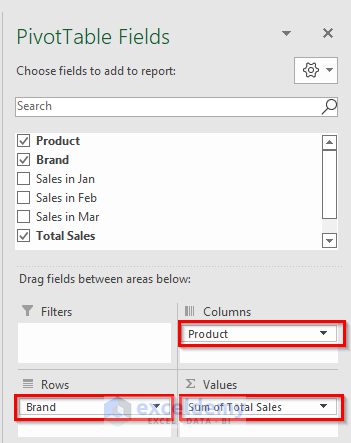
- Finally, all the data are now grouped. We can change if the requirements change.
6. Excel VBA to Group Cells
Visual Basic for Applications (VBA) is a Microsoft-developed programming language. It always completes the assignment in the same manner as normal functions and tools work in Excel. Excel VBA can complete the operation considerably more quickly than manually. We can group cells using Excel VBA. Let’s see how to do that.
STEPS:
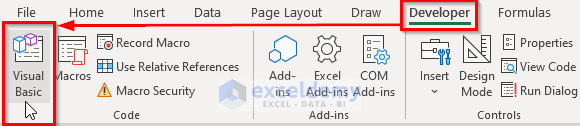
- First, go to the Developer tab on the ribbon.
- Second, click on Visual Basic or press Alt + F11 to open the Visual Basic Editor.
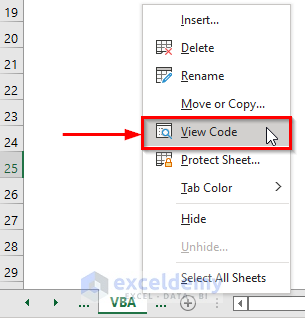
- Another way to open the Visual Basic Editor is, to simply right-click on the sheet and select View Code.
- This will open the Visual Basic Editor where you can write the code.
- Now, write down the VBA Code below.
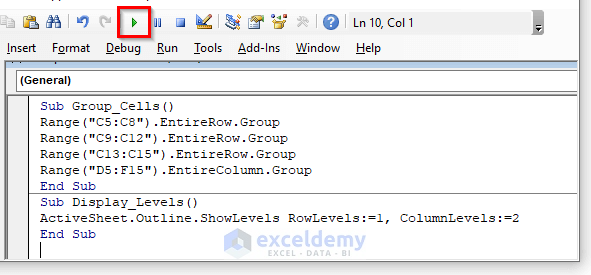
VBA Code:
Sub Group_Cells()
Range("C5:C8").EntireRow.Group
Range("C9:C12").EntireRow.Group
Range("C13:C15").EntireRow.Group
Range("D5:F15").EntireColumn.Group
End Sub
Sub Display_Levels()
ActiveSheet.Outline.ShowLevels RowLevels:=1, ColumnLevels:=2
End Sub- Now, run the code by pressing the F5 key or clicking the Run Sub button.
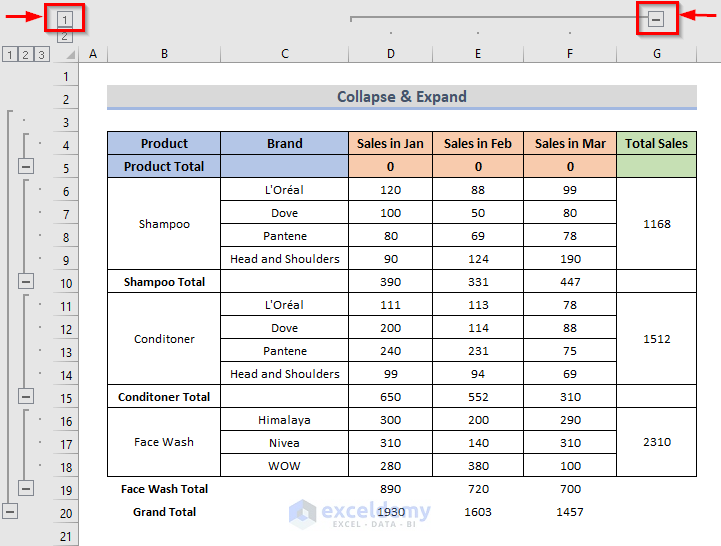
Collapse & Expand Cells after Grouping
We can rapidly hide and unhide cells in Excel using groups and outlines. With the click of a button, each group can be expanded or collapsed. To collapse the grouped cells, on the left, click the minus (‘–’) icons. Or, you can click on the numbers. The above numbers will collapse the cells.
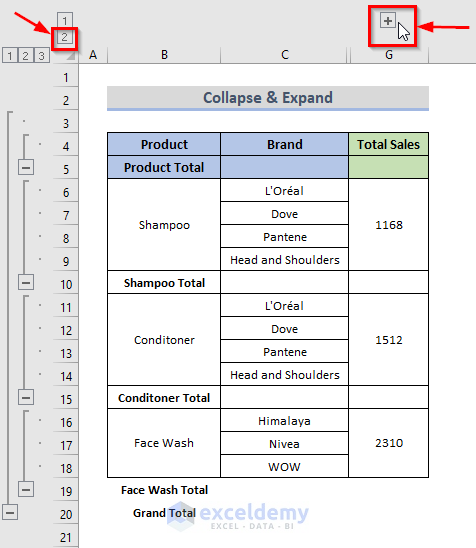
To expand the grouped cells, use the plus (‘+’) sign and this will widen the collapsed collection of cells. Or, click on the numbers after. The inner numbers will expand the cells.
Ungroup Cells in Excel
If we don’t need the summarized or grouped cells anymore. Or, if we need to see the detailed data. We can ungroup the grouped cells. To do this, we have to follow some steps shown below.
STEPS:
- First, go to the sheet, where you group your data before.
- Second, go to the Data tab.
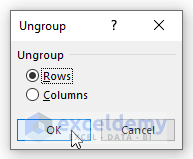
- Third, from the Outline category, click on the Ungroup drop-down menu and select Ungroup.

- This will open up an Ungroup selection window. From there, you need to select that you want to ungroup the Rows or Columns.
- Finally, just click on the OK button. And, that’s it!
- Or, you can Ungroup the cells by using the keyboard shortcut Shift + Alt + Left Arrow.
Download Practice Workbook
You can download the workbook and practice with them.
Conclusion
The above methods will assist you in grouping cells in Excel. Hope this will help you! If you have any questions, suggestions, or feedback please let us know in the comment section. Keep learning new features in Excel.
Group Cells in Excel: Knowledge Hub
- Use Grouping and Consolidation Tools
- Group and Ungroup Columns or Rows
- Group Cells with Same Value
- Group Similar Items
- Create Multiple Groups
- Group Duplicates
- Group Time Intervals
- Remove Grouping
- Group Rows
- Group Rows with Expand or Collapse
- Group Rows by Name
- Group Rows by Cell Value
- Group Rows with Same Value
- Group Rows with Plus Sign on Top
- Group and Ungroup Columns or Rows
- Group Columns Next to Each Other
<< Go Back to Outline in Excel | Learn Excel

