Printing in Excel means making a paper copy or a PDF copy of your Excel sheet. This is handy for meetings or sharing physical documents.
In this article, you will learn about all the printing options and features available in Excel.
Excel printing is vital for finance, project management, education, etc. sectors, and creating clear documents like financial statements, project plans, or grade sheets.
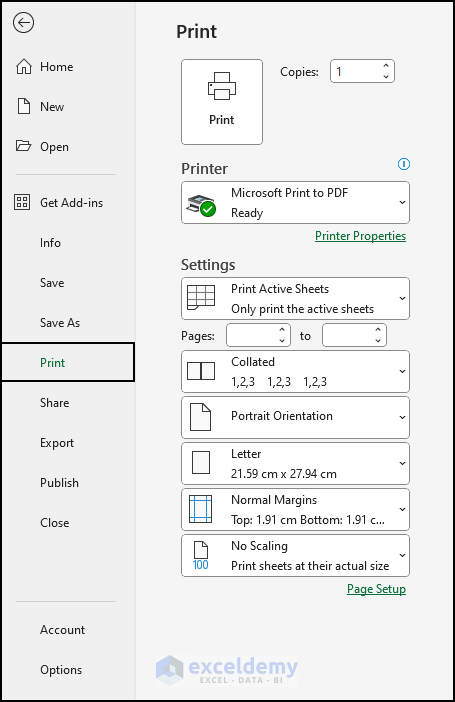
In the following image, you can see what options are available in the Print section of Microsoft Excel. You can choose your printer, and you can change print settings including what to print, how many copies to print, page orientation, paper size, margin, and scaling options. Pressing CTRL+P directly takes you to this menu.
After reading this article, you will learn how to
– Use Printing Options
– Print worksheets, workbooks, and more
– Print workbooks to a file
– Print Selected Ranges
– Print Formulas, Charts, Tables, and Gridlines
– Print Titles for better documentation
– Print Comments, Background, Header and Footer
– Add Print Button in Excel ribbon
And lastly, how to insert Page Break in Excel.
Note: We have used Excel for Microsoft 365 to prepare this article.
⏷Printing Options in Excel
⏷Print an Excel Worksheet in One Page
⏷Print Selected Ranges
⏷Print a Workbook to a PDF or Other File
⏷How to Print Formulas
⏷Print an Excel Chart
⏷Print Tables in Excel
⏷How to Print Gridlines
⏷Print Titles for Better Documentation
⏷Print Header and Footers on Each Page
⏷Print Comments in Excel
⏷Print Background in Excel
⏷Adding a Print Button in Excel
⏷Inserting Page Breaks
What Are the Printing Options in Excel?
You can print any Excel dataset, multiple sheets, or the entire workbook using options in the Print menu or Page Layout tab.
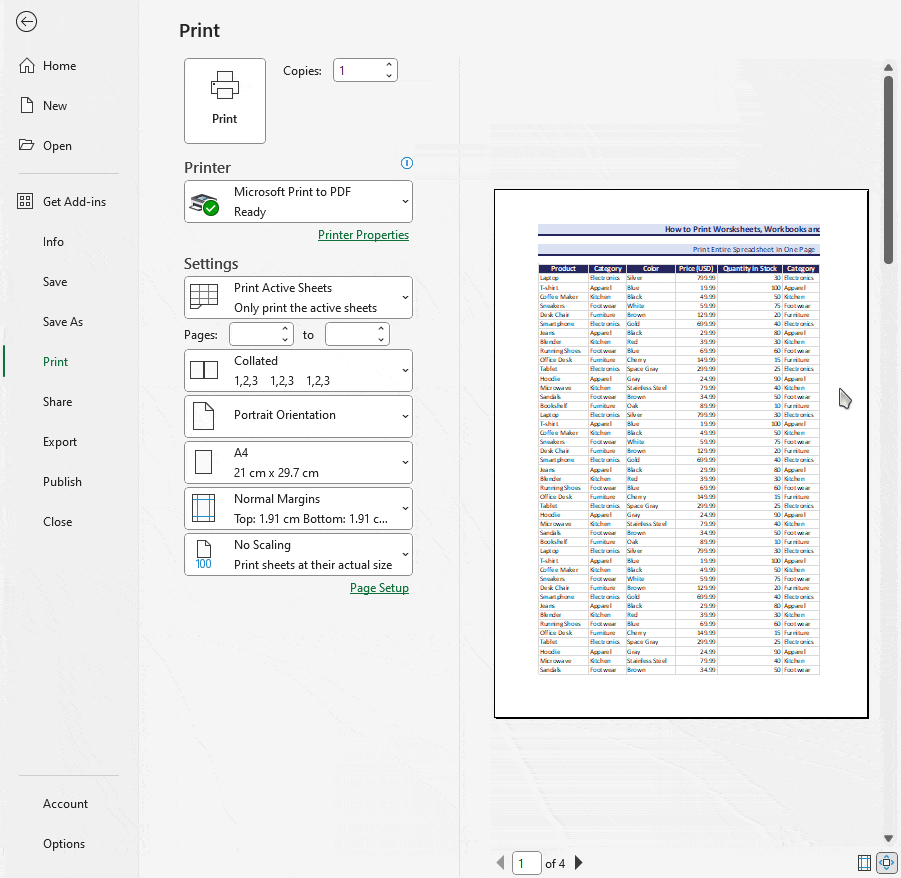
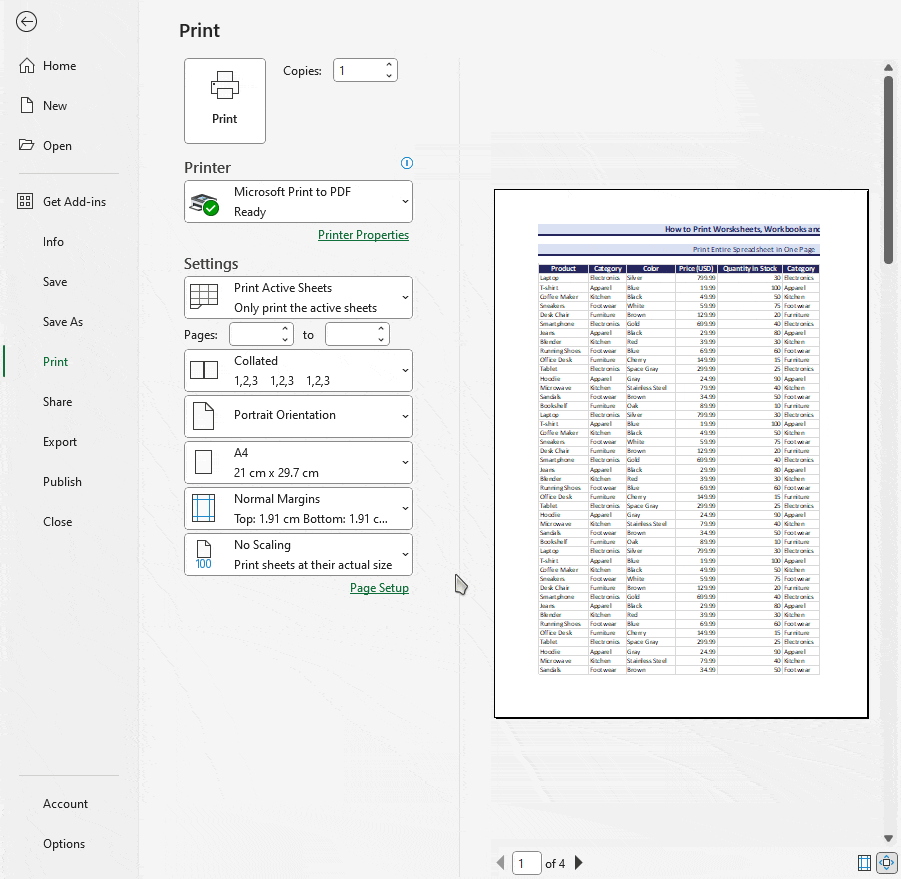
In the print window of Excel, you will find two segments.
On the left, you will find the Print button, Printer list, and all the Print settings.
On the right, you will find the print preview window.
Using the features of Print Settings, you can easily set the format of your printed Excel document.
Click on this image for a clearer view
1. Number of Copies to Print
Right beside the Print button, you can specify how many copies of your document you want to print. You can print up to 32,767 copies.

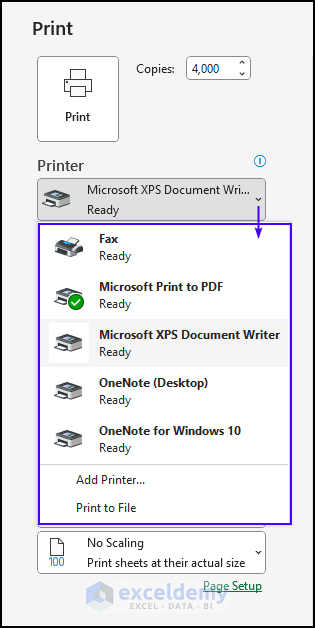
2. Choose Printer
You will see all the available printers in the following list.
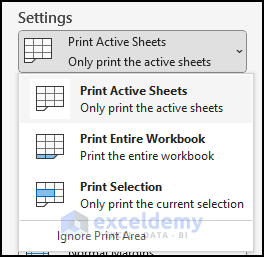
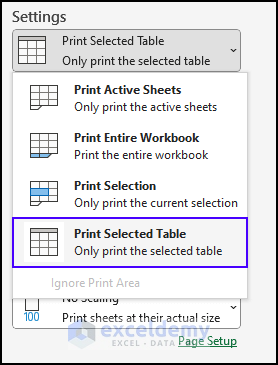
3. Define What to Print
You can control the part you want to print from your workbook. You will find 3 options here:
i. Print Active Sheets
Allows you to print only the currently active sheets in your workbook. You can press and hold CTRL to activate multiple sheets.
ii. Print Entire Workbook
It prints all the sheets in your workbook. This option is helpful when you need a hard file copy of the entire workbook.
iii. Print Selection
This option only focuses on the selected area or range of cells. Useful for printing specific information.
iv. Print Selected Table
If you select any cell in a table, you will also see this option in the Print menu.
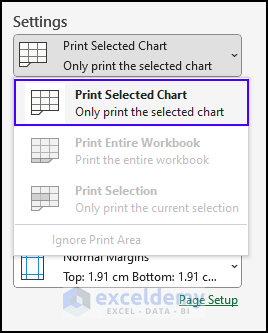
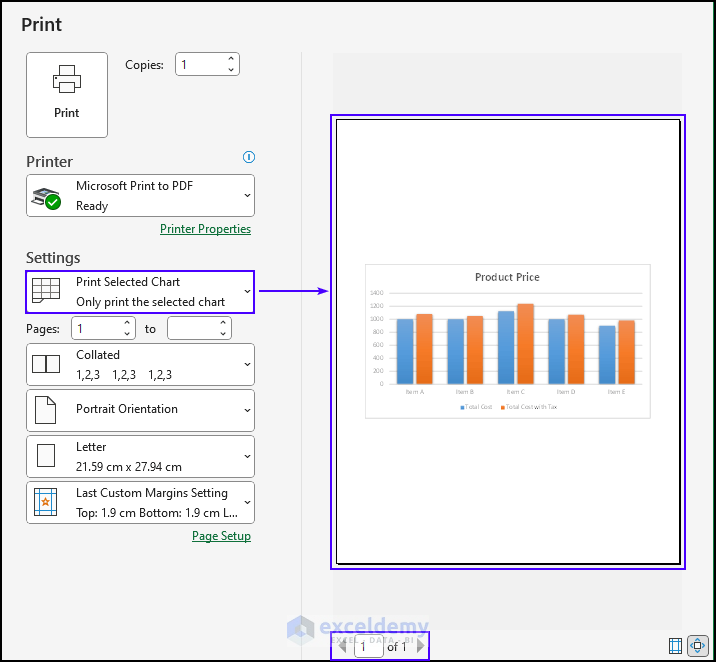
v. Print Selected Chart
If you select any chart, you will see this option in the Print menu, and all other menus will be greyed out.
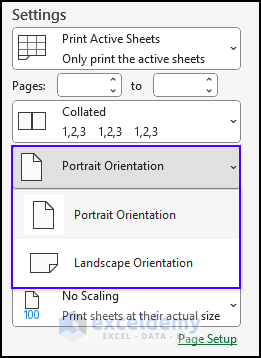
4. Page Orientation
It has 2 options for you: Landscape and Portrait.
- If your data has more columns and is wide, Landscape is the best format to choose.
- In the case of data with more rows and a tall appearance, Portrait is preferable.
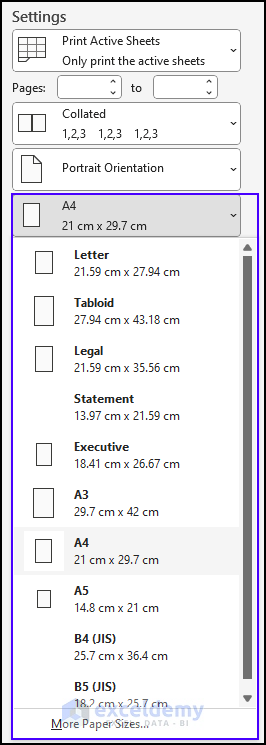
5. Paper Size
You can choose any paper size for printing, like letter, legal, or A4.
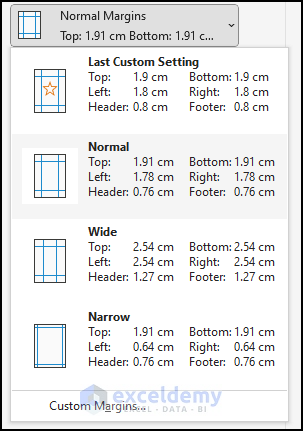
6. Select a Suitable Page Margin
Page margins act as a visual boundary between the content and the edge of the paper. There are a few options available by default: Normal, Wide, and Narrow. Additionally, you can set Custom Margins depending on your content.
7. Page Scaling
To adjust the size of the printed content in the paper, you can use these page scaling options.
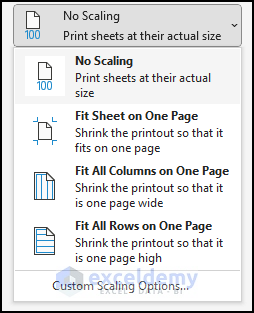
i. No Scaling
This option allows you to print without applying any scaling adjustments to your sheet content.
ii. Fit Sheet on One Page
It ensures each sheet content fits on one page. If you have 3 sheets, you’ll see 3 pages in the print preview, each displaying the entire content of a separate sheet.
iii. Fit All Columns on One Page
This option helps you to put all your columns together on a single page. It scales the width of the columns to fit them on a single page.
iv. Fit All Rows on One Page
It makes all the rows visible on one page. This option scales the height of the rows to fit them on a single page providing a complete view.
If you want to customize the scaling of your document, you can use the Custom Scaling Options.
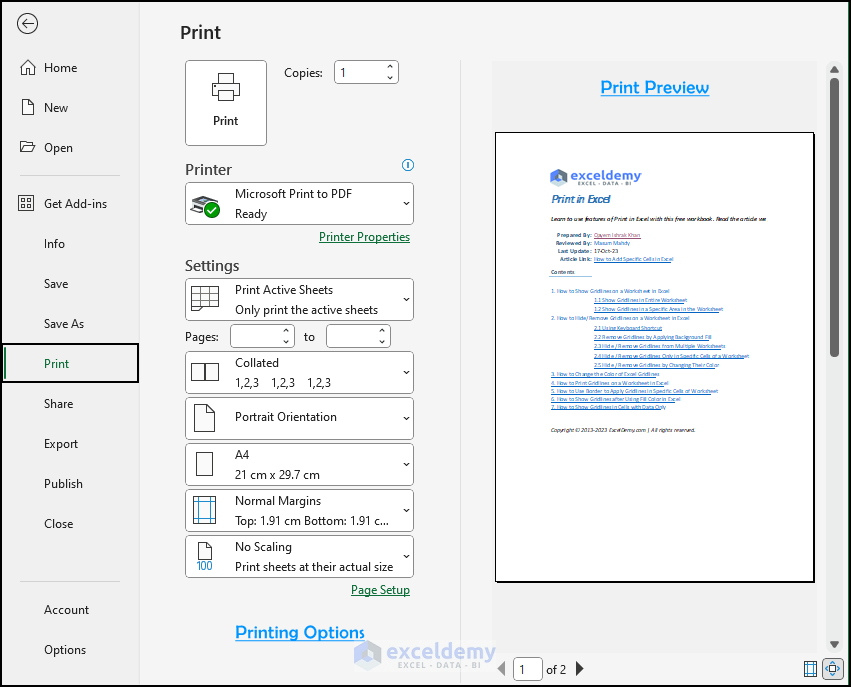
8. Print Preview
You can look at how your printed documents will be in the Print Preview option.
You can find Print Preview using any of the following options.
- File tab ⇒ Print Option
- Keyboard shortcuts CTRL+P or CTRL+F2
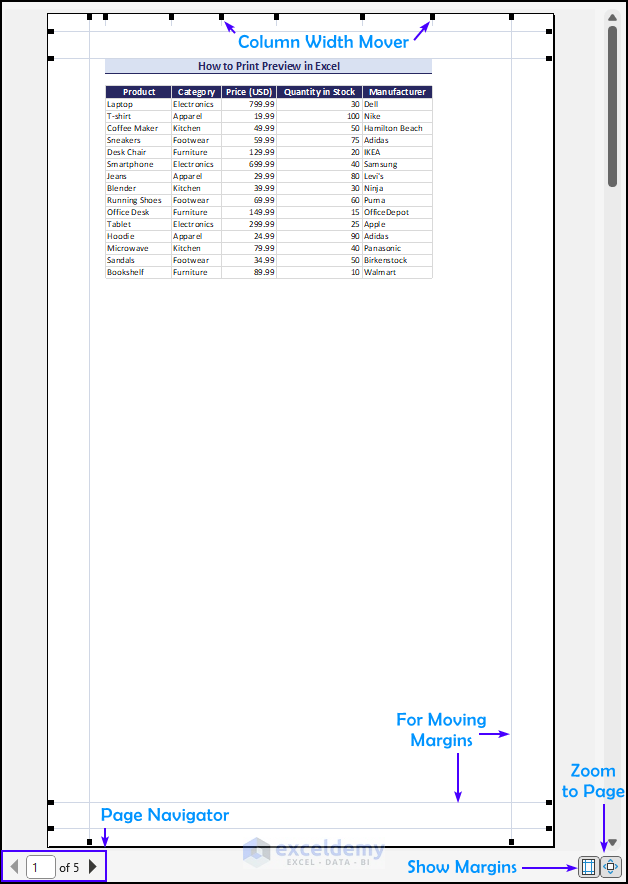
It is very helpful for printing documents as it shows exactly how it will look on paper. You may also find the following features in Print Preview.
i. Margins Mover
Generally, it makes the margins wider or narrower. You can drag them to adjust the size.
ii. Column Width Mover
You can adjust the cell widths by dragging the handles at the top of the print preview window.
iii. Page Navigator
Using this option, you can navigate to any page.
iv. Show Margins Option
By default, the margins are hidden in the print preview window. You can show the margins using this option.
v. Zoom to Page
This option will help you to see the paper by zooming in. To zoom out again click this option.
Click on this image for a clearer view
How to Print an Excel Worksheet in One Page in Excel?
Excel print sheets at their original size. Therefore, larger worksheets get broken in the middle and go to additional pages which is difficult to use. Here’s an example of such a document.
Click on this image for a clearer view
In the above image, you can see that the selected range is divided into four pages, which is evidently not what you intended. To have all the content fit on a single page for printing, select the Fit Sheet on One Page option from the Scaling drop-down menu in the Print Settings.
If, after checking the print preview, you think your data isn’t quite clear enough, you might want to try reducing the margins.
Click on this image for a clearer view
To make the margins smaller in the printed copy, go ahead and choose Narrow Margins. Or, click on the Custom Margins button, and it’ll take you to the Margins section of the Page Setup dialog.
Once there, set all the margins (top, bottom, right, and left) to 0 or any value you find suitable. This way, your printed copy should be more readable.
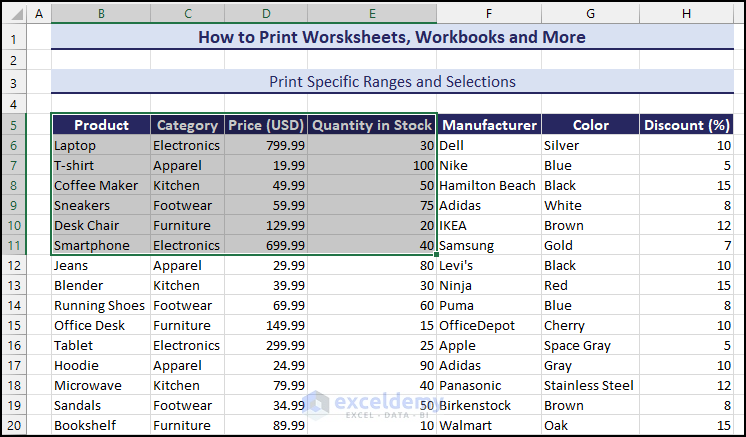
How to Print Selected Ranges in Excel?
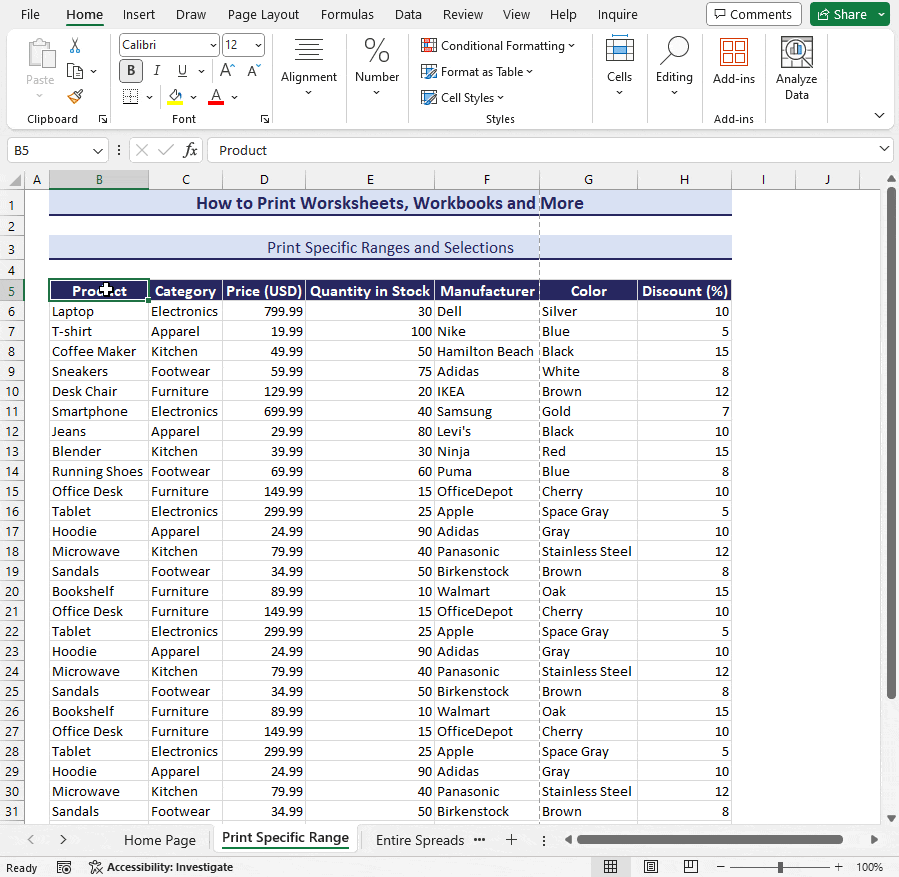
Let’s say you want to print only the B5:E11 range. To print these selected cells, apply the following steps.
Step 1: Select target (e.g. B5:E11) cells.
Step 2: Go to the File tab ⇒ select Print Option.
Or press CTRL+P to open the print menu.
Step 3: Set how many copies to print using the Copies spin button.
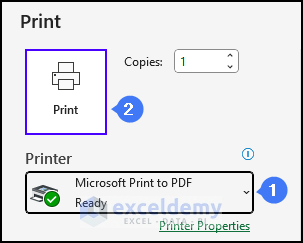
Step 4: Select a printer from the Printer list.
Here, we have selected Microsoft Print to PDF since we currently have no printer connected. This selection will proceed to create a PDF file, which we can later convert to a hard copy using a printer.
Step 5: Select an appropriate paper size commonly used in your office.
[image]Step 6: Choose a suitable scaling option.
Step 7: Then press the Print button.
Click on this image for a clearer view
How to Print the Same Range in Multiple Sheets
If you want to print the same cell range in multiple sheets, follow the steps below.
- First, select the range.
- Then select the sheets while holding the CTRL key. For example, we have selected February, March, and April worksheets.
- Now press CTRL+P to open the Print menu. And do the rest of the job.
In this case, we have selected 3 sheets and so there are 3 pages.
How to Print a Workbook to a PDF or Other File?
To save your document in PDF format or others through the Print Settings, follow the steps below.
Step 1: Press CTRL+P and click the down arrow under the Printer list, and you’ll see Print to File below. Choose that.
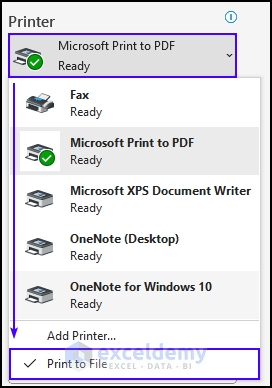
Step 2: Next, choose the appropriate printer from the list. For instance, if you’re looking to convert your file to PDF, select the Microsoft Print to PDF printer.
Step 3: Once that’s done, click the Print button. This will prompt a window to appear for saving the output.
Step 4: Select your desired location to save the file, give the file a suitable name, and press the Save button.
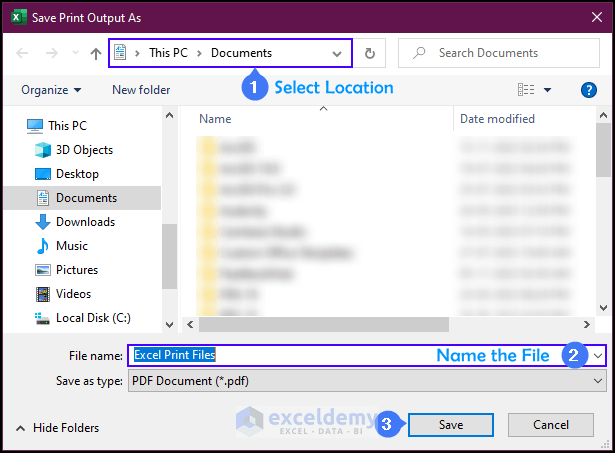
Now whenever you need you can simply print it from the saved PDF file.
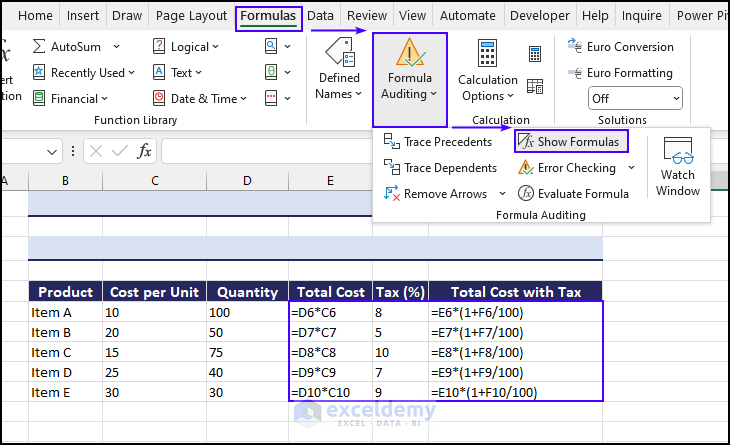
How to Print Formulas in Excel?
To print formulas in Excel, just make sure the formulas are visible.
For that, go to Formulas Tab ⇒ Formulas Auditing Group ⇒ Show Formulas.
Thus, you can include formulas when printing your Excel sheets.
How to Print an Excel Chart?
If you want to print an Excel chart, then first select the chart and press CTRL+P. This will bring up the Print Selected Chart option under the Settings of the Print menu.
Steps to follow:
- Select the chart and press CTRL+P to access the print menu.
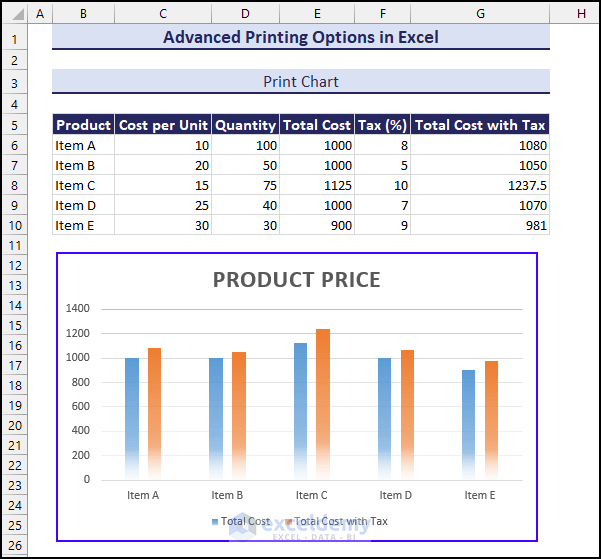
- In the print preview window, review the chart preview.
- Click Print.
This allows you to print only the selected chart, excluding any associated worksheet data.
How to Print Tables in Excel?
To print an Excel table in your workbook, select any cell from the table ⇒ press CTRL + P ⇒ select the Print Selected Table option.
Then click on Print button.
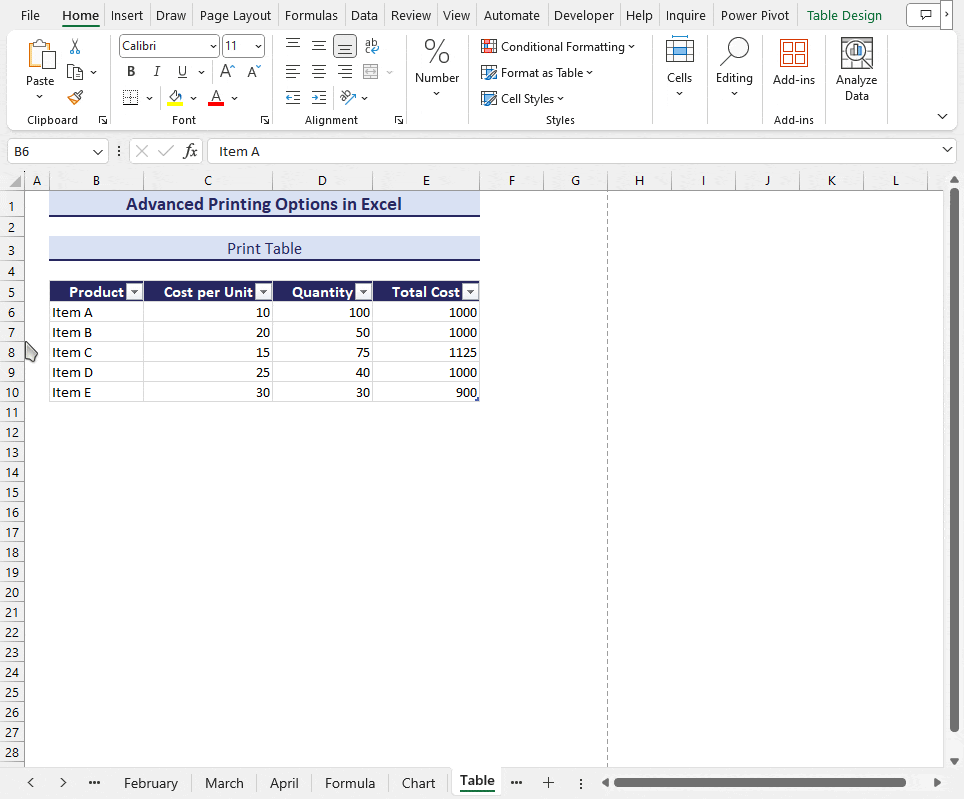
Click on this image for a clearer view
How to Print Gridlines in Excel?
Excel doesn’t print gridlines by default. To show gridlines on a printed Excel document, follow these simple steps:
- Page Layout Tab ⇒ Sheet Options Group ⇒ Under the Gridlines column ⇒ check the Print box.
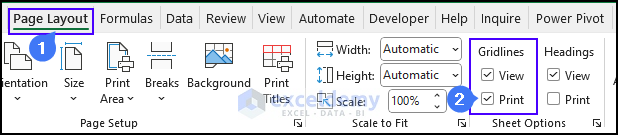
These steps ensure that Excel prints gridlines around your cells. Look at the following print preview.
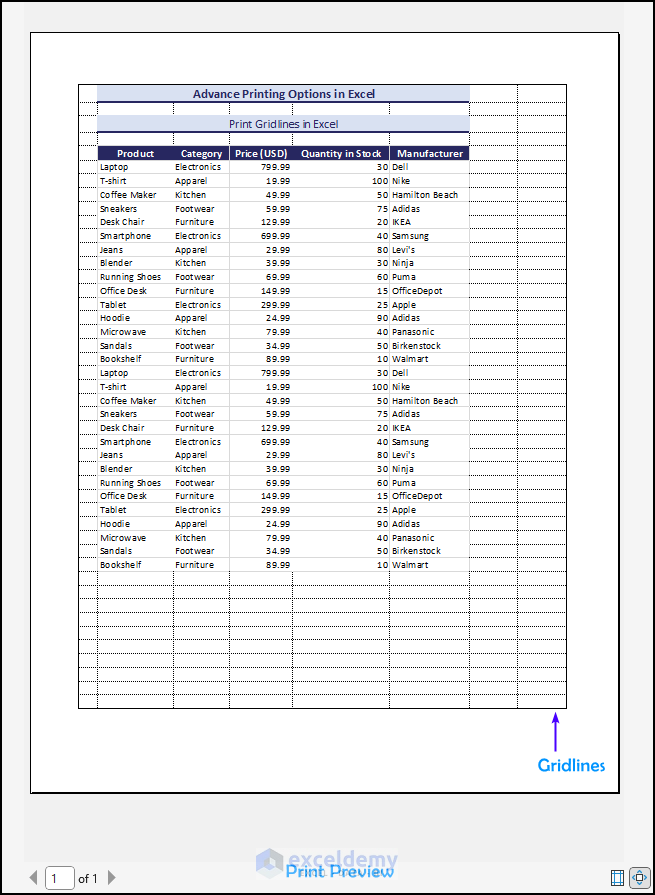
Read More: How to Print Gridlines in Excel
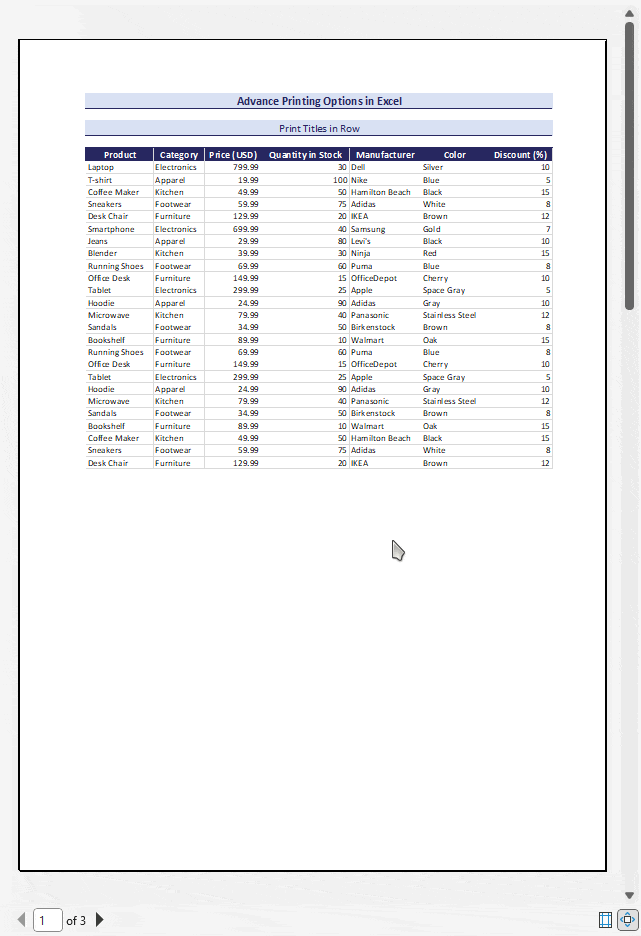
How to Print Titles for Better Documentation?
You can repeat titles while printing multiple pages using the Print Setup window. Using this feature you can make your document easier to read.
Check the following steps to print titles in Excel.
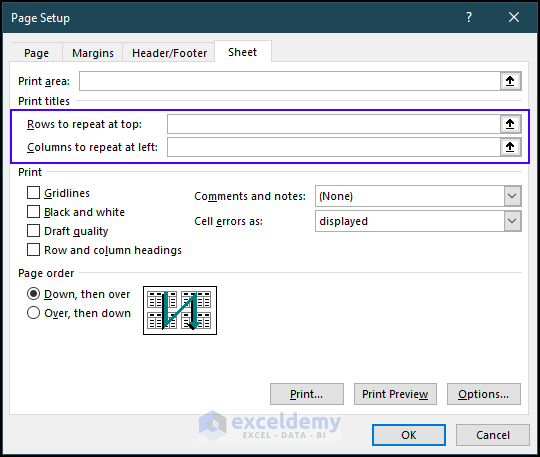
- Go to Page Layout tab ⇒ from Page Setup group ⇒ select Print Titles option
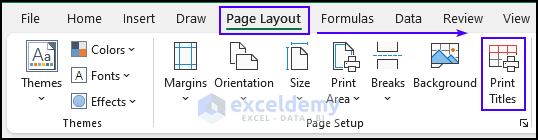
- Now from the Page Setup window ⇒ Head to the Sheet tab.
- In the Print Titles section, you can set which row(s) or column(s) or both to repeat at every page.
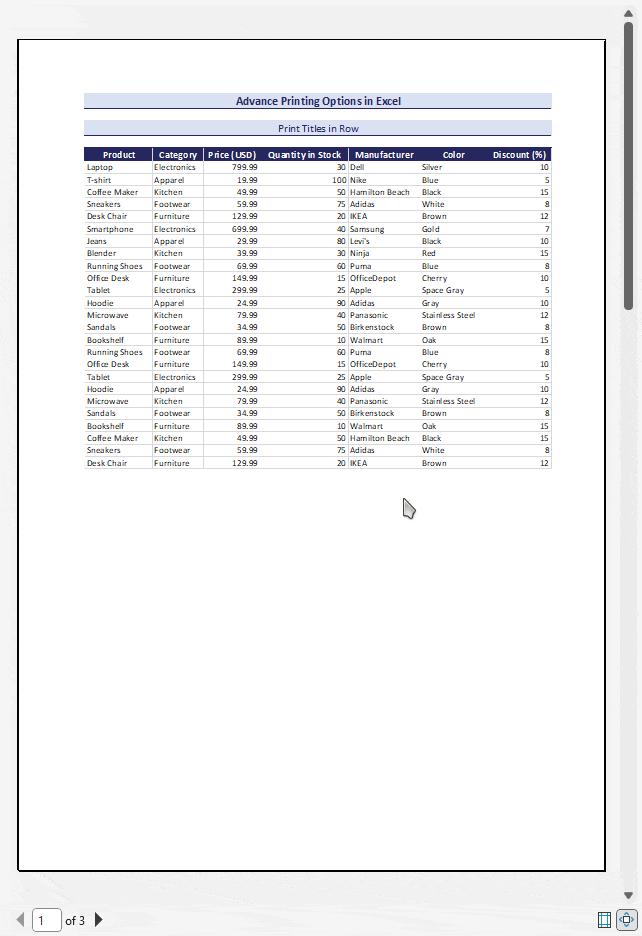
For example, in the following printed document, we see that the column headings are not there at every page’s top.
If the column headings were at the top of every page, then it would be more helpful for the users of the printed copy.
Steps to Print Titles:
- In the Rows to repeat at top box, choose the specific row you want to repeat on each page, such as $5:$5.
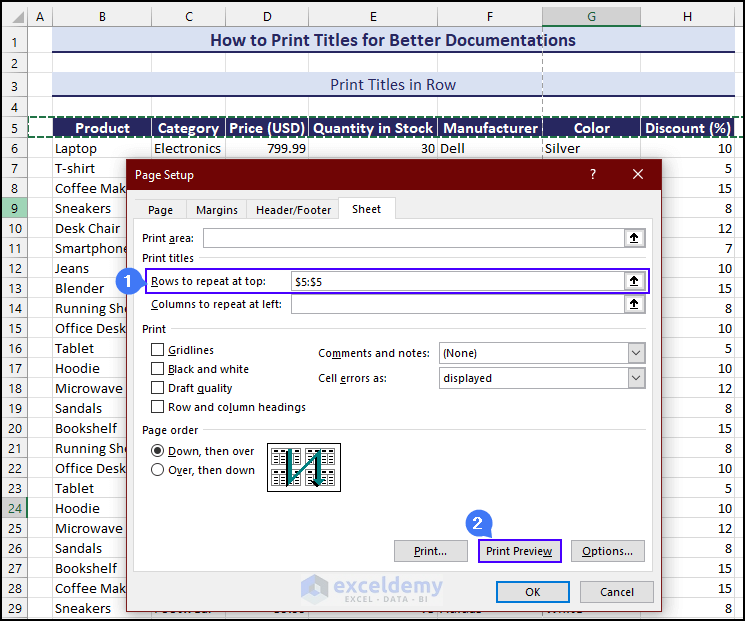
- Go to Print Preview to see the reflection.
Similarly, you can print column(s) on each of the pages.
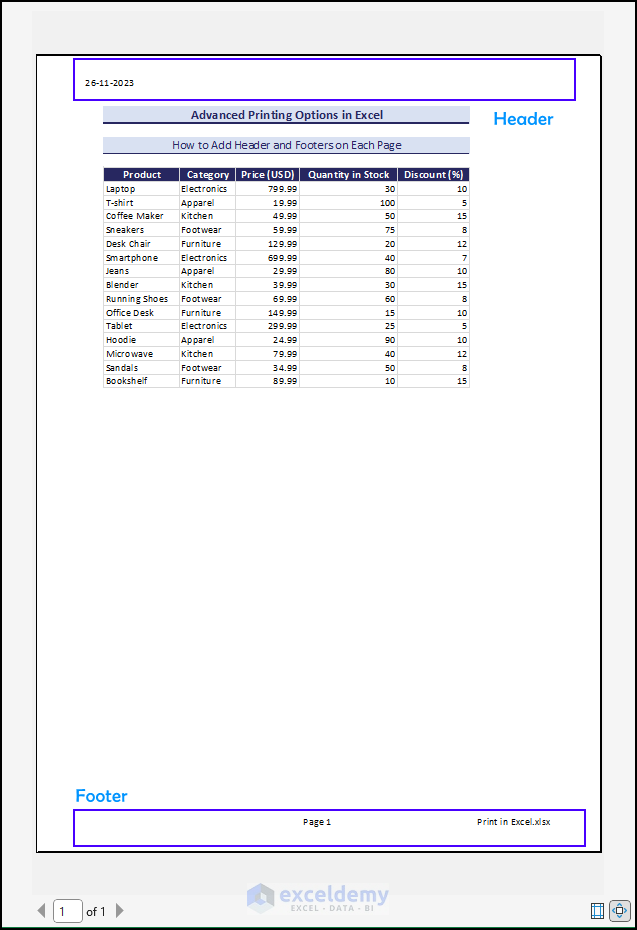
How to Print Header and Footers on Each Page?
In Excel, you can print headers and footers on every page through the Page Setup window. Simply go to the Header/Footer tab from there.
- In the Header dropdown list, you’ll find various preset options. Choose one or use the Custom Header option below the box. Here, we used the date as Header.
- Similarly, pick a Footer from the dropdown list or create a custom footer using the Custom Footer option above the box. In this case, we used the page number and file name as the Footer.
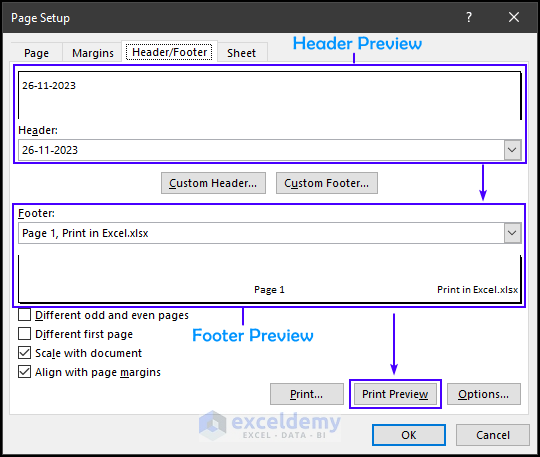
To preview the result in the print document, click on the Preview option. It will take you to the Print Preview window, displaying the header and footer settings for the printed document.
How to Print Comments in Excel?
From the Page Setup window, you can print comments from your worksheets at the end of your printed document. To print comments check the following steps.
- Go to the Page Layout tab ⇒ Select the small arrow of the Page Setup group (right bottom corner)
- Page Setup window ⇒ Head to the Sheet tab.
- Under the Print section ⇒ find the Comments and Notes option.
- From the drop-down menu, select how you want to view comments in the printed documents.
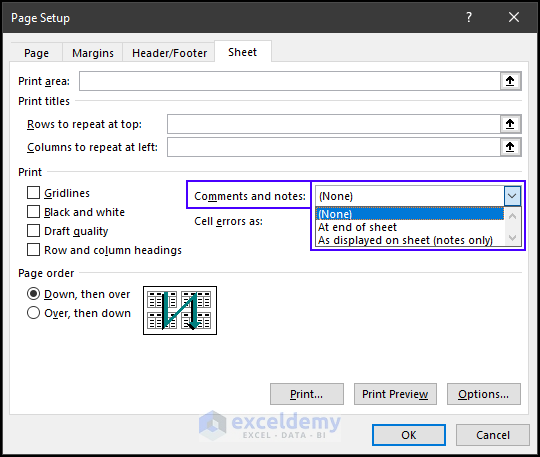
Choose At end of sheet to place comments at the bottom of the sheet as the other option is for notes. You can also choose None to hide comments altogether.
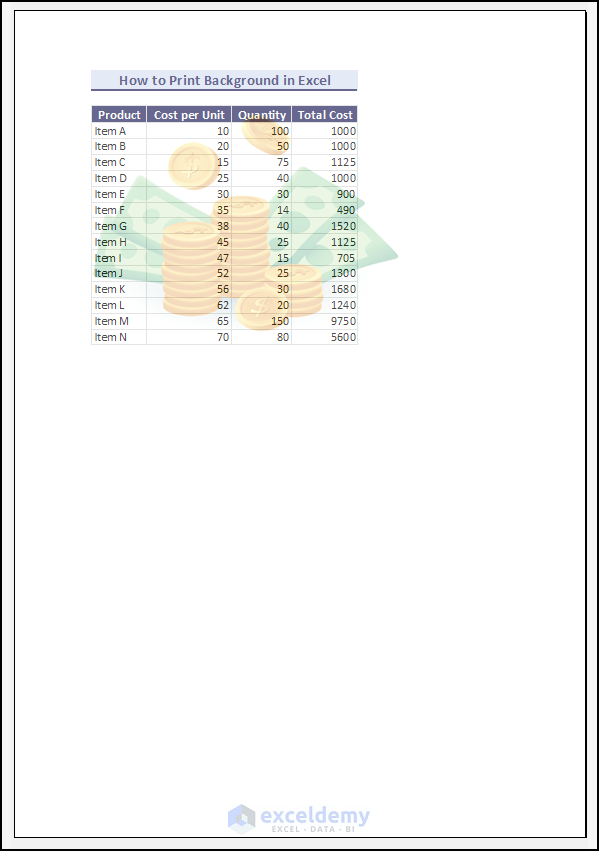
How to Print Background in Excel?
You can print background shapes, colors, or images indirectly using the Insert tab. Excel does not print background colors or images by default. Even if you set the background image from the Page Layout tab. Check the following example to get an idea of how to print background shapes, images, or colors in Excel.
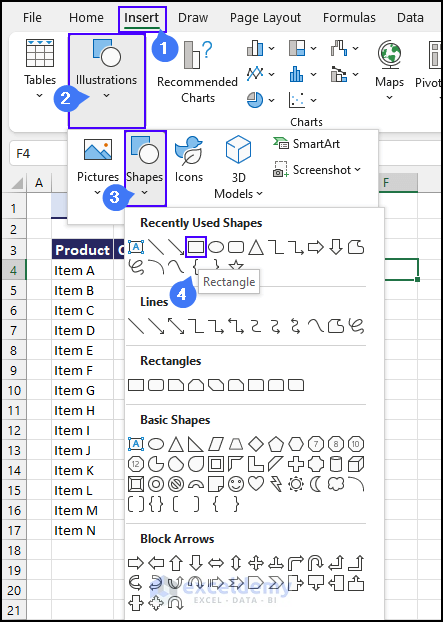
Step 1: Insert Shape
Insert shapes or images from the Insert tab. We inserted a rectangle from:
Insert tab ⇒ Illustrations group ⇒ Shapes drop-down menu ⇒ Rectangle.
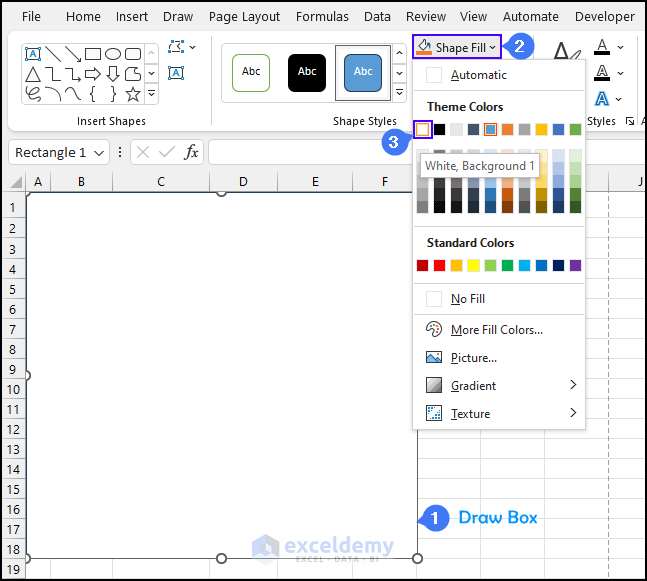
Step 2: Change Background Fill
First, draw a box around the data. Once done, change its shape fill color to white using the Shape Fill option.
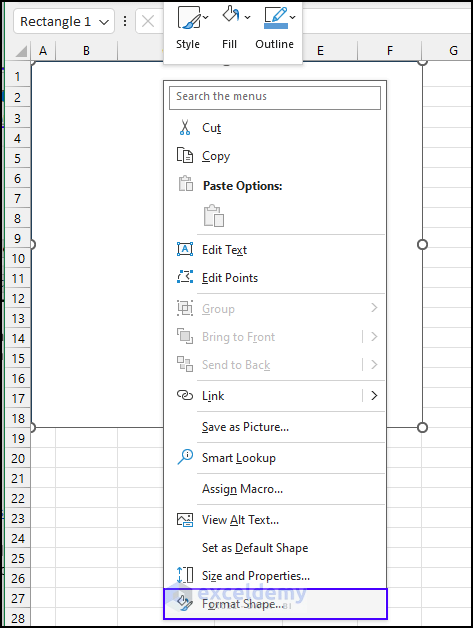
Step 3: Format Shape
Using the mouse, right-click and scroll down to find and open the Format Shapes window.
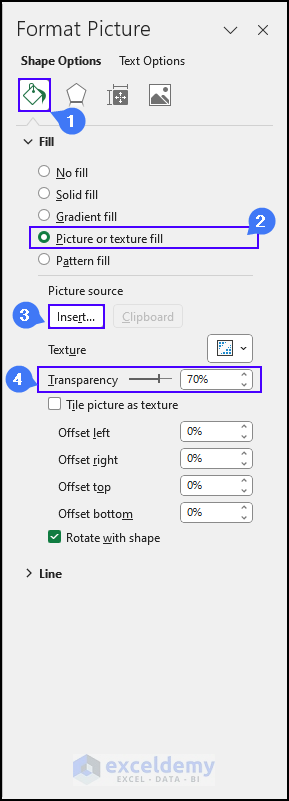
- In the Format Picture pane on the right, navigate to the Fill and Line option.
- From the Fill dropdown menu, choose Picture and Texture Fill.
- Insert your desired picture in the Picture Source section using the Insert option.
- Under the Texture section, set the transparency to 70%.
Step 4: Background Print Preview
With the picture inside the rectangle shape and 70% transparency, your background image is ready to print with the dataset. To view the final outcome, press CTRL+P to go to the Print Preview window.
How to Add a Print Button in Excel?
Simply click the down arrow of the Customize Quick Access Toolbar button, select Print Preview and Print from the list of displayed commands to add a print button in Excel.
Some professions require frequent printing of Excel sheets. For those in such roles, consider adding the Print command to your Quick Access Toolbar for enhanced efficiency.
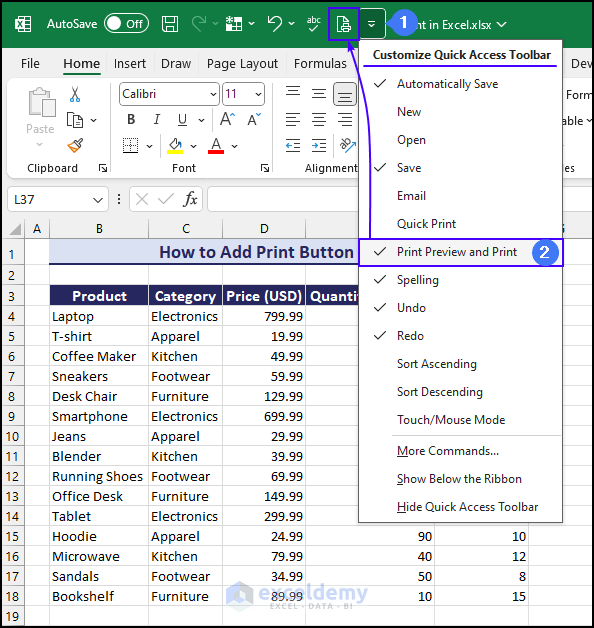
Now clicking on that Print Preview and Print button will take you to the Print Menu directly.
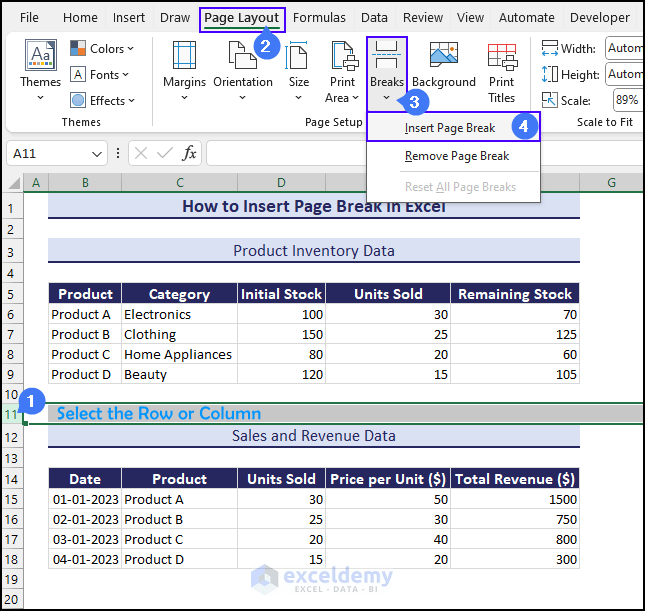
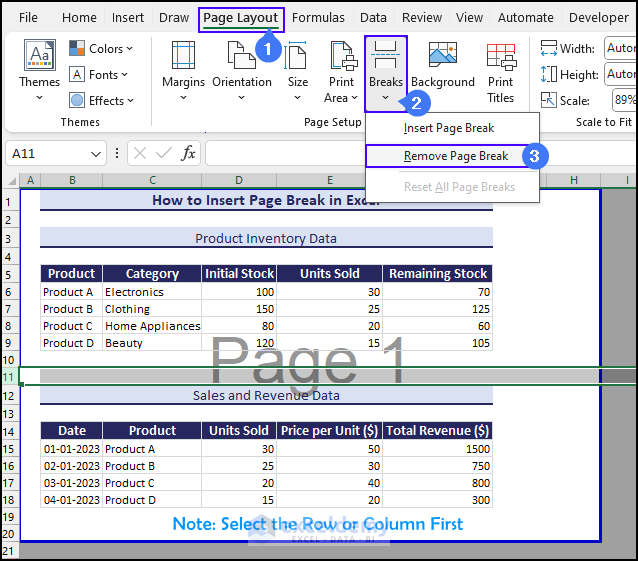
How to Insert Page Breaks in Excel?
You can easily insert page breaks from the Page Layout tab. Using the Breaks drop-down menu you can insert, remove, and even reset all page breaks. Page break is very helpful for controlling the appearance of printed documents. To add a page break check the following steps:
- Select the row or column where you want to insert the page break.
- Go to the Page Layout tab.
- Click on Breaks in the Page Setup group.
- Choose Insert Page Break.
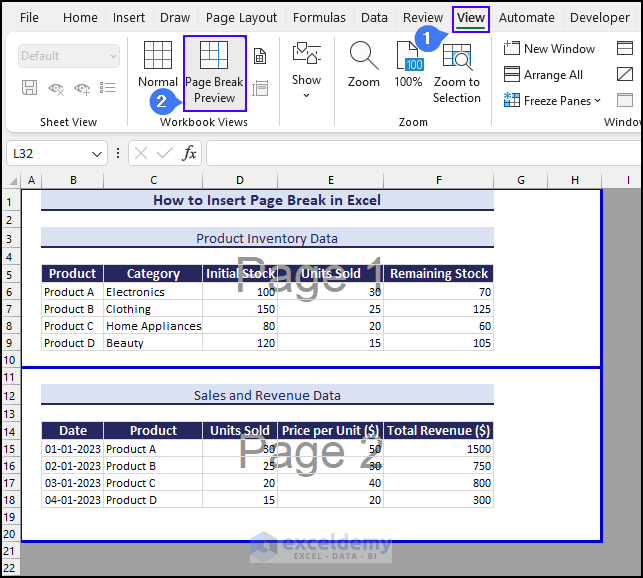
To see the page breaks based on the current print settings,
- Go to the View tab in the Excel ribbon.
- Click on Page Break Preview in the Workbook Views group.
The worksheet will switch to Page Break Preview mode, showing solid blue lines indicating the page breaks.
You can also adjust the page break manually by dragging the line using the mouse.
To exit Page Break Preview, in that case, click on Normal in the Workbook Views group.
If you want to remove the page break, then follow these steps:
- Select the row or column and then go to the Page Layout tab.
- Page Setup group ⇒ select Breaks ⇒ choose Remove Page Break.
Download Practice Workbook
This article concludes here. Here you have learned all about print in Excel options and how to print worksheets or workbooks. Besides, we have covered how to print workbooks to a file for future use. Eventually, you have learned how to print formulas, charts, tables, gridlines, titles, comments, headers, and footers. In the end, we have also demonstrated how to add a print button for quick access and how to insert page breaks in Excel. Hope this article has all the answers to your questions. Please let us know your feedback in the comment box.
Print in Excel: Knowledge Hub
<< Go Back to Learn Excel

