In this article, we will review the benefits of using the print scale in Excel. The ability to scale prints is crucial for professionals who rely on Excel for data analysis and management. Therefore, get an idea about all the options available for scaling your printed document.
By adjusting the size and layout of content, print scaling enhances readability, optimizes space usage, maintains consistent formatting, and improves document structure. It is especially valuable in fields like business reports, marketing materials, and educational resources, where creating visually appealing printed documents is essential.

Download Practice Workbook
How to Use Print Scale in Excel
The print scale in Excel allows you to adjust the weight, height, and overall scale of the worksheet or document for optimal printing. Check out the following section for a clear understanding of how to use print scale in Excel.
1. Adjusting Width
The width option controls the number of pages your worksheet will occupy when printed. It ensures that your content fits within the specified page width, avoiding data truncation and maintaining readability.
To use it, first, go to the Page Layout tab > find the Scale to Fit group > select the Width option > Choose the desired number of pages (e.g., 1 page, 2 pages) to fit your worksheet horizontally.

Then, see the Page Break Preview below. (Click on the image for better visualization)
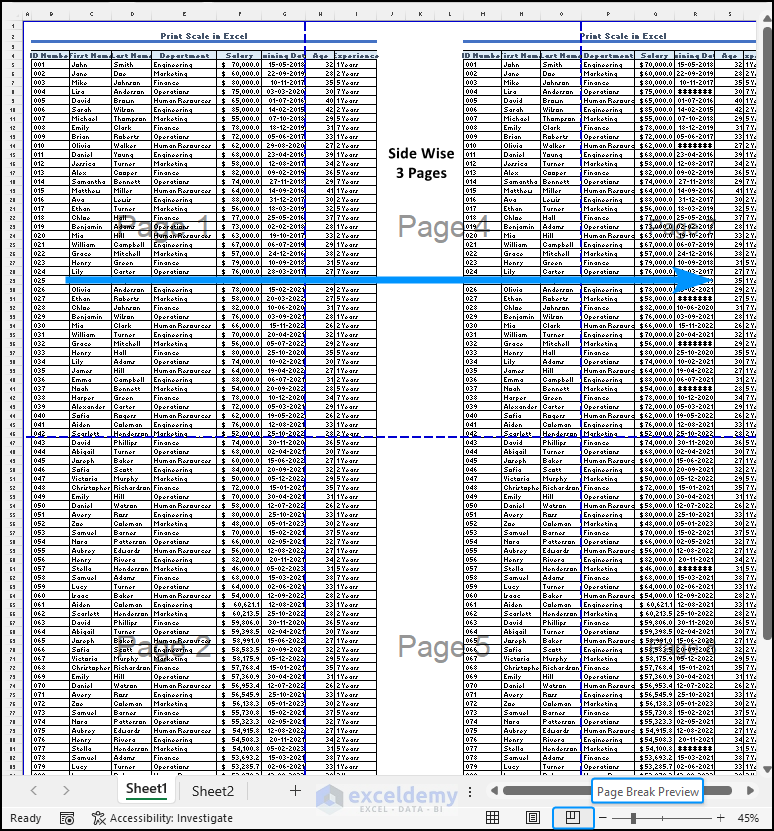
Use the Page Break Preview to determine the number of pages required for printing your dataset. Count the pages based on the columns displayed side by side. For example, if it takes three pages, you can condense the data to two pages or even fit it on one page by adjusting the width to one page. (Click on the image for better visualization)

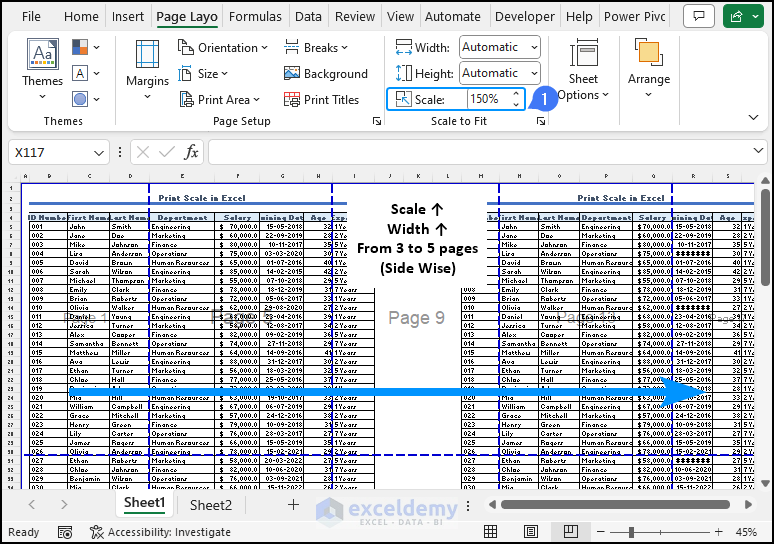
Increasing only the page width won’t have a significant impact, as the scale is set to 100% by default. To make the spreadsheet larger when printing, increase the scale. However, it will take more pages to print the dataset. (Click on the image for better visualization)
2. Adjusting Height
You can also adjust the height of your dataset using a similar process. If your data has more rows than columns, it will expand vertically.
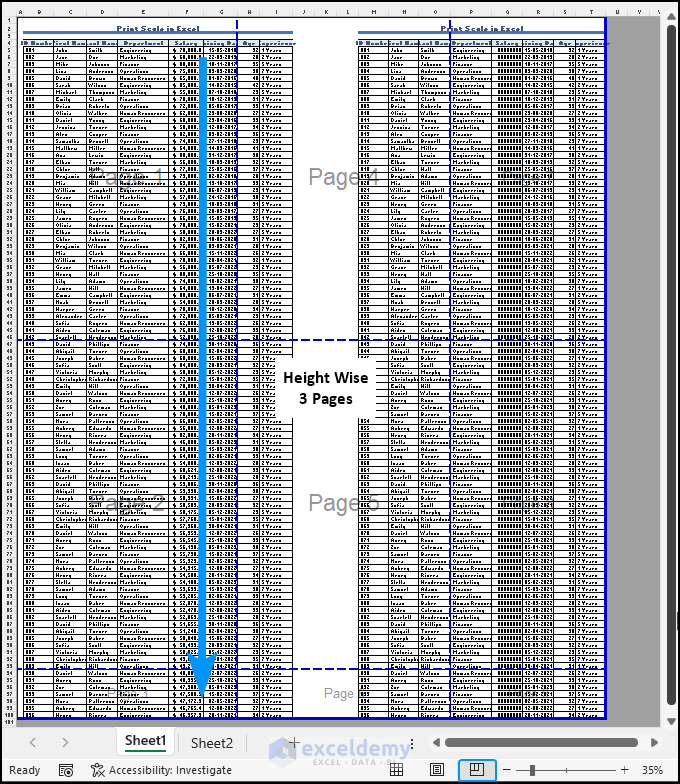
In the image above, you can observe that the data required 2 and a half pages (in total, 3 pages) with a scale of 100%. However, we aimed to fit it within 2 pages vertically. To achieve this, we changed the height setting from automatic to 2 pages.
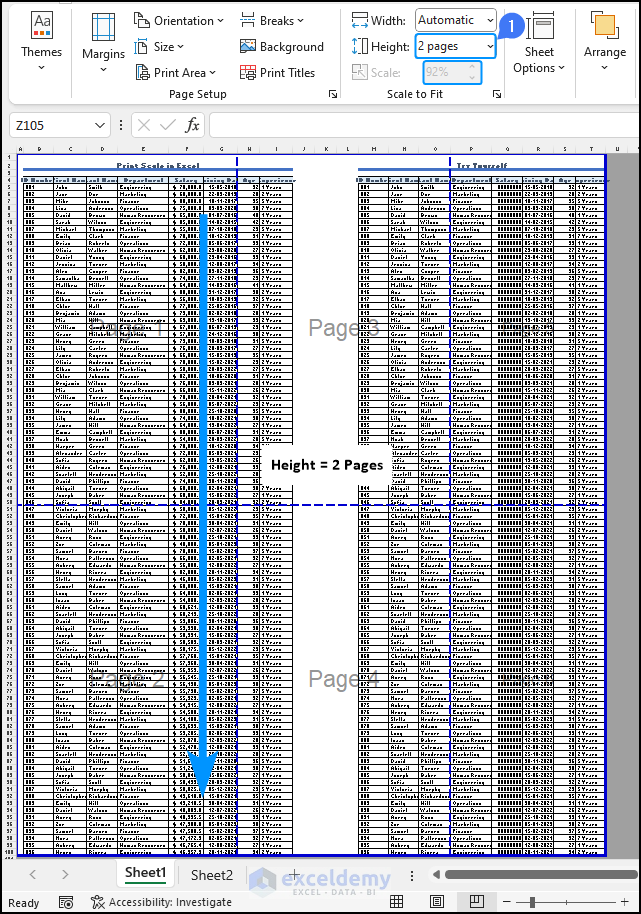
Excel automatically adjusted the scale of the dataset and resized the data to fit within 2 pages in height.
3. Adjusting Scale
The scale option in Excel allows you to resize your entire worksheet when printing, making it suitable for different paper sizes or adjusting the content to a specific percentage. Scaling enables you to shrink or enlarge the content while maintaining readability and optimizing the use of space.
To access the scale option, there are two methods. First, go to the Page Layout tab and locate it in the Scale to Fit group.
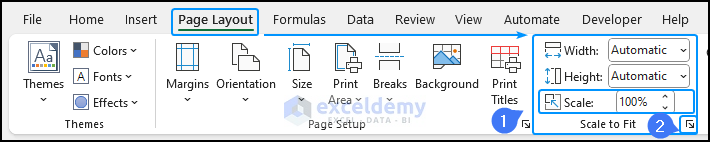
Alternatively, select the icon next to the Scale to Fit group to open the Page Setup menu, where you can easily adjust the scale from the Page tab.

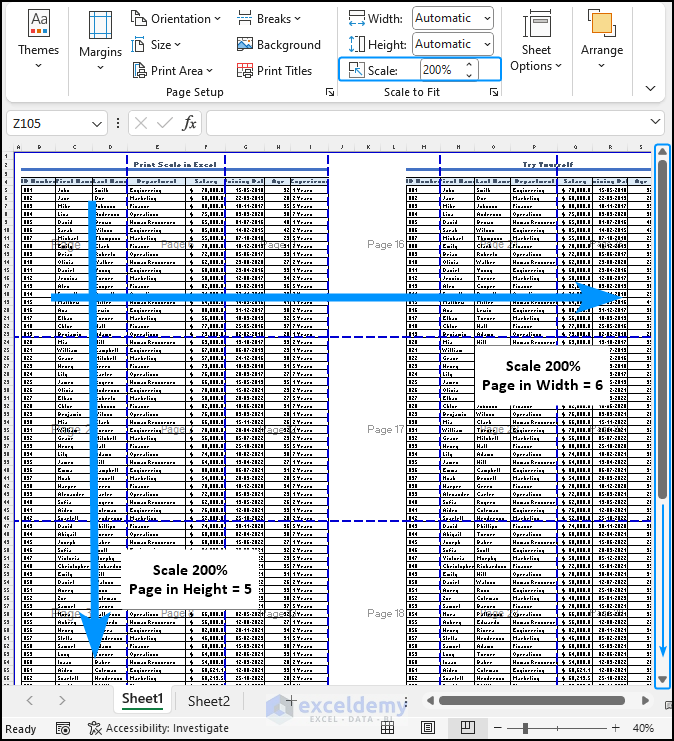
By default, the scale is set to 100%. Increasing the scale, for example, to 200%, will enlarge the dataset and require more pages for printing.
Conversely, decreasing the scale, such as to 37%, will proportionately resize the data and fit it on a single page for printing.

How to Understand Print Scale Options in Excel
Understanding print scale options is crucial, as they enable you to optimize the printing of your Excel worksheets, ensuring that the content fits neatly within the available pages and provides a clear and readable representation of your data.
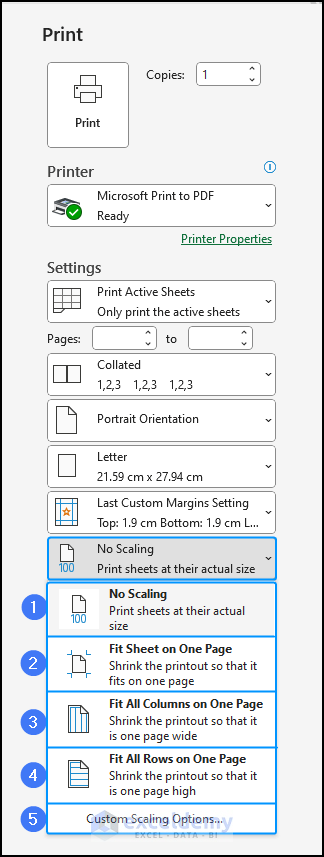
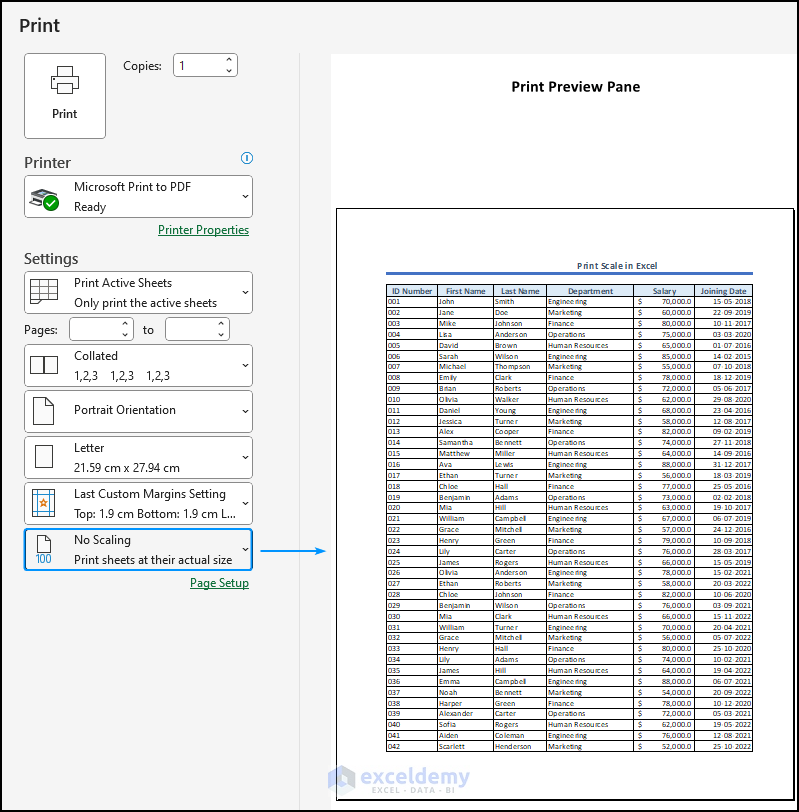
1. No Scaling
Generally, it preserves the original size of the content and ensures that it is printed as it appears on the screen. If you want to print the worksheet without any resizing, this option is best for you. (Click on the image for better visualization)
2. Fit Sheet on One Page
This option is useful when you want to condense the entire worksheet onto a single printed page. Likewise, It automatically adjusts the scale and margins to fit the content within the available space. (Click on the image for better visualization)
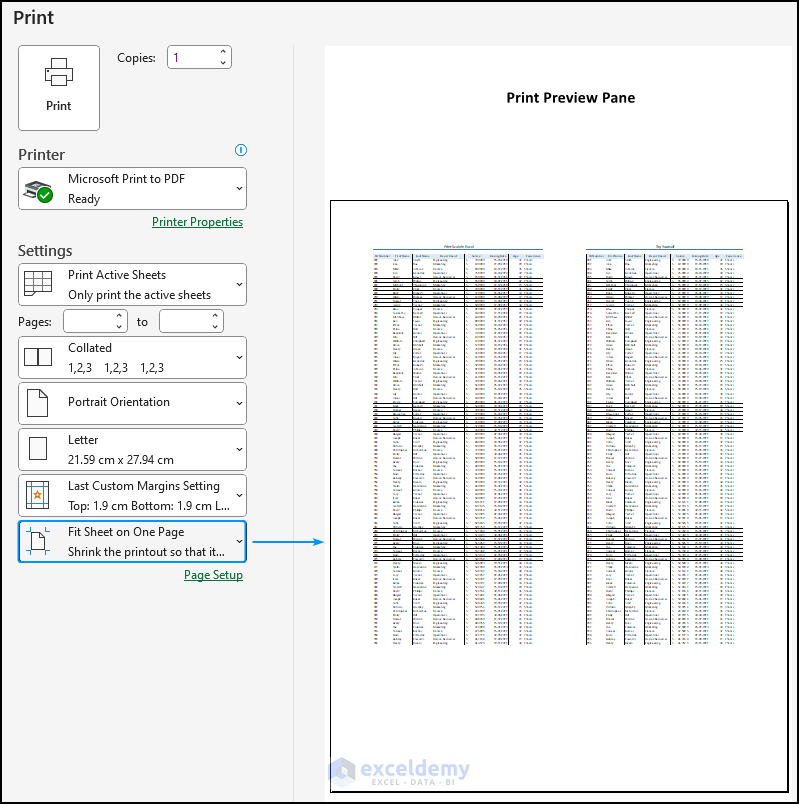
However, this option sometimes causes loss of data, reduces readability, and thus may lead to inaccurate interpretation and analysis.
3. Fit All Columns on One Page
This option is handy when you have a large dataset and want to fit all columns on a single printed page. (Click on the image for better visualization)
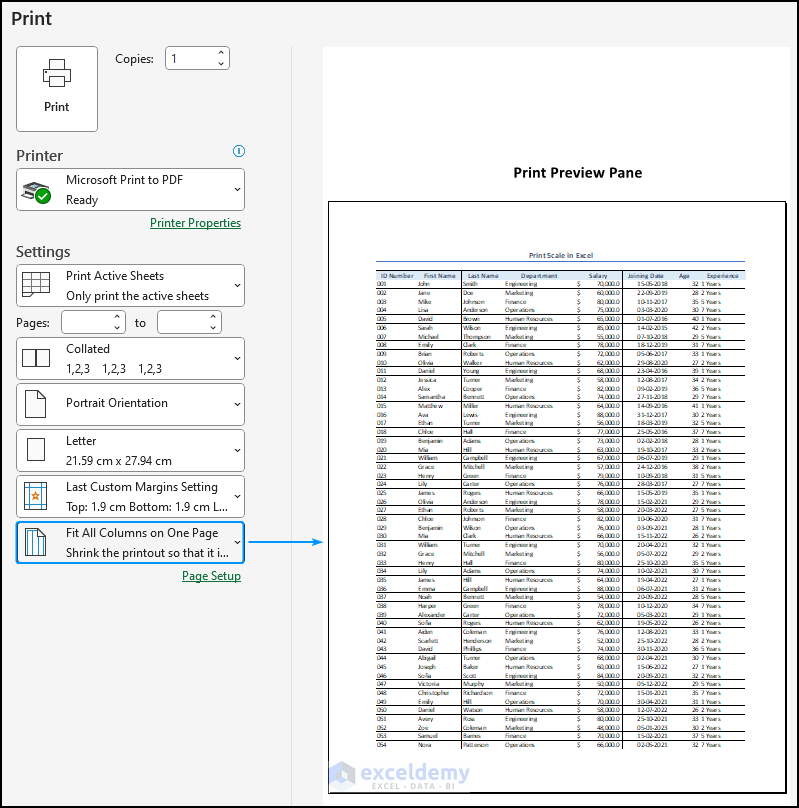
Basically, it adjusts the width of the columns and the scale of the content, ensuring that all columns are visible without the need for horizontal scrolling.
4. Fit All Rows on One Page
This option is beneficial when you have a lengthy dataset and want to fit all rows within a single printed page. (Click on the image for better visualization)

Chiefly, it ensures that all rows are visible without the need for vertical scrolling.
5. Custom Scaling Options
The Custom Scaling option in Excel offers the flexibility to resize the content according to your specific requirements. You can manually input a desired percentage or specify the desired number of pages for both width and height, providing precise control over the scaling of the printed output.
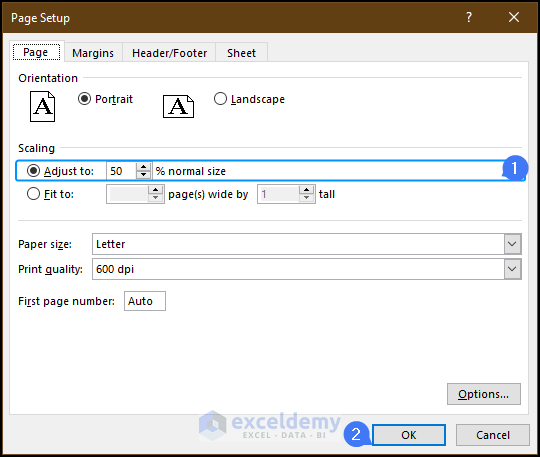
Selecting this option will take you directly to the Page Setup window. From there, you can adjust the scale or fit the dataset within your specified page numbers.
For instance, you can decrease the scale size to 50%. Once you’re satisfied with the changes, simply click OK to apply them.

Read More: How to Use Scaling Option in Excel
How to Handle If Scale to Fit Is Not Working in Excel
One of the main reasons why the Scale to Fit feature may not work in Excel is due to the presence of page breaks in spreadsheets. When page breaks are present, Excel will only print the content up to the page break, leading to incomplete printing.
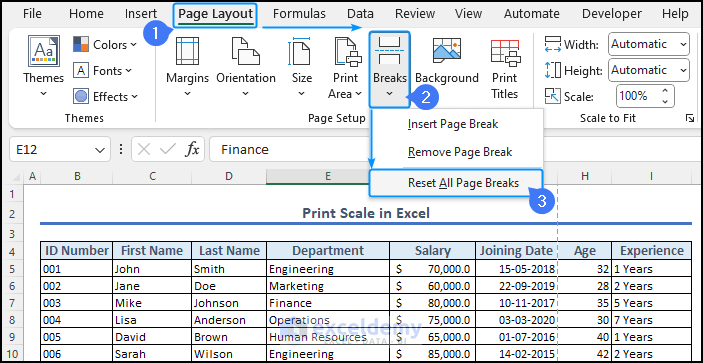
To resolve this issue, first, go to the Page Layout tab > from the Page Setup group > select the drop-down menu of Breaks > click on Reset All Page Breaks.
Removing all page breaks will enable you to effectively use the Scale to Fit feature in Excel for printing.
Things to Remember
- You can only select one option at a time, either Scale or Width/Height.
- Use Page Break Preview to visualize the divisions between pages.
- Width adjusts the number of pages horizontally, and Height adjusts the number of pages vertically.
Conclusion
In short, Excel provides users with precise control over the size and layout of printed documents. By understanding and using the print scale feature in Excel effectively, users can ensure that their content fits within the designated page dimensions, optimizing space usage and maintaining readability.
Whether for business reports, educational materials, or personal use, the proper understanding of the use of print scale in Excel empowers users to create professional and visually appealing printed outputs.
Frequently Asked Questions
Q1. What is print scaling?
Print scaling is a process. In Excel, It resizes the content to fit the specified page dimensions when printing. You can adjust the width, height, or both to optimize space usage and maintain the desired layout.
Q2. How do I print to a 1:100 scale in Excel?
Excel does not have a built-in option to print to a specific scale ratio, like 1:100. It is primarily intended for printing spreadsheets and lacks specialized architectural or engineering scaling capabilities.
Q3. What should I consider when adjusting the scale using the Print Scale?
When adjusting the scale, consider the legibility and clarity of the printed content. It is important to find a balance between fitting the content within the desired page dimensions and maintaining readability.
Print Scale Excel: Knowledge Hub
- How to Print and Fit to One Page in Excel
- How to Perform Custom Scaling in Excel
- [Solved!] Excel Scaling Issues
<< Go Back to Page Setup | Print in Excel | Learn Excel

