Protecting Excel cells means locking certain or all cells in the Excel worksheet to prevent any unwanted changes. In this free Excel tutorial, we will learn how to protect cells in Excel.
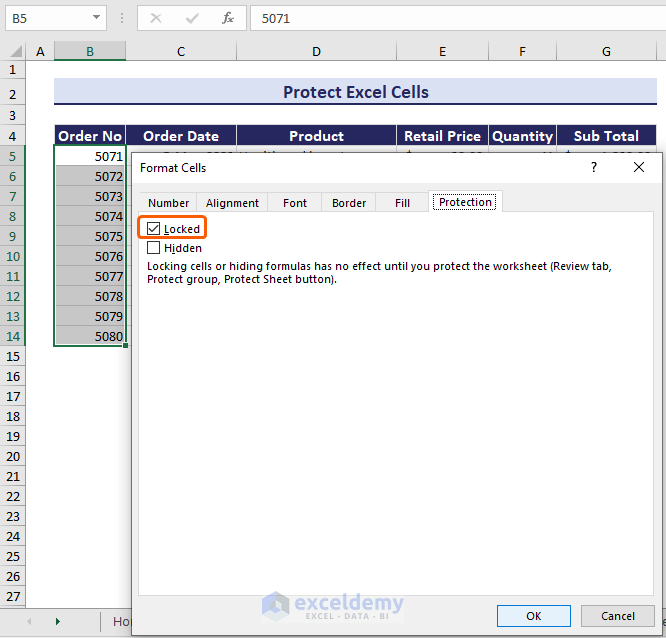
The following image shows the protection of the cell range B5:B14 by locking them through the Protection tab of the Format Cells dialog box.
In this blog post, we will learn how to
– protect all cells
– lock certain cells
– protect cells containing formula
– protect cells without protecting sheet
– protect cells but allow data entry
– lock cell in Excel formula
Later, we will also show how to find locked cells and how to unlock cells in Excel.
⏷Why Protect Excel Cells?
⏷Protect All Cells in Excel
⏵Use Lock Cell Command to Protect All Cells
⏵Protect Cells with Format Cells Option
⏵Lock Cells with Keyboard Shortcut
⏷Lock Certain Cells in Excel
⏵Select the range to Lock Cells
⏵Use VBA Code to Lock Certain Cells
⏷Protect Cells Containing Formula
⏷Protect Cells Without Protecting Sheet
⏷Protect Cells but Allow Data Entry
⏷Find Locked Cells
⏷Unlock cells in Excel
Why Protect Excel Cells?
Protecting Excel cells is like applying a safety guard to specific cells of your Excel file. It stops others from accidentally changing important information or messing up formulas. It’s useful when we want to share a file but want to make sure certain numbers or calculations stay the same. It helps to keep the data safe and prevents unintentional changes to important stuff in Excel.
1. How to Protect All Cells in Excel Worksheet
If we want to protect Excel cells from being edited, we can lock all the cells, followed by protecting the worksheet.
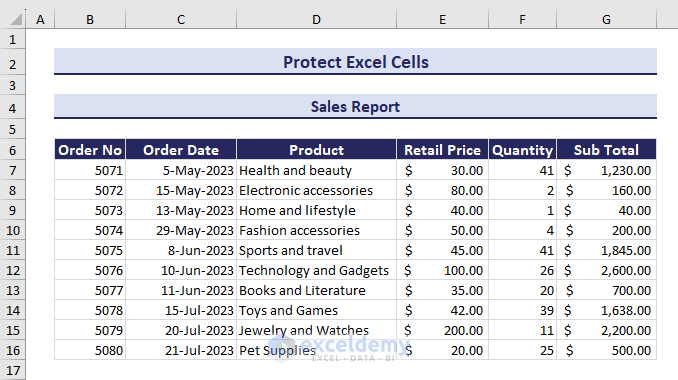
Let’s say we have a confidential dataset of the Sales Report of an organization. We don’t want to take any risk of losing the data. So, we want them to protect these Excel cells from deletion.
Excel offers three different ways to protect all cells in a worksheet:
– using the Lock Cell command
– using the Format Cells option
– and applying a keyboard shortcut
1.1. Use Lock Cell Command to Protect All Cells
To protect all cells in Excel with the Lock Cell command:
- Go to the Home tab => Cells group => click Format drop-down => select Lock Cell.
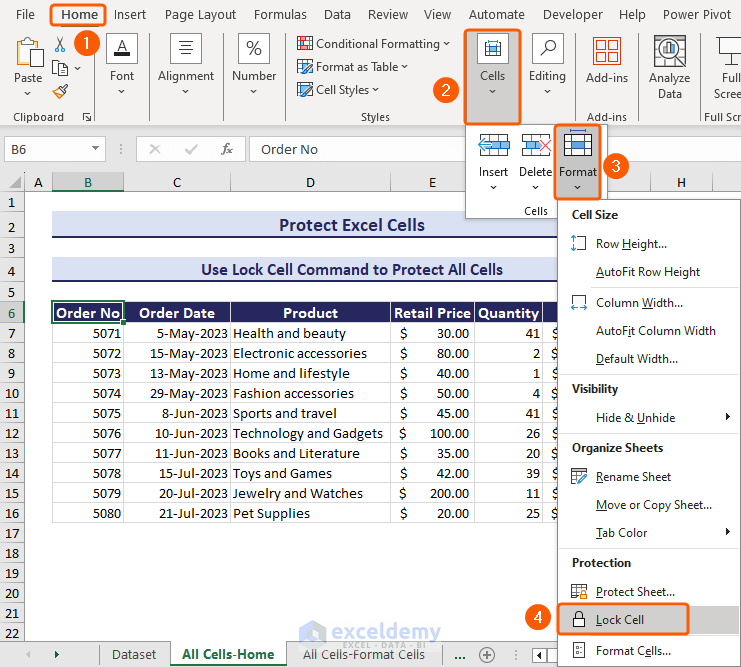
This command locks all the cells in the worksheet by default. However, locking cells has no effect until we protect the worksheet.
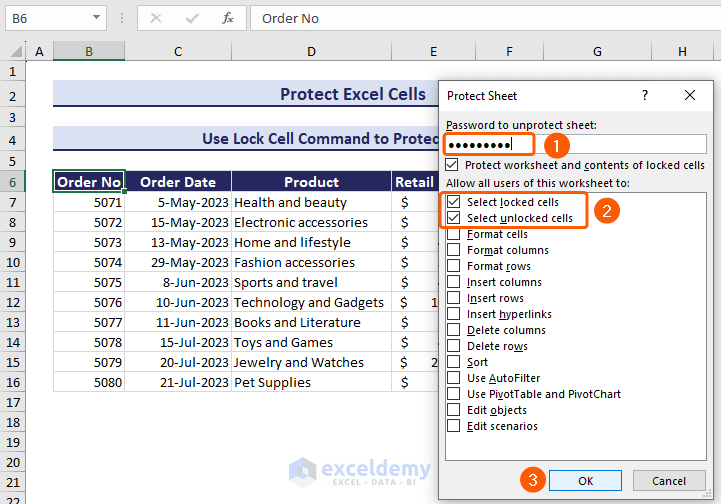
- Go to the Review tab => click Protect Sheet.
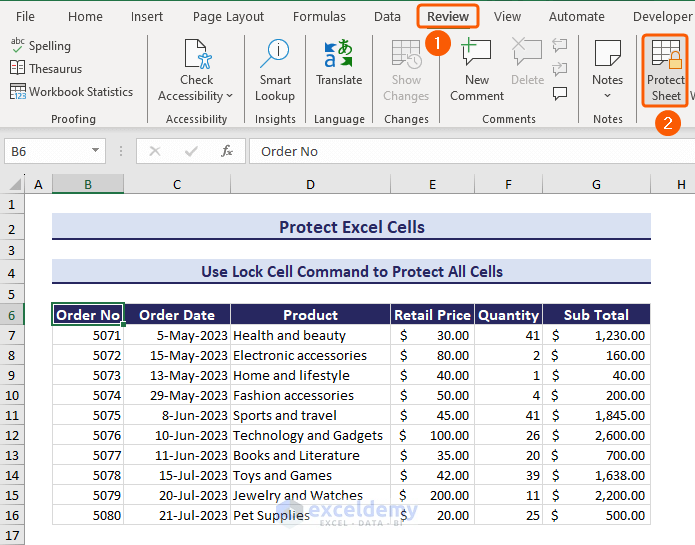
- This command will launch the Protect Sheet dialog box.
- If we want to protect Excel cells with a password, set a password in the Password to unprotect sheet field. Or we can skip it if you want to protect cells without a password.
- Keep the Select locked cells and Select unlocked cells checkboxes marked => click OK.
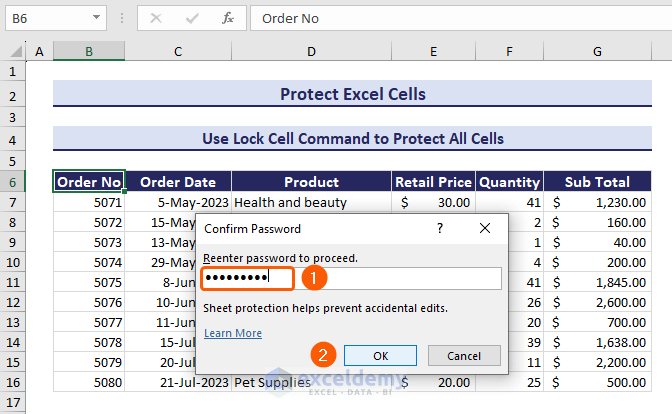
- In the Confirm Password dialog box, re-enter the password to proceed => click OK.
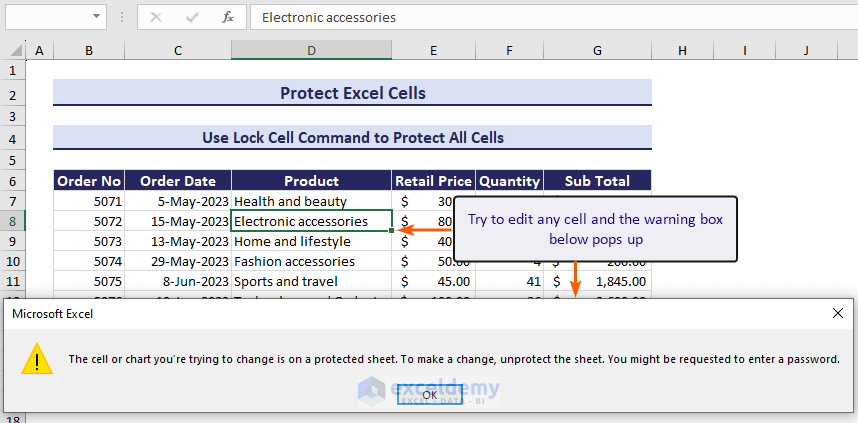
Now, Excel has locked all the cells in the worksheet. Try to edit any cell by double-clicking, and Excel will show a warning box as an indication of the protected sheet.
Click here to see the full image
1.2. Protect Cells with Format Cells Option
To apply the Format Cells options to protect Excel cells:
- Click on the green triangle at the intersection of row and column to select all the cells in the worksheet.
- Right-click on the mouse => select the Format Cells option from the context menu.
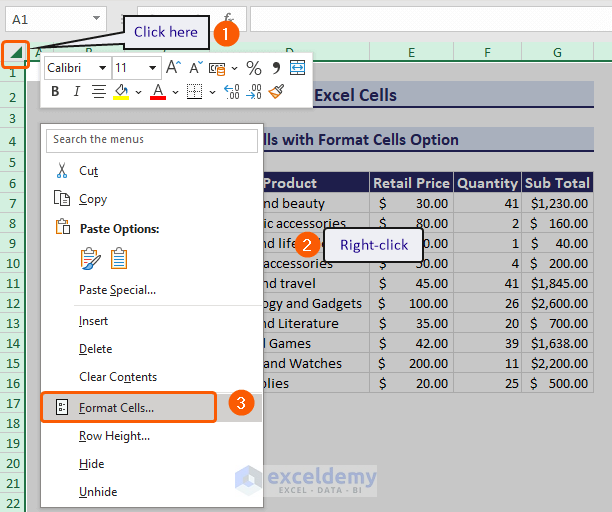
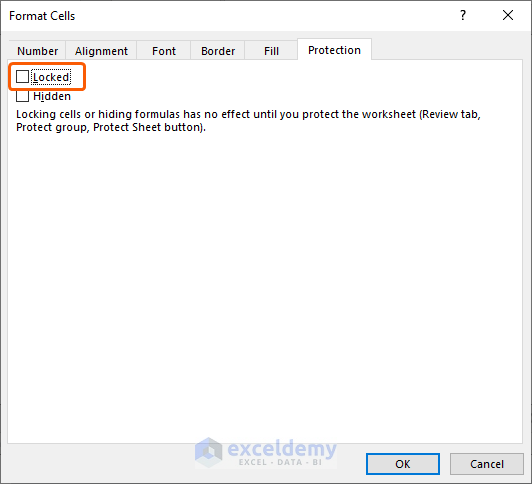
- This will launch the Format Cells dialog box.
- In the Protection tab, keep the Locked field marked => click OK.
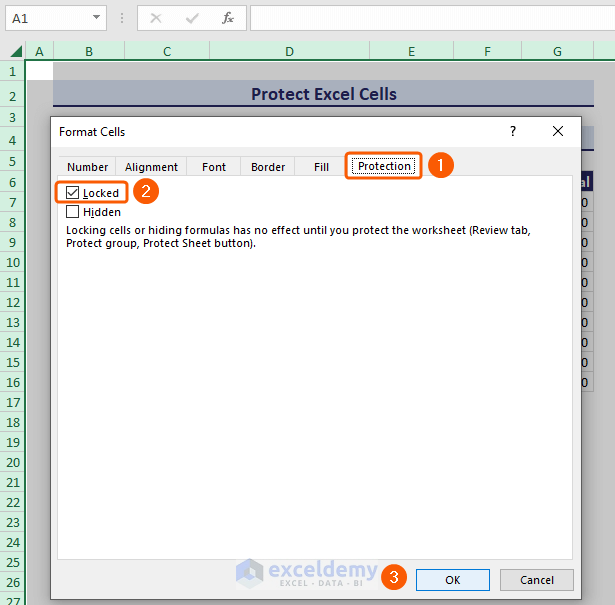
Now, protect the sheet by following method 1.1.
1.3. Lock Cells with Keyboard Shortcut
To lock cells in Excel with a keyboard shortcut:
- Press CTRL+A to select all the cells on the worksheet.
- Press CTRL+1 to launch the Format Cells dialog box.

- In the Protection tab, keep the Locked field marked => click OK.
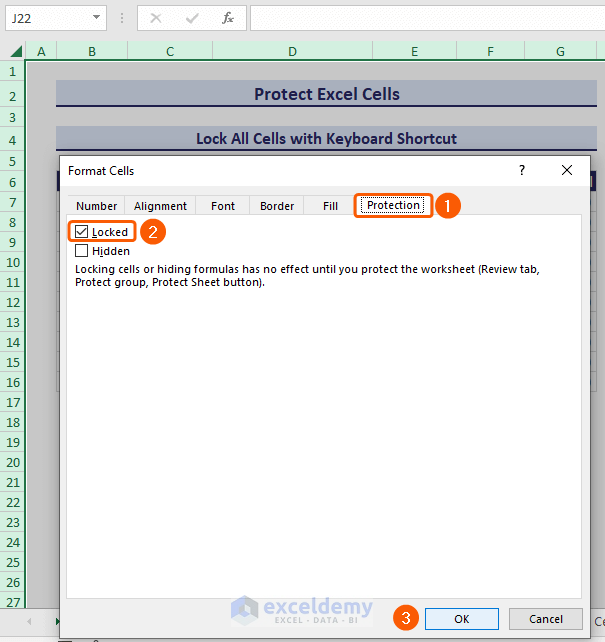
Now, protect the sheet by following method 1.1.
2. How to Lock Certain Cells in Excel
In this section, we will learn how to lock certain cells in Excel. We can lock both a single or multiple cells in Excel by
– selecting the range to lock
– using VBA code
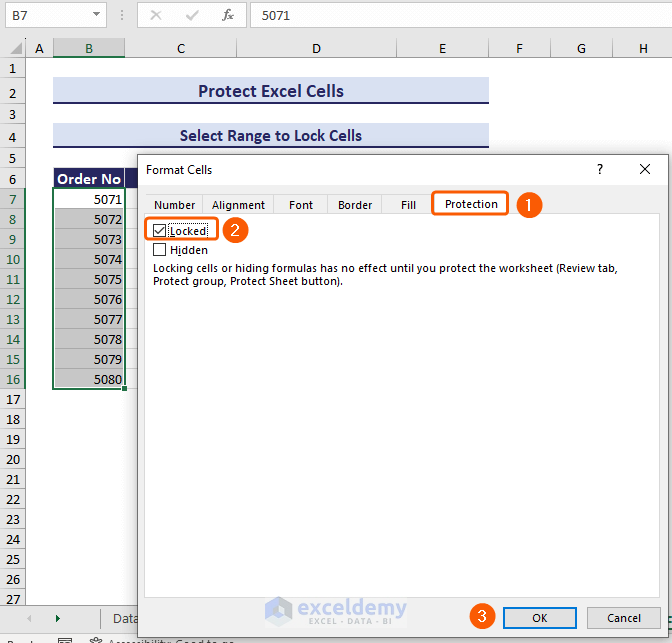
2.1. Select the Range to Lock Cells
In the dataset of the Sales Report, we want to protect only the cells B7:B16 in the Order No column. To do this, we first need to unlock all the cells in the worksheet.
- Click on the green triangle at the intersection of row and column to select all the cells in the worksheet.
- Press CTRL+1 to launch the Format Cells dialog box.
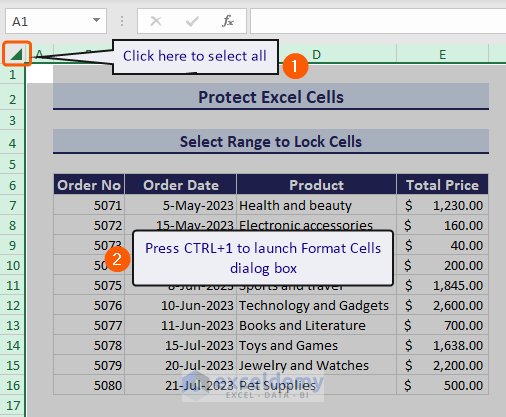
- In the Protection tab, unmark the Locked option => click OK.
- Select the range B7:B16 => press CTRL+1 again.
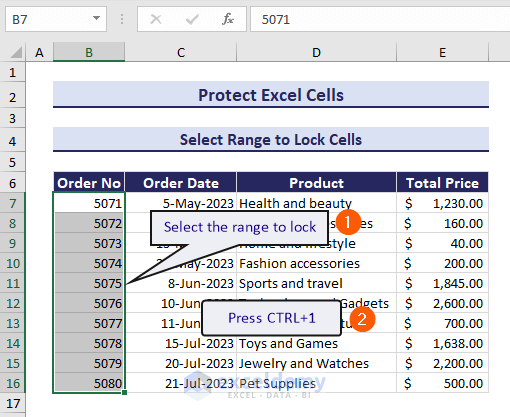
- In the Protection tab, put a checkmark on the Locked option => click OK.
Hence, the selected cells are locked. To see the action of locking certain cells, protect the sheet following method 1.1.
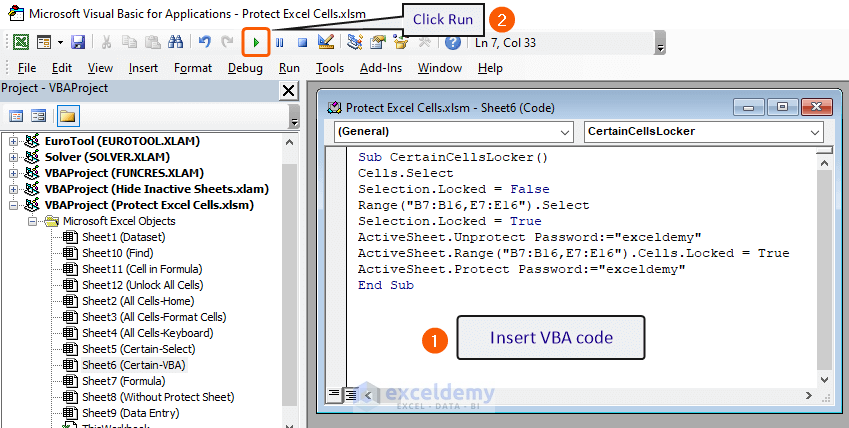
2.2. Use VBA Code to Lock Certain Cells
For the same dataset, we will now lock two certain ranges of cells: B7:B16 and E7:E16. This time, we will apply a VBA code to lock certain cells in Excel.
- Right-click on the sheet tab => select View Code.
- This will launch the Visual Basic for Applications window. In the Sheet(Code) window, insert the VBA code.
Sub CertainCellsLocker()
Cells.Select
Selection.Locked = False
Range("B7:B16,E7:E16").Select
Selection.Locked = True
ActiveSheet.Unprotect Password:="exceldemy"
ActiveSheet.Range("B7:B16,E7:E16").Cells.Locked = True
ActiveSheet.Protect Password:="exceldemy"
End Sub
We have used the ActiveSheet.Protect property that protects the sheet after locking the cells. The password we used is => exceldemy.
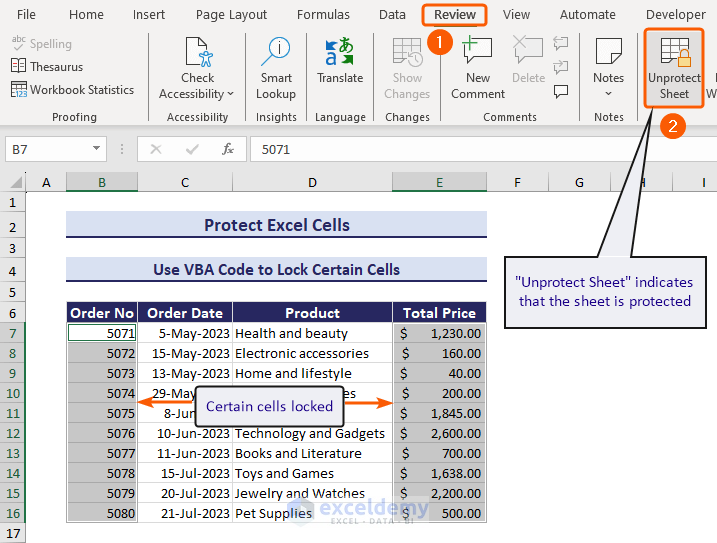
- Click Run to execute the code.
Click here to see the full image
Executing the code will lock the ranges B7:B16 and E7:E16. If we navigate to the Review tab, we will find the Unprotect Sheet option, which indicates that the sheet has already been protected.
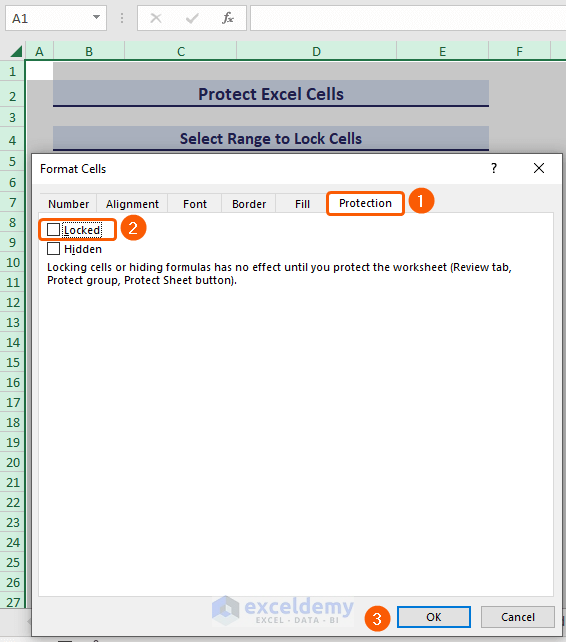
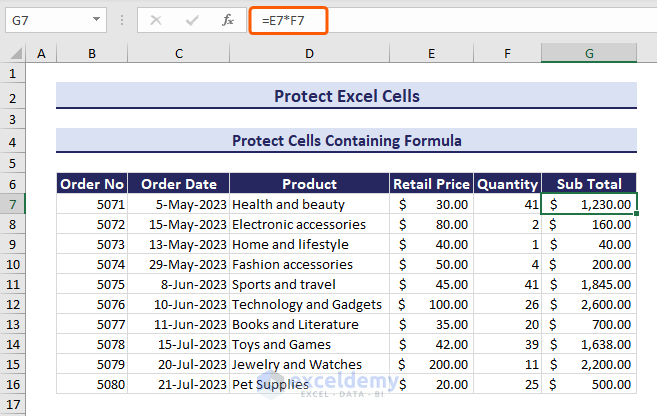
3. How to Protect Excel Cells Containing Formula
In this part of the article, we will learn how to protect Excel cells with formulas. Our dataset contains the Retail Price of some products in column E and their Quantity in column F. By multiplying column E and column F, we get the total price in column G. We aim to protect the cells in column G that contain the formula.
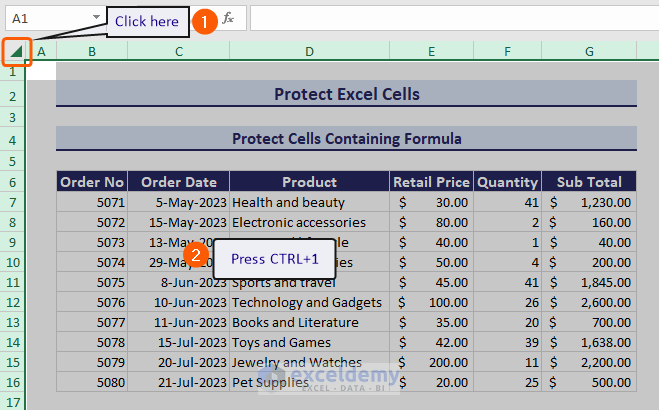
- Click on the green triangle at the intersection of row and column to select all the cells in the worksheet.
- Press CTRL+1 to launch the Format Cells dialog box.
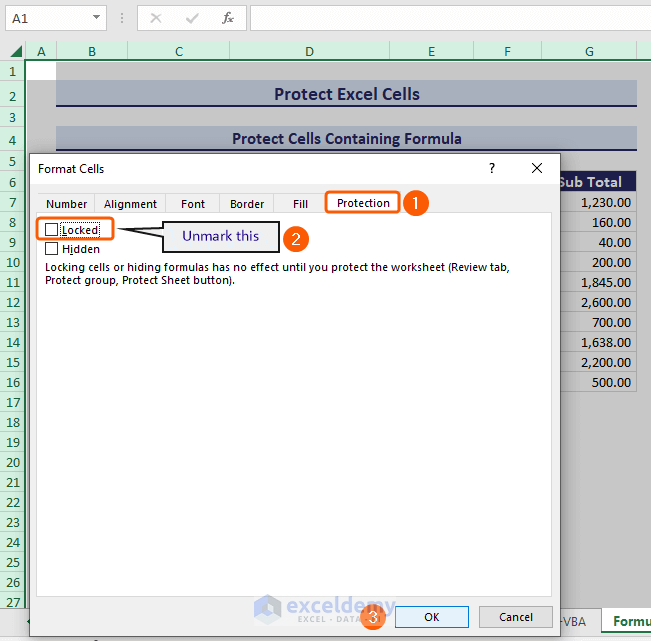
- In the Protection tab, unmark the Locked option => click OK. This command will unlock all the cells in the worksheet.
Now, we will lock the formula cells.
- Go to the Home tab => Editing group => click Find & Select dropdown => select Go to Special.

Click here to see the full image
- The Go to Special dialog box will appear.
- Select Formulas => click OK.
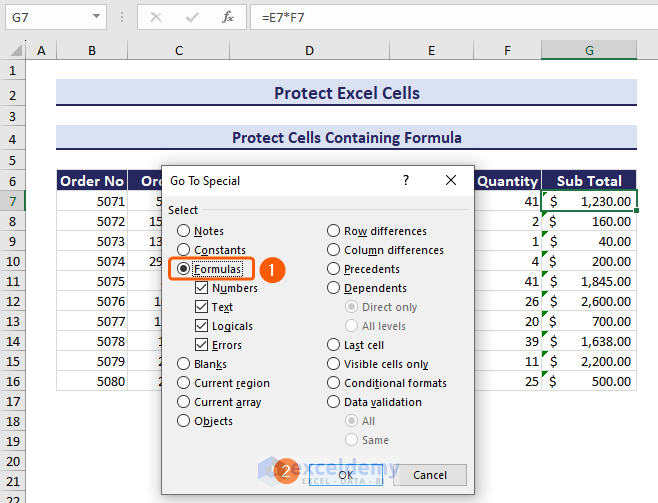
- This command will select all the cells containing the formula in the worksheet.

- Again, launch the Format Cells dialog box by pressing CTRL+1.
- In the Protection tab, put a checkmark on the Locked option => click OK.
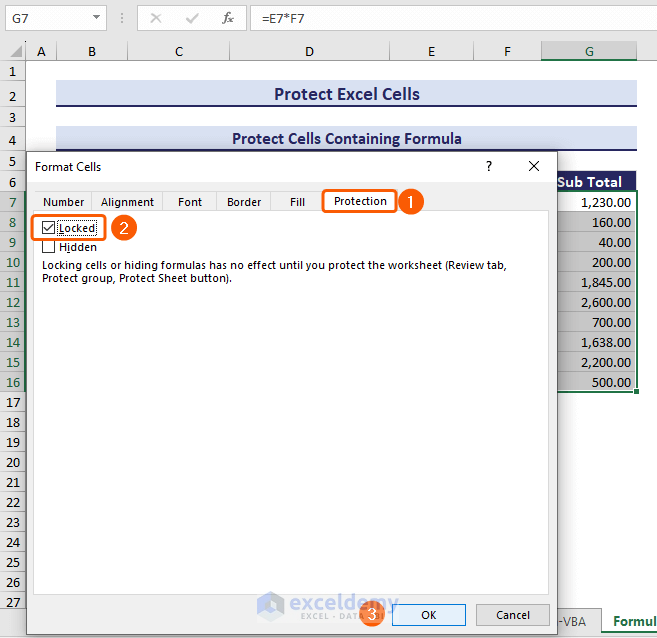
Now, protect the sheet by following method 1.1.
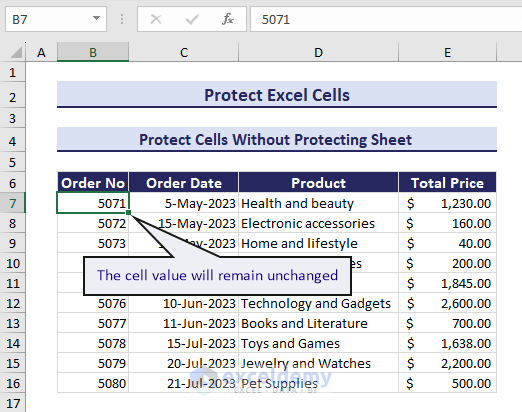
4. How to Protect Cells in Excel Without Protecting Sheet
In this section, we will learn to protect cells in Excel without protecting sheet. We will lock the range B7:B16 using the VBA code. But we won’t protect the sheet with this method.
- Right-click on the sheet tab => Select View code.
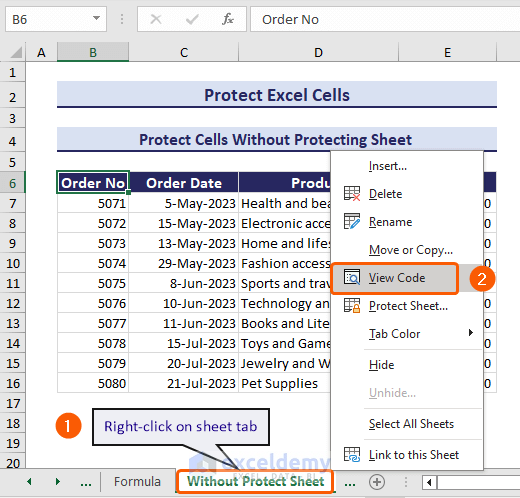
- Insert the VBA code in the Sheet(Code) window.
Private Sub Worksheet_Change(ByVal Lock_Range As Range)
If Not Intersect(Range("B7:B16"), Lock_Range) Is Nothing Then
    Application.EnableEvents = False
    Application.Undo
    Application.EnableEvents = True
End If
End Sub
We have used the Worksheet_change event. You don’t need to Run the code.

This code locks the range B7:B16.
- Select cell B7 and try to change its value.
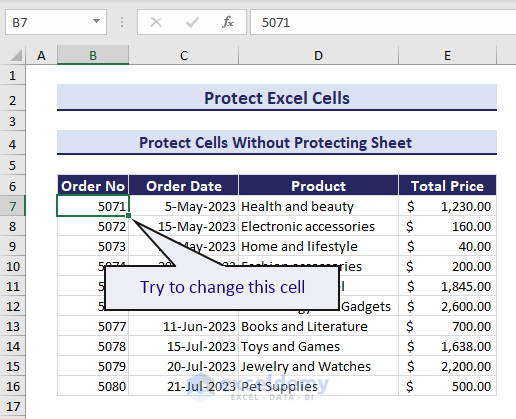
- Type another value and press ENTER.
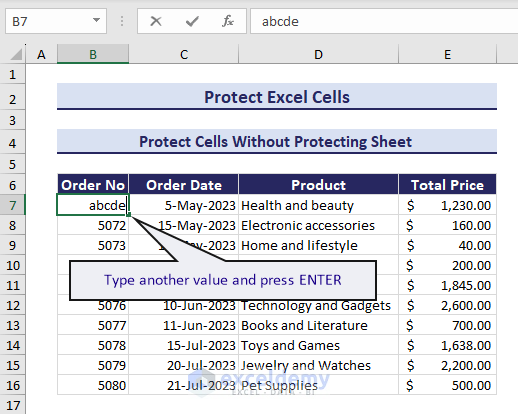
- The cell value will remain unchanged, which indicates that the cell is protected.
5. How to Protect Excel Cells but Allow Data Entry
In this part of the article, we will protect Excel cells but allow data entry.
In our sales dataset, we want to allow data entry only in the range B7:B16 in the Order No column. We will apply the VBA code so that all the cells except the Order No column are locked.
- Right-click on the sheet tab => Select View Code.
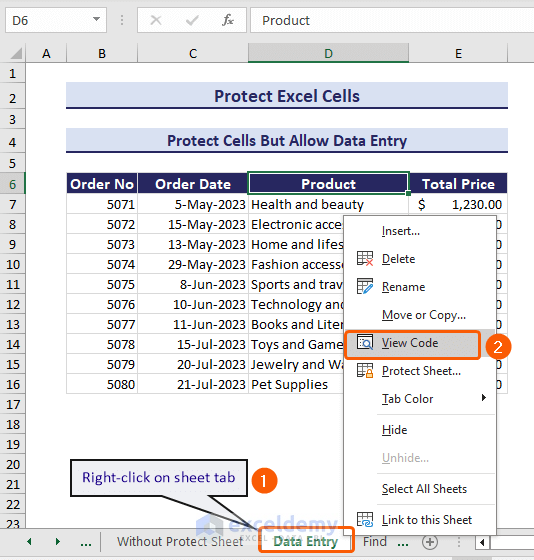
- Insert the VBA code in the Sheet(Code) window.
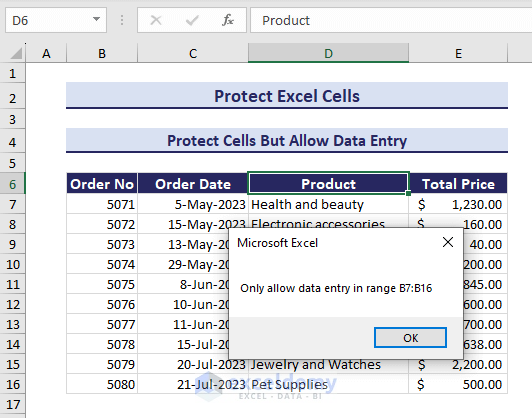
Sub AllowDataEntryOnly()
    ActiveSheet.Protect Userinterfaceonly:=True, _
    AllowFiltering:=True
    Range("B7:B16").Locked = False
        MsgBox "Only allow data entry in range B7:B16"
End Sub
- Click Run to execute the code.

- Executing the code will show you a message box telling you to enter data only in rage B7:B16.
- Close the message box by clicking OK.
- Try to enter data in the range B7:B16. Excel will allow you to do this.

- But if you try to enter data out of range B7:B16, a warning box will pop up to unprotect the sheet to make a newer entry of data.
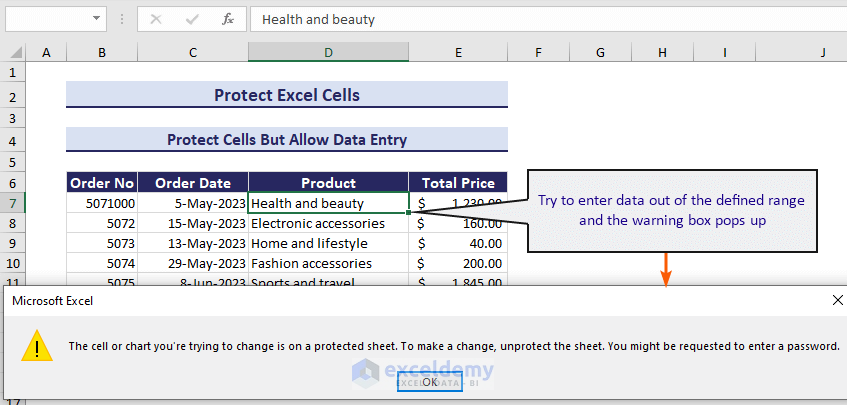
Click here to see the full image
How to Find Locked Cells in Excel
We can find locked cells in Excel using the CELL function. The “protect” property of the CELL function helps to detect locked cells.
The formula below returns 1 (TRUE) indicating that cell E7 is locked.
=CELL("protect",E7)The formula below returns 0 (FALSE) indicating that cell E8 is unlocked.
=CELL("protect",E8)But if the formula refers to a mixture of locked and unlocked cells (E7:E8), the formula returns 1 with an error sign.
=CELL("protect",E7:E8)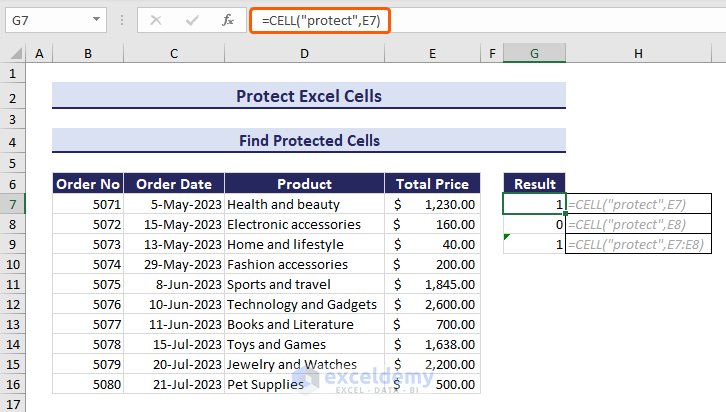
How to Unlock Cells in Excel
You can unlock cells in Excel without a password if they are protected without one. Unprotecting the Excel sheet is enough if you need to unlock cells, because locking cells has no effect until you protect your sheet.
- Go to the Review tab => click Unprotect Sheet.

Furthermore, you can unmark the Locked option in the Protection tab of the Format Cells dialog box, but it’s not mandatory.
Things to Remember
- For Excel versions 2007 and 2010, you can protect the sheet from the Review tab => Changes/Protect Sheet => Protect worksheet and contents of locked cells.
- For Excel version 2003, you will need to follow these steps: Tools => Protection => Protect Sheet => Protect worksheet and contents of locked cells.
Download Practice Workbook
You can download the Excel file that we used to create this article for free.
In this article, we have learned to protect all Excel cells, certain cells, and cells with a formula. Through the post, we have also discussed how to protect cells without protecting sheets, protect cells but allow data entry, and find locked cells. Moreover, we get to know the way to unlock Excel cells.
Protect Excel Cells: Knowledge Hub
<< Go Back to Excel Protect | Learn Excel

