In Microsoft Excel, creating a drop down list from the table is very easy. In this article, we will explain the process of creating an Excel drop-down list from the table. To illustrate this problem we will follow different examples followed by different datasets.
How to Create Excel Drop Down List from Table: 5 Examples
1. Create Drop Down List from Table with Validation
To create a drop-down list from a table we can use the validation option. This is one of the easiest methods to create a drop-down. We will use validation in the following three ways:
1.1 Use of Cell Data to Create a Drop Down
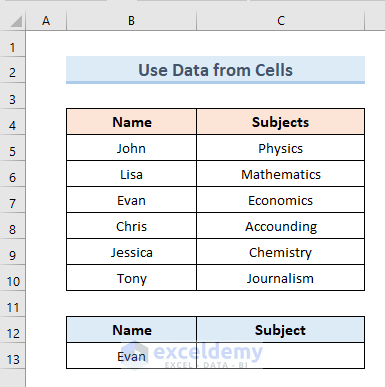
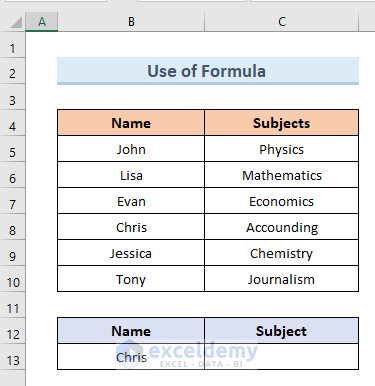
To illustrate this method we have a dataset of students and their subjects. In this example, we will create a drop-down of the column values subjects in cell C13. Let’s see how we can do this:
- In the beginning, select cell C13. Go to the Data tab.
- Select the option Data Validation from the Data Tools section. A new window will open.
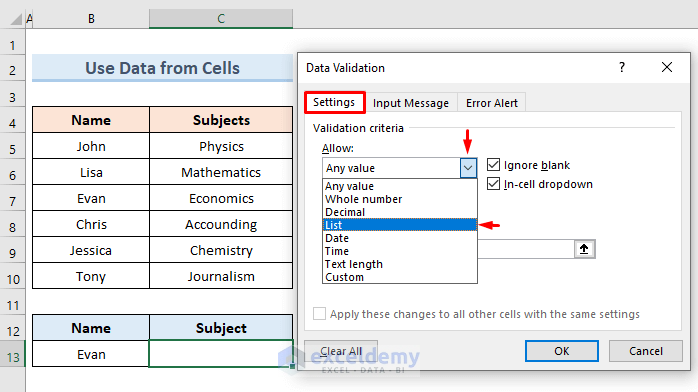
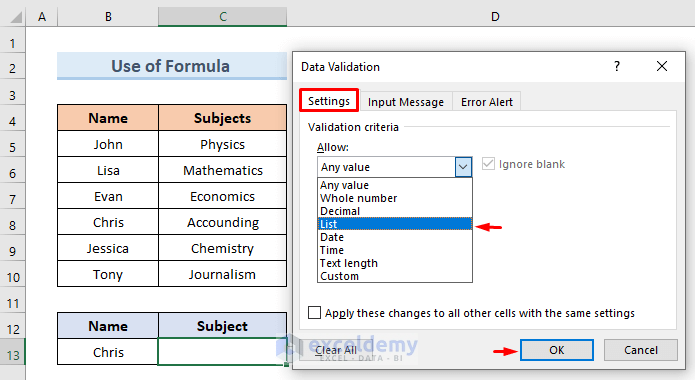
- Next, from the Data Validation window, go to the Settings option.
- From the dropdown of the Allow section select the option List.
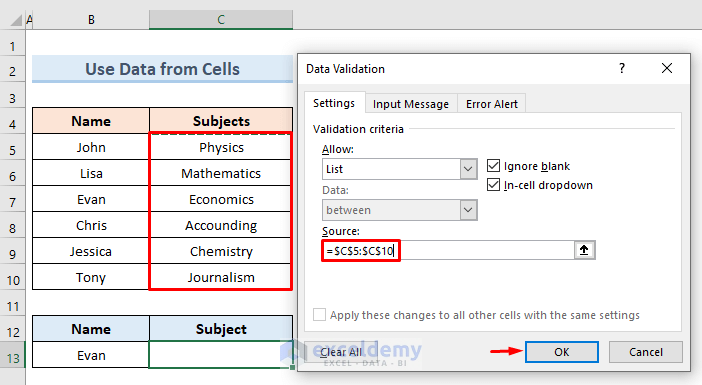
- Then, we will get the Source bar. Select cell (C5:C10) in the bar.
- Press OK.
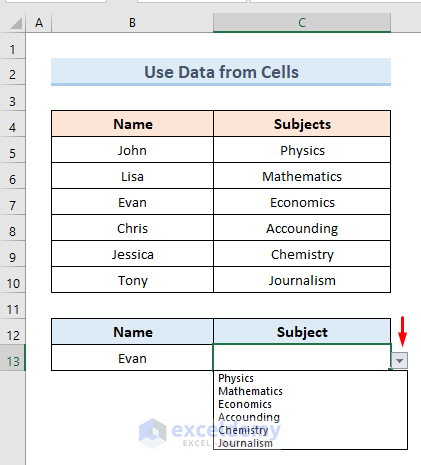
- Finally, we will see a drop-down icon in cell C13. If we click on the icon we get the values of the subject of our dataset.
1.2 Enter Data Manually
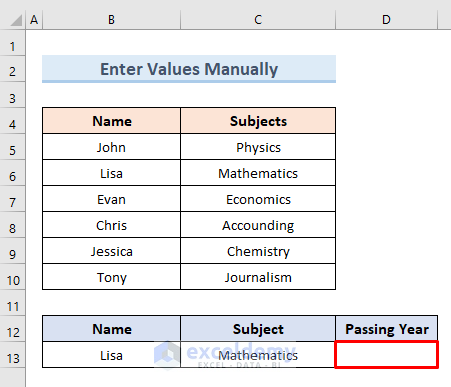
In this example, we will enter the values under drop-down manually whereas, in the previous example, we took the values from our dataset. In the following dataset, we will enter a drop-down bar for the passing year of students at cell D13. Just follow the below steps to perform this action:
- Firstly, select cell D13. Open the Data Validation window.
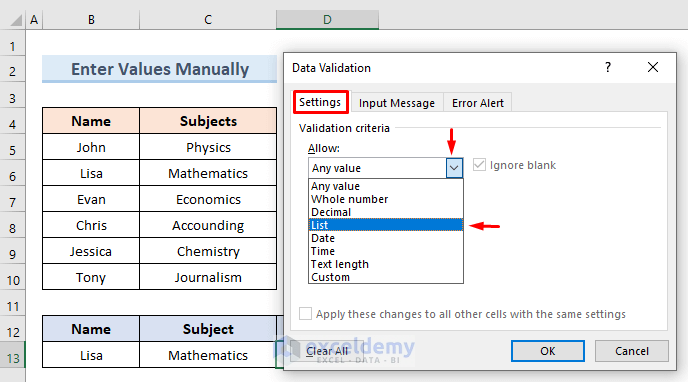
- Go to the Settings option.
- From the Allow drop-down select the list option.
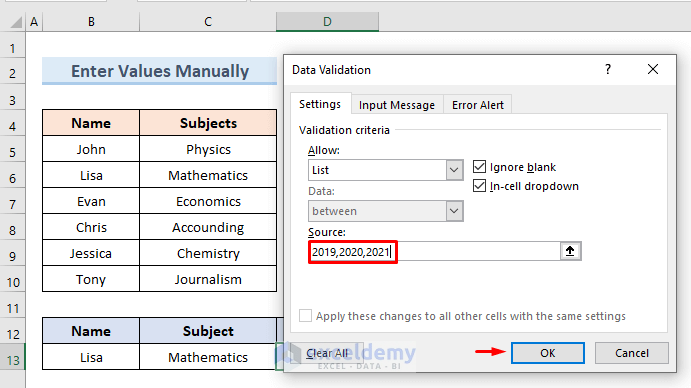
- Then in the Source bar, input manually 2019, 2020 & 2021.
- Press OK.
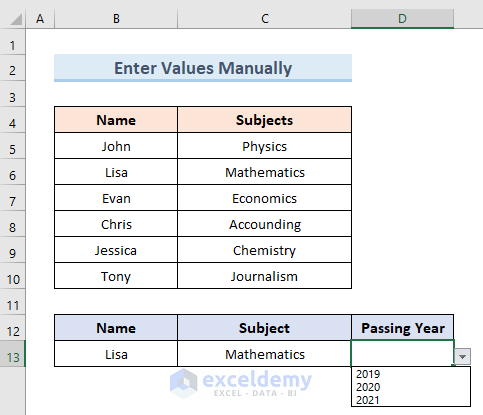
- Finally, we can see a drop-down of 3 values of years in cell D13.
1.3 Use Excel Formula
We can use formula also to create a drop-down in Microsoft Excel. In this example, we will do the same task with the same dataset as the first method. In this case, we will use an Excel formula. Let’s see the steps of doing this work:
- First, select cell C13. Open the Data Validation window.
- Select the Settings option.
- Select the list option from the Allow drop-down.
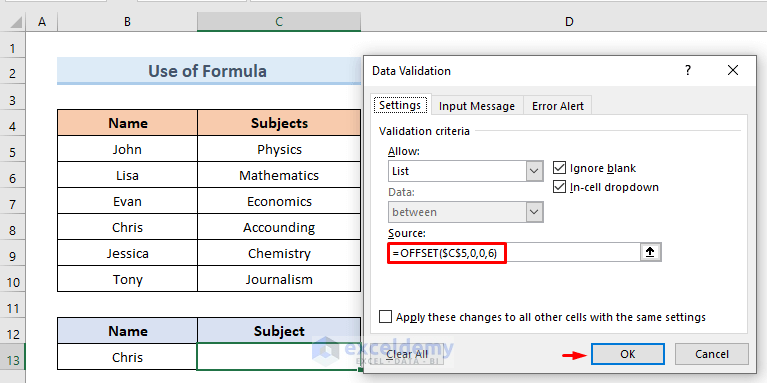
- Now we can see the Source bar is available. Insert the following formula containing the OFFSET function at the bar:
=OFFSET($C$5,0,0,6)- Press OK.
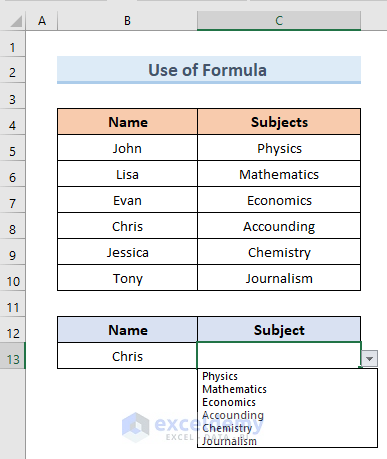
- Finally, we can see a drop-down icon in cell C13. If we click on the icon we will get the dropdown list of subjects.
Read More: How to Make a Drop Down List in Excel
2. Make a Dynamic Drop Down List from Excel Table
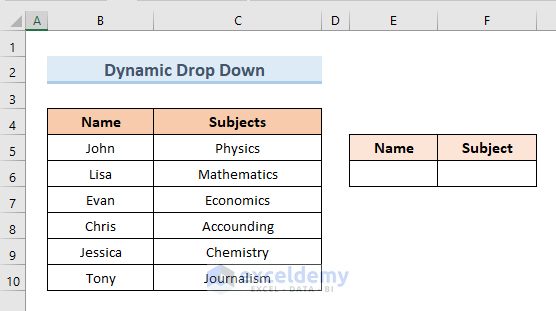
Sometimes after setting the drop-down list we may need to add items or values to that list. To add a new value in the table as well as in the drop-down list we have to make it dynamic. Let’s solve this problem by following steps:
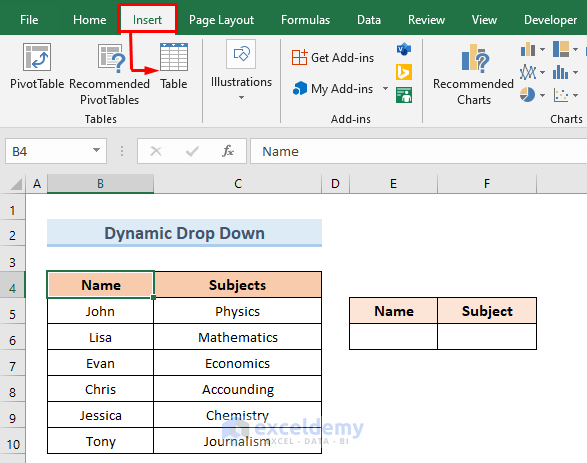
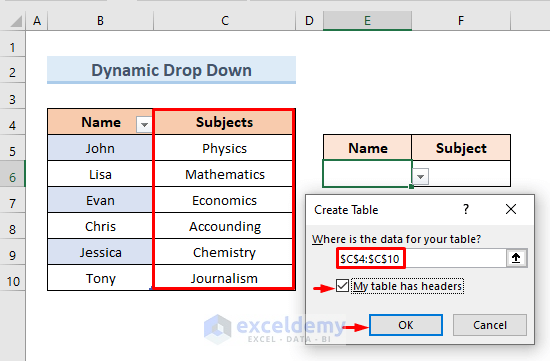
- In the beginning, select the Insert tab.
- From the tab, select the option Table.
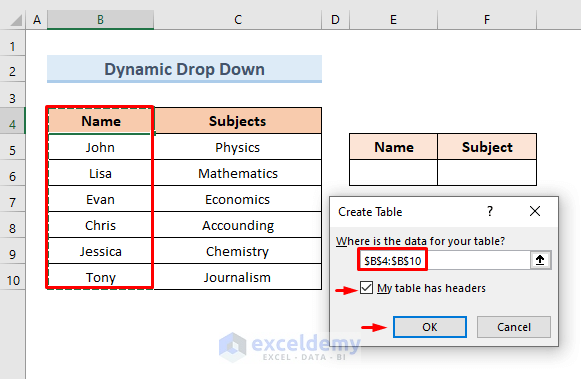
- A new window will open.
- Select cell range (B4:B10) as table data.
- Don’t forget to check the option ‘My table has headers’.
- Press OK.
- Now, select cell E6. Open the Data Validation window.
- Select the Settings option.
- Select the list option from the Allow drop-down.
- Insert the following formula in the new Source bar:
=INDIRECT("Table1[Name]")- Press OK.
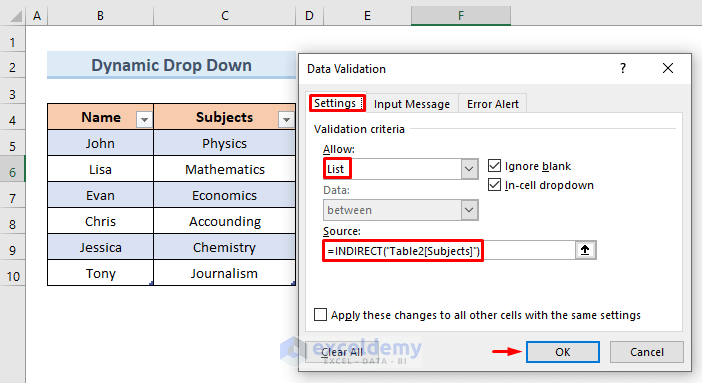
- Again we will create a table for the Subjects column.
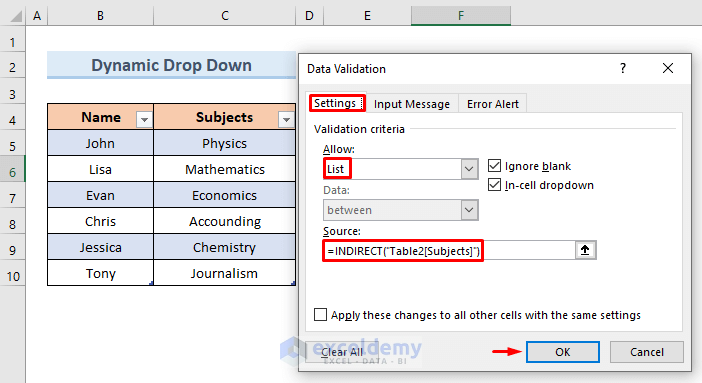
- Here, select cell F6. Open the Data Validation window.
- Select the Settings option.
- From the Allow drop-down, select the list option
- Insert the following formula in the new Source bar:
=INDIRECT("Table2[Subjects]")- Press OK.
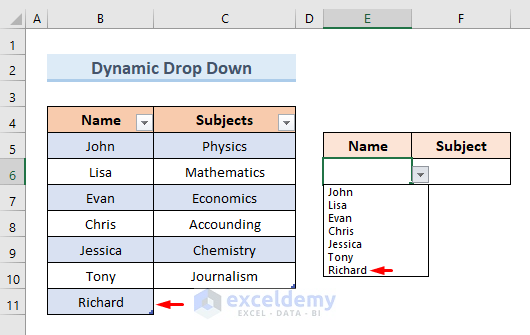
- Now, add a new name Richard in the Name column. we can see the drop-down list is also showing the new value.
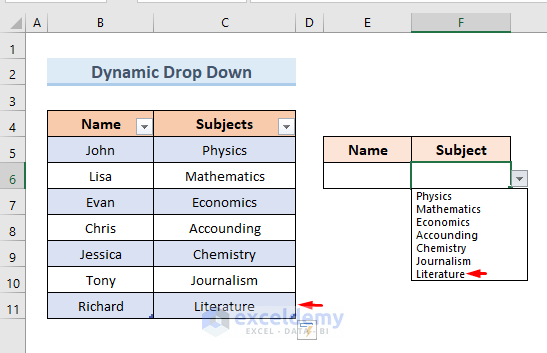
- Finally, Insert a new value Literature in the Subjects column. We will get the new value in the dropdown as well.
Read More: How to Link a Cell Value with a Drop Down List in Excel
3. Drop-Down List Copy Pasting in Excel
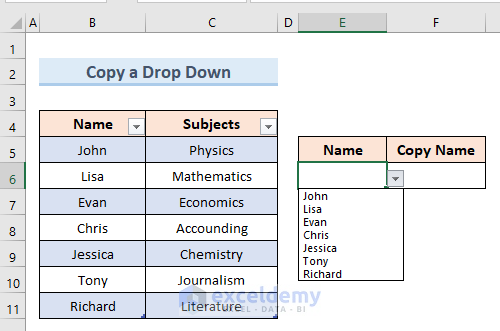
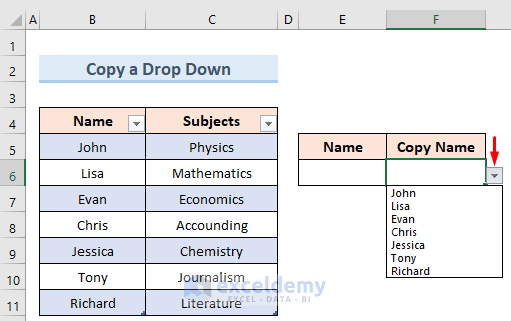
Suppose, we have a drop-down list in a cell and we want to copy that into another cell. In this example, we will learn how we can copy a drop-down list from one cell to another. Just go through the following instruction to perform this action:
- Firstly, select the drop-down cell that we want to copy.
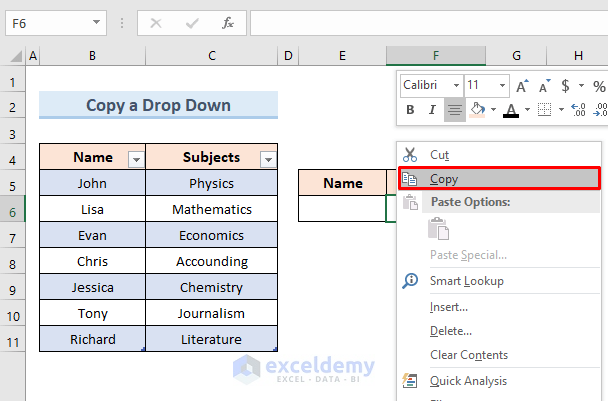
- Do right-click and select the Copy option.
- Now select cell F6 where we will paste the drop-down list.
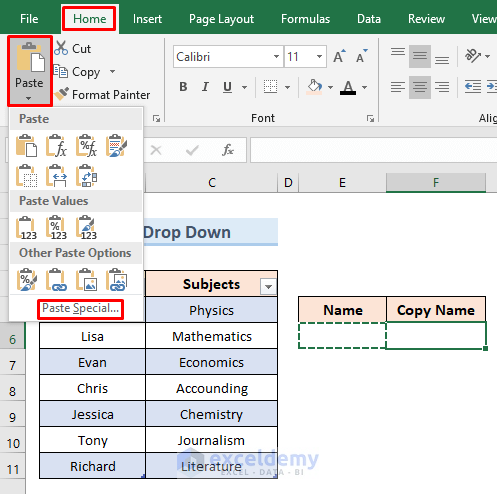
- Go to the Home tab. Select the Paste option.
- From the drop-down, select the option Paste Special.
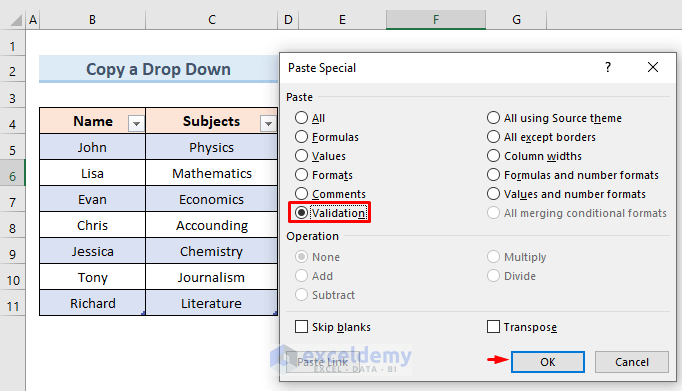
- Then a new window will open. Check the option Validation from the box.
- Press OK.
- Finally, we can see that the drop-down list of cell F6 is the copy of E6.
Read More: How to Copy Filter Drop-Down List in Excel
4. Select All Drop Down List Cells from Table
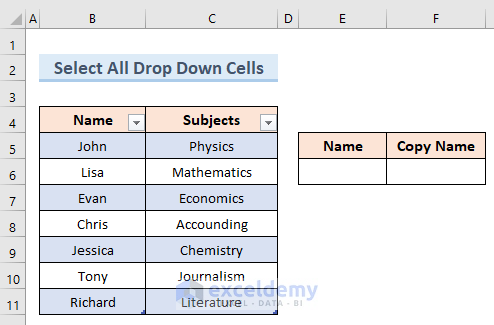
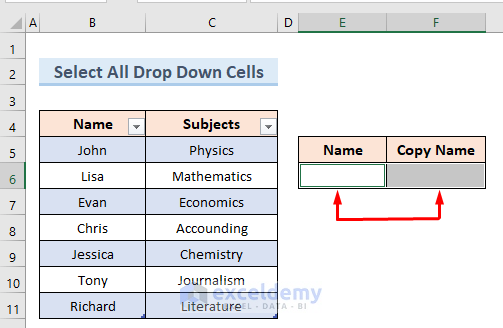
Sometimes we may have multiple drop-down lists in our dataset. In this example, we will see how we can find and select all the drop-down lists in a dataset. We will use the dataset of our previous example to illustrate this method. Let’s see how we can do this following simple steps:
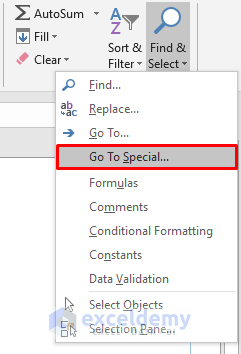
- Firstly, go to the Find & Select option in the editing section of the ribbon.
- From the drop-down select the option Go To Special.
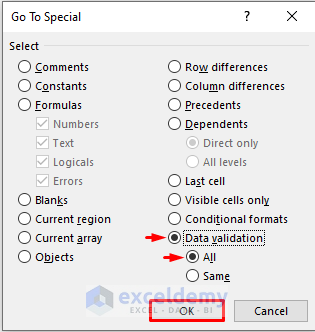
- A new window will open.
- Check the option All under the Data validation option.
- Hit OK.
- So, we get the selected drop-down list in cells E6 & F6.
5. Dependent or Conditional Drop Down List Making
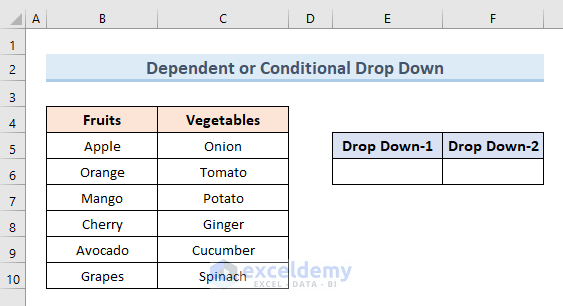
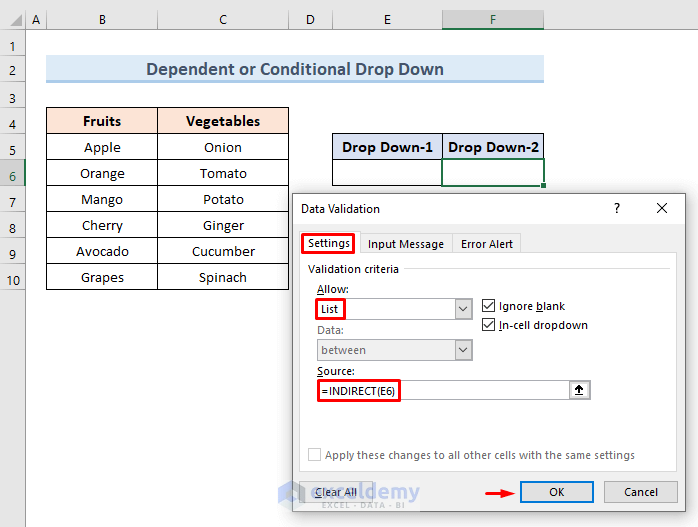
Suppose, we need to create two interrelated dropdown lists. In this example, we will see how to make a drop-down list available depending on another drop-down list. Just follow the steps to perform this action:
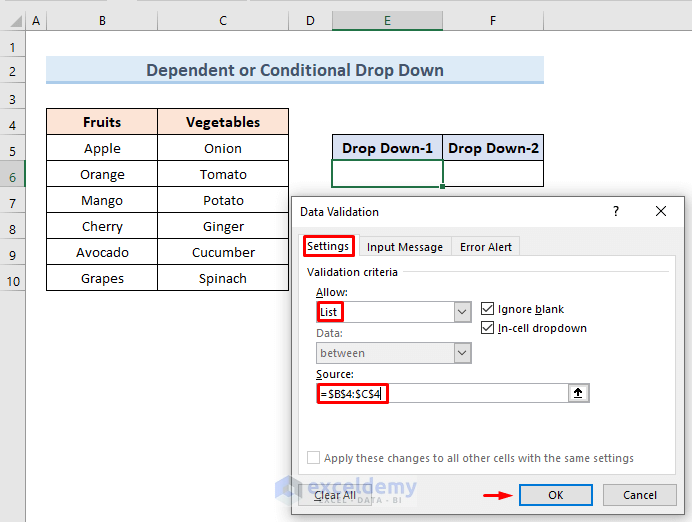
- Firstly, select cell E6.
- Open the Data Validation window.
- Select the Settings option.
- Select the list option from the Allow drop-down
- Input the following formula in the new Source bar:
=$B$4:$C$4- Press OK.
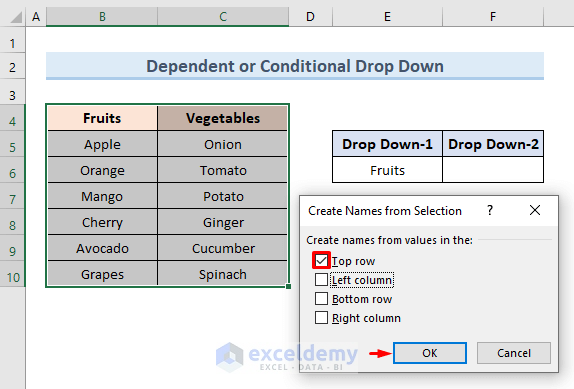
- Next, go to the Formula tab.
- Select the option Create from Selection from the Defined Name section.
- Then a new window will open.
- Check only the option Top row.
- Press OK.
- Now, select cell F6 and open the Data Validation window.
- Go to the Settings option.
- From the Allow drop-down select the option List.
- Insert the following formula in the new Source bar:
=INDIRECT(E6)- Press OK.
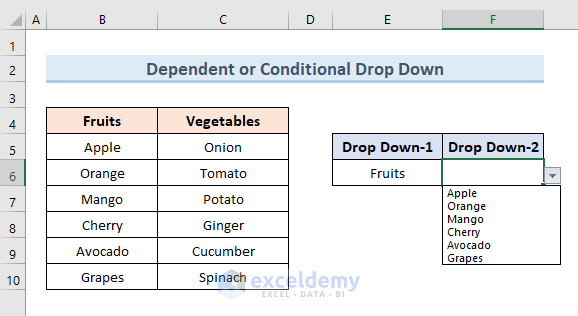
- Finally, if we select the option Fruits from Drop Down-1 we get only fruits items in Drop Down-2.
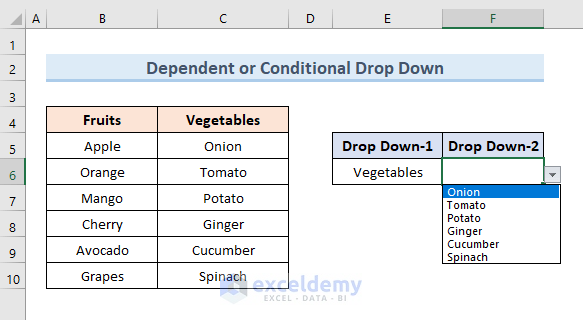
- Again If we select Vegetables in Drop Down-1 we get the list of Vegetables in Drop Down-2.
Read More: Conditional Drop Down List in Excel
Things to Remember
- The drop-down list is lost if you copy a cell (that does not contain a drop-down list) over a cell that contains a drop-down list.
- The worst thing is that Excel will not provide an alert informing the user before overwriting the drop-down menu.
Download Practice Workbook
You can download the practice workbook from here.
Conclusion
In this article, we have tried to cover all the possible methods to create Excel drop-down lists from tables. Download the practice workbook added with this article and do practice yourself. If you feel any kind of confusion just comment in the below box.
Related Articles
- How to Create a Drop Down List from Another Sheet in Excel
- How to Edit Drop Down List in Excel
- How to Remove Drop Down List in Excel
- How to Auto Update Drop-Down List in Excel
- How to Create Excel Drop Down List with Color
- How to Create Drop Down List with Filter in Excel
- How to Add Item to Drop-Down List in Excel
- How to Create a Drop Down List with Unique Values in Excel
- Excel Drop Down List Not Working
<< Go Back to Create Drop-Down List in Excel | Excel Drop-Down List | Data Validation in Excel | Learn Excel




Hello, in the “2. Make a Dynamic Drop Down List from Excel Table” section, the forth image is supposed to be for the table “Name”, but instead its the same as the table “Subjects”, so basically you have used the same image for both and this crate a bit of confusion.
Thank you so much for your observation. We will rectify and update this error soon. Thanks again for your concern.