In this article, we are going to learn about data entry in Excel. We will learn about the basics of data entry, form creation, and error handling.
Data entry stands for simply entering the data in an Excel worksheet. This is important if we need to keep proper track of data and want to manage our data efficiently.
The data entry form is a game changer in this regard. This form has made the data entry task butter smooth and added useful functionalities like adding, editing, or searching data in the worksheet in an organized way.
Download Practice Workbook
How to Enter Text or Numbers in Excel
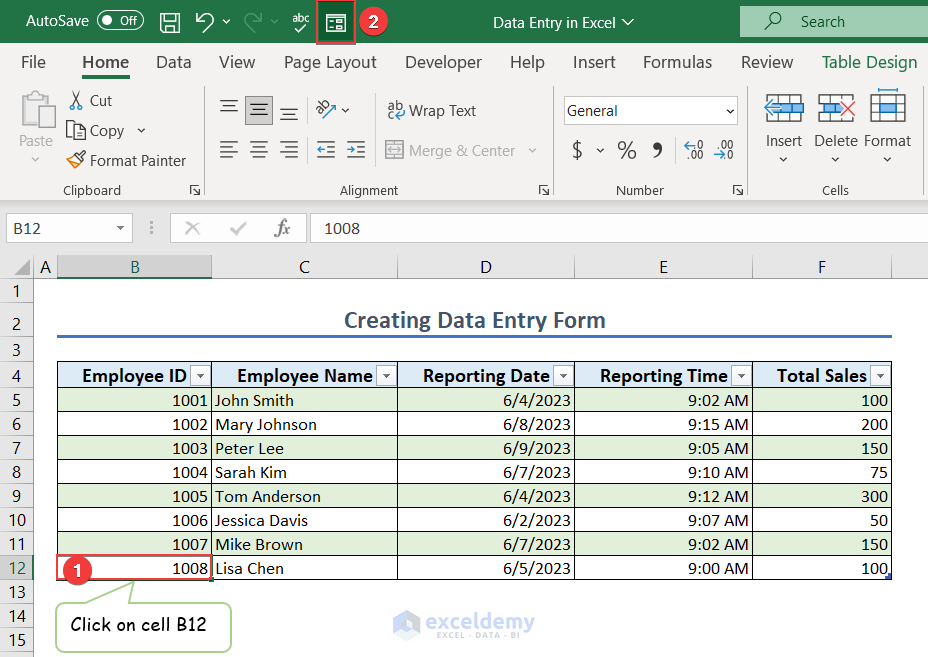
- Click on cell B12 to type number type data.
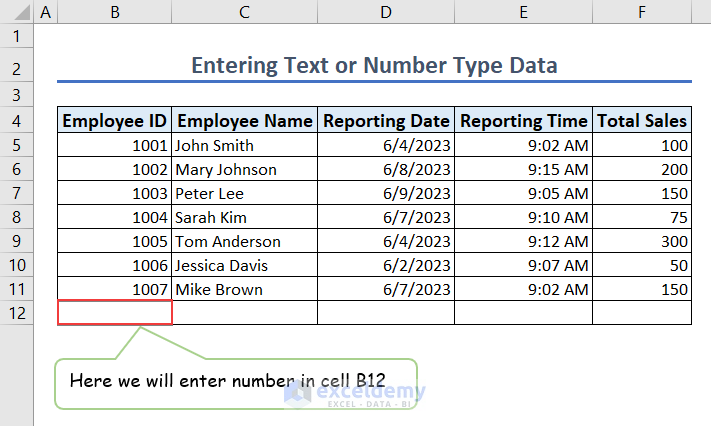
- Type the number in cell B12 and press the Tab key to move to cell C12.

- Type text type data in cell C12.
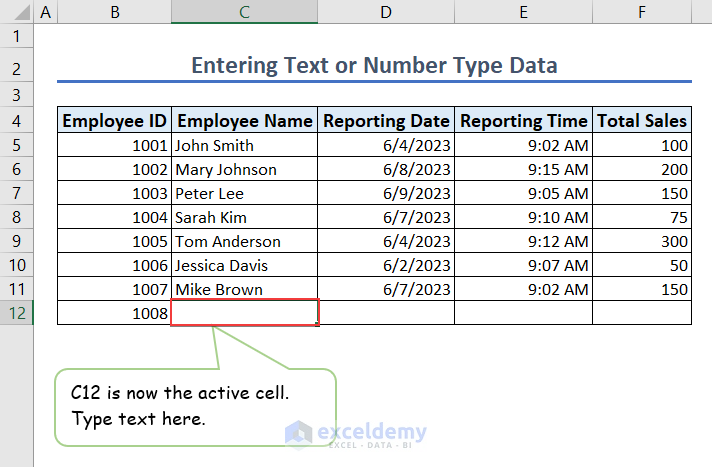
- The text type data is inserted in cell C12.

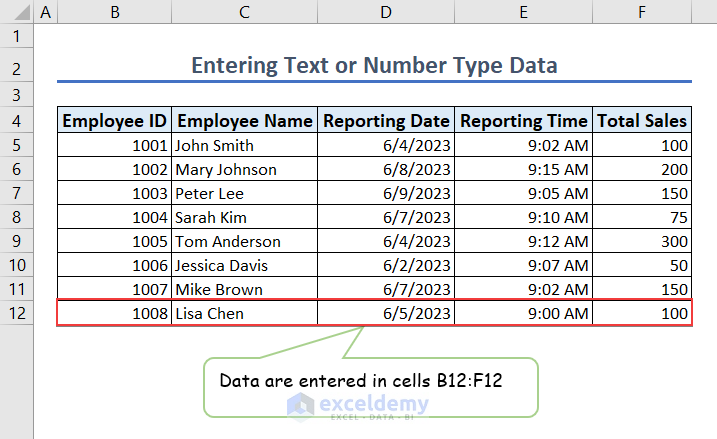
- Similarly, enter data in cells B12:F12.
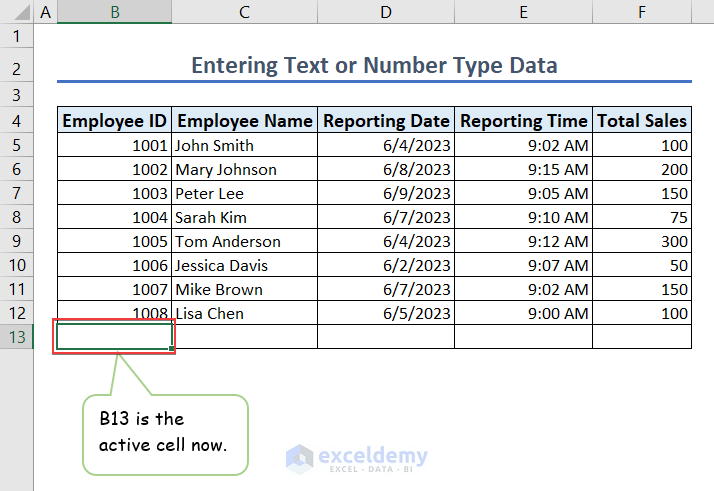
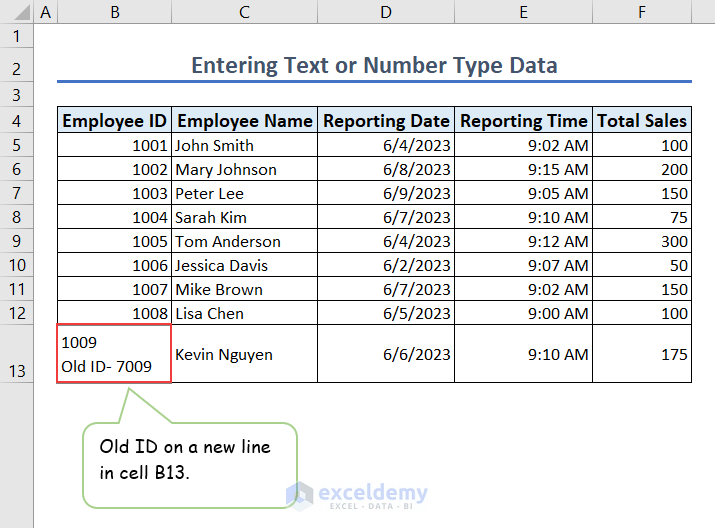
- Press ENTER to move to cell B13.
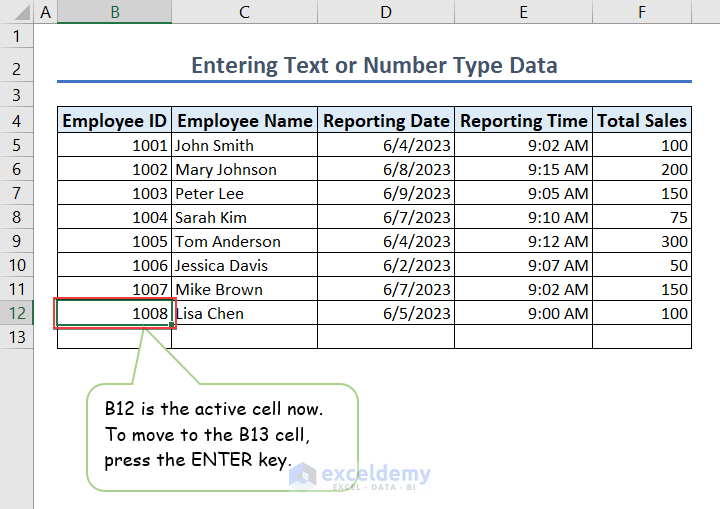
- As a result, B13 is the active cell now.
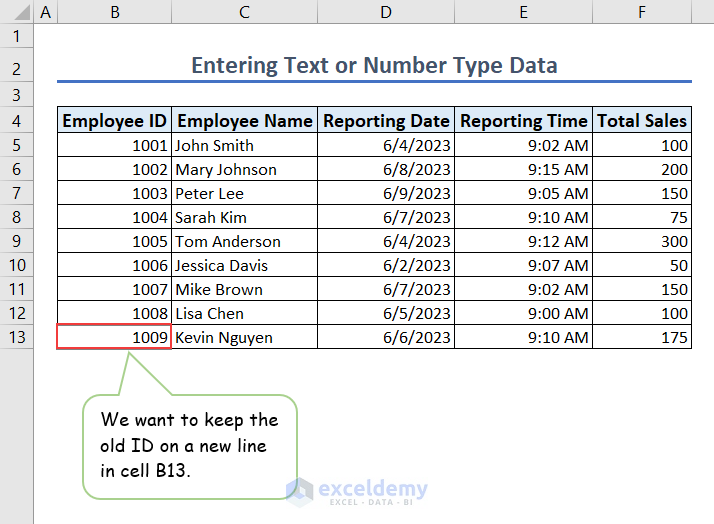
- We need to keep the old ID on a new line in cell B13.
- Press the ALT + ENTER keys together to add a new line in cell B13.
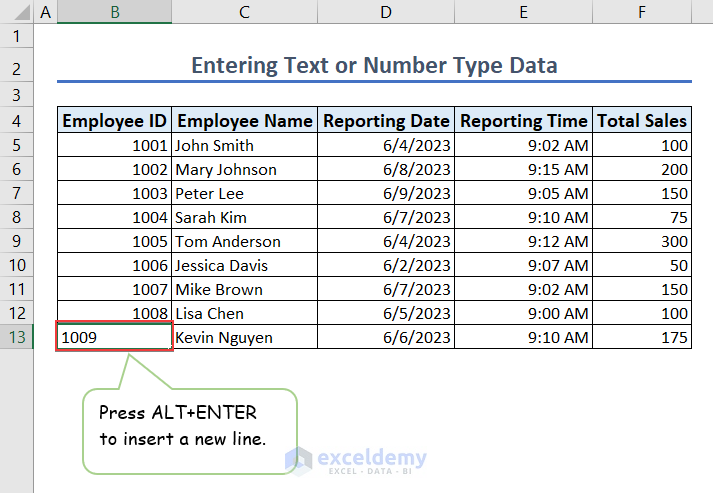
- Type the old ID in the newly inserted new line in cell B13.
How to Enter Numbers with Fixed Decimal Points in Excel
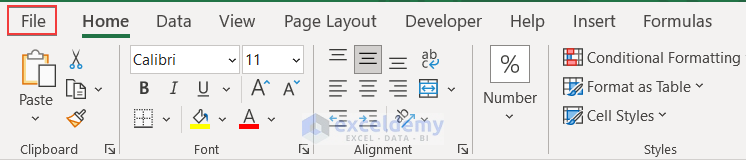
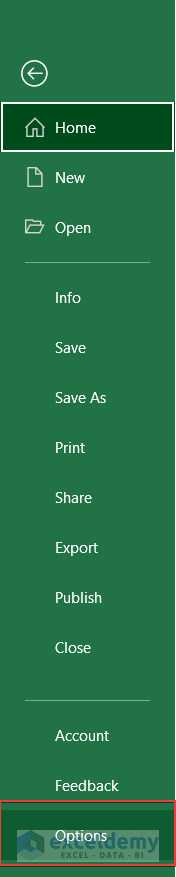
- Click on File.
- Navigate to Home >> Options.

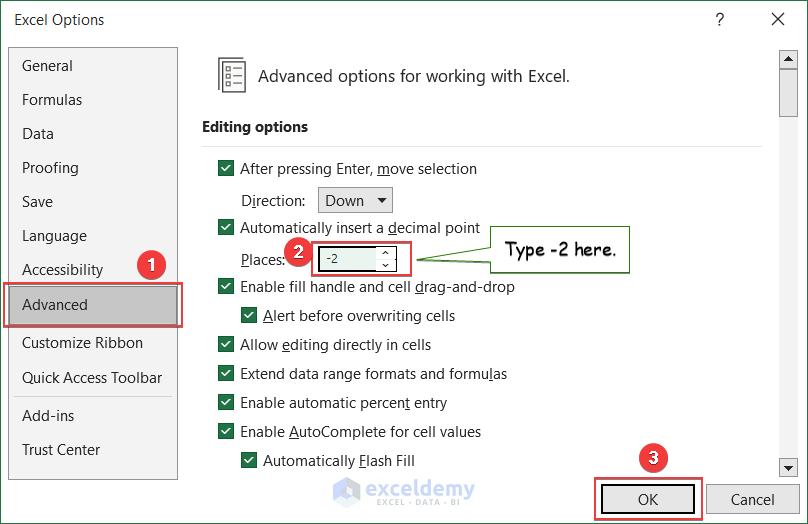
- In the Advanced menu, check the settings as shown in the following image.
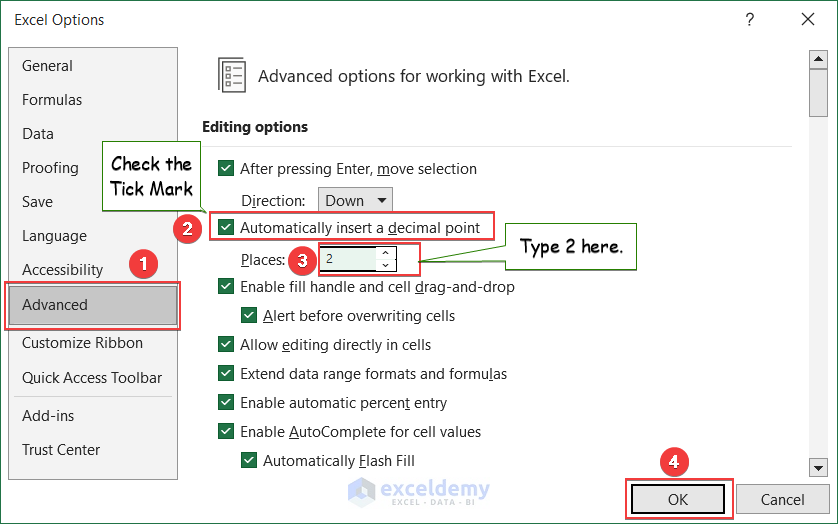
- If we enter a number anywhere in the worksheet now, a decimal point will be followed by the last two digits.
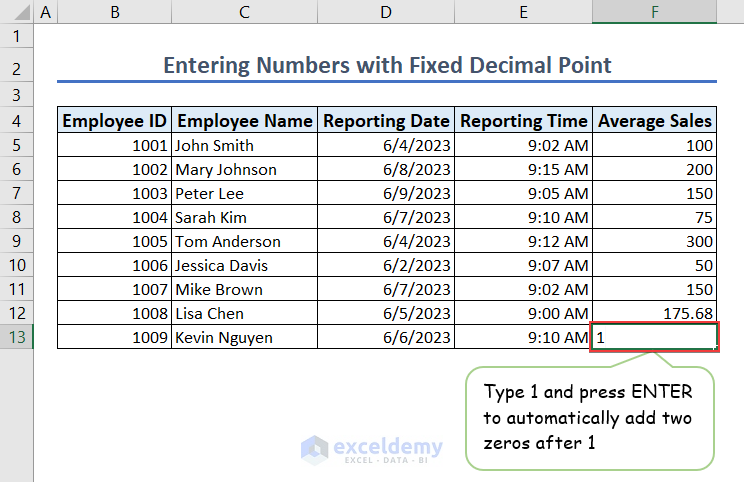
- Type 17568 in cell F12 and press ENTER.
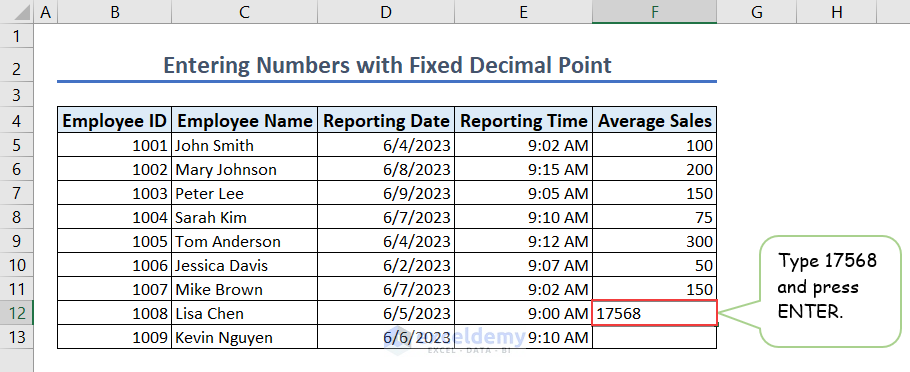
- As a result, we can see that cell F12 contains the number 175.68.

- If we replace the 2 with -2, two zeros will be automatically added after the number we will type in the worksheet.
- Do accordingly as shown in the following image to check this feature.
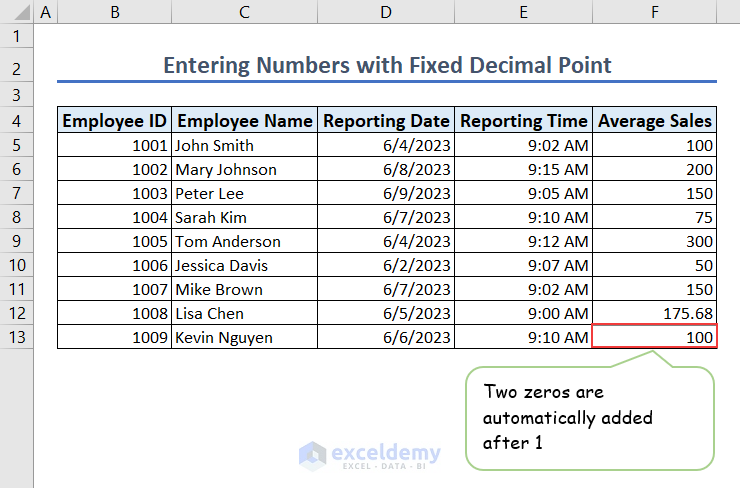
- Now type 1 in cell F13 and press ENTER.
- As we can see, there are two zeros after 1, hence the number becomes 100.
How to Enter Date or Time in Excel
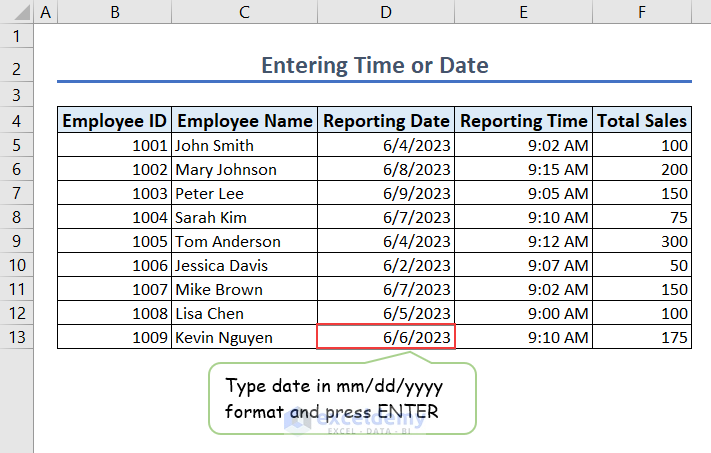
- By default, the date format in Excel is MM/DD/YYYY. We need to use the “/” sign as the separator.
- Type 6/6/2023 in cell D13 and press ENTER. We can see the date is added in the cell.
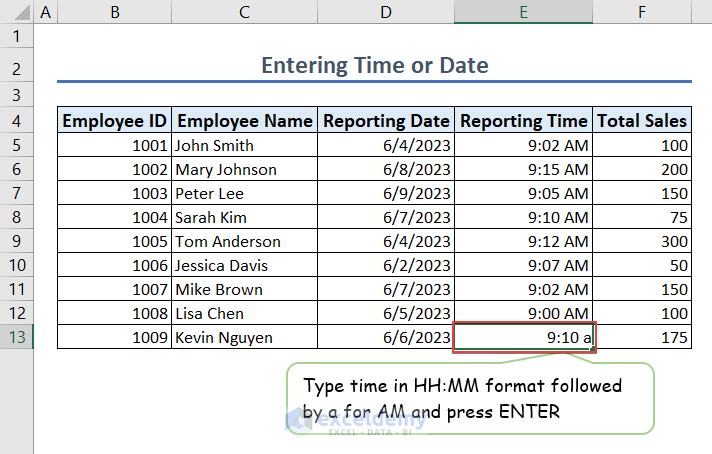
- We need to type a for AM and p for PM at the end of 12 hours based on the HH: MM time format in Excel.
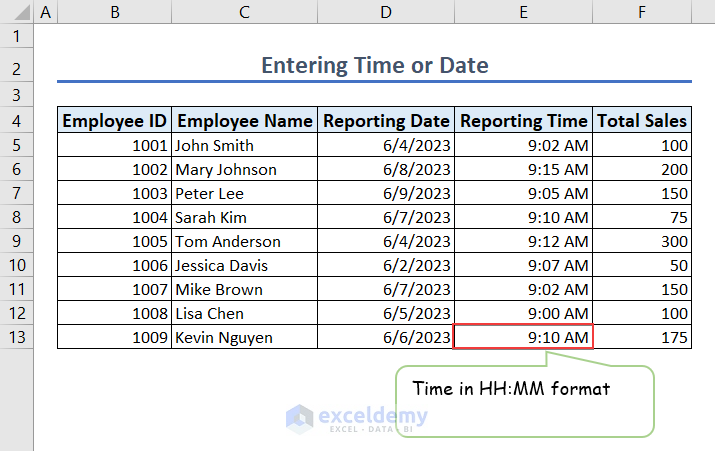
- Type 9:10 a in cell E13 and press ENTER.
- As a result, we can see the time as 9:10 AM in cell E13.
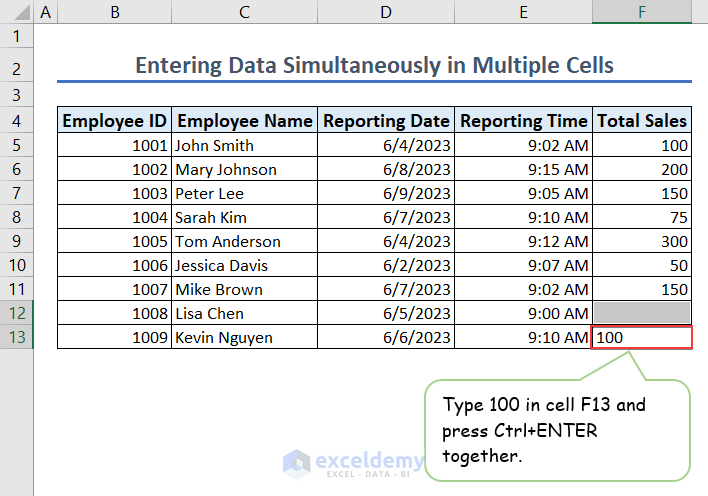
How to Enter Data Simultaneously in Multiple Cells
- We can enter data simultaneously in multiple cells.
- For example, we need to enter 100 in cells F12 and F13 simultaneously.
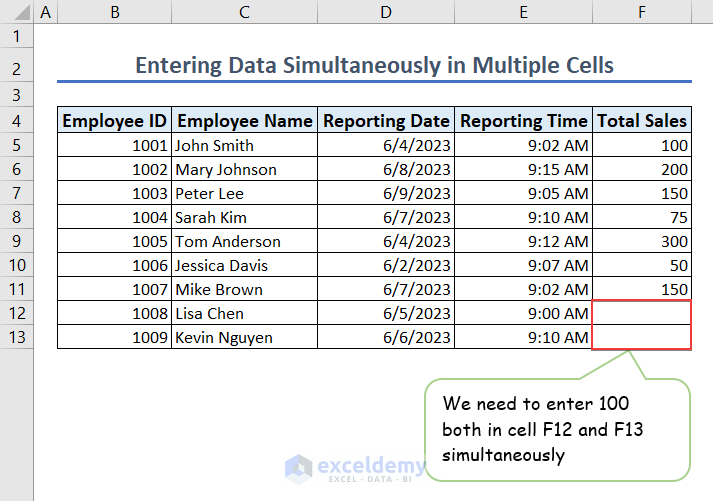
- Select cell F12 first, press and hold the Ctrl key, and click on cell F13 to select both cells.
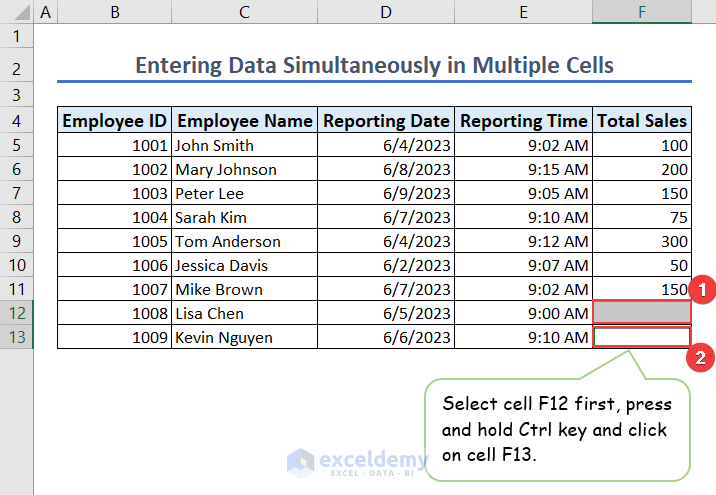
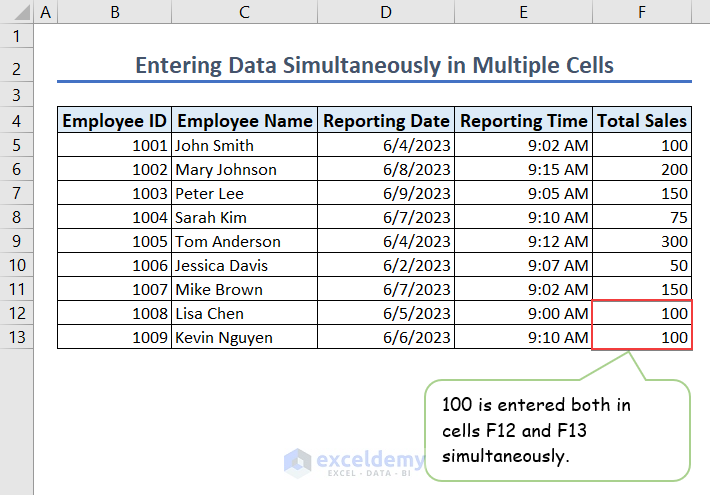
- Type 100 in cell F13 and press Ctrl + ENTER together.
- As a result, 100 is entered simultaneously in cells F12 and F13.
How to Enter Data Simultaneously in Multiple Worksheets
- We can enter data simultaneously in multiple worksheets too.
- For example, Backup2 and Backup3 are two back-ups of the worksheet named Multiple Worksheets and we need to enter data simultaneously in these worksheets.

- When Multiple Worksheets is the active worksheet, press and hold the Ctrl key and select worksheets named Backup2 and Backup3.
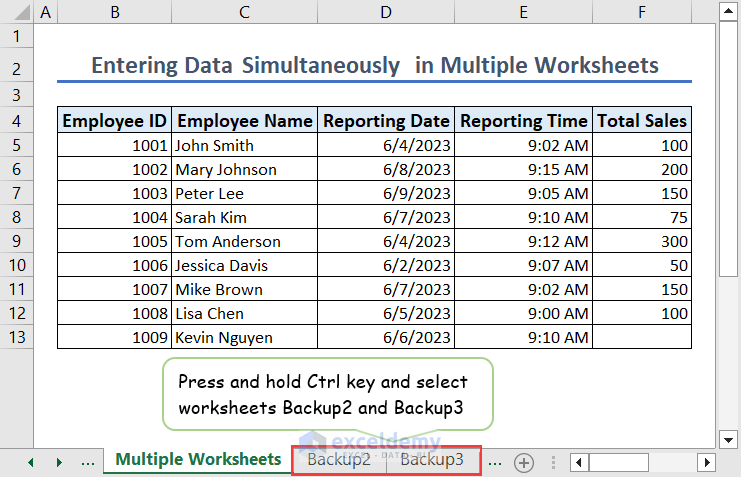
- As a result, all three worksheets are selected now.

- Type 175 in cell F13 of the worksheet Multiple Worksheets and press ENTER to enter the value simultaneously in the selected worksheets.
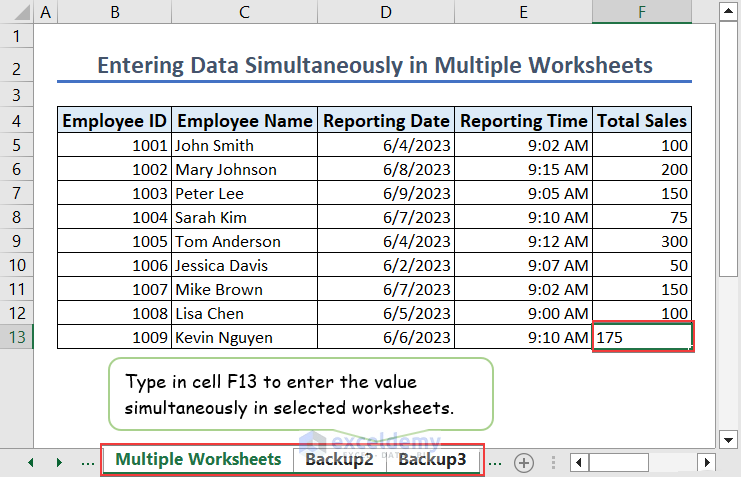
- As we are done entering the value simultaneously in the selected worksheets, we can now ungroup the selected cells.
- Right-click on the worksheet named Multiple Worksheets and select Ungroup Sheets to do so.
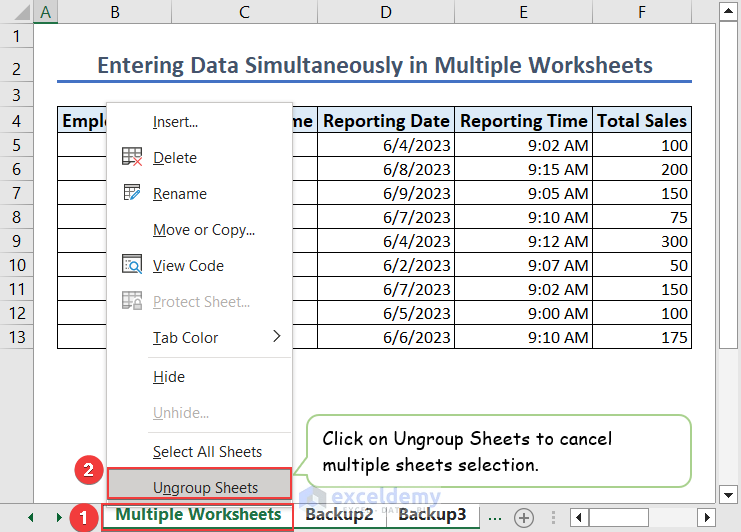
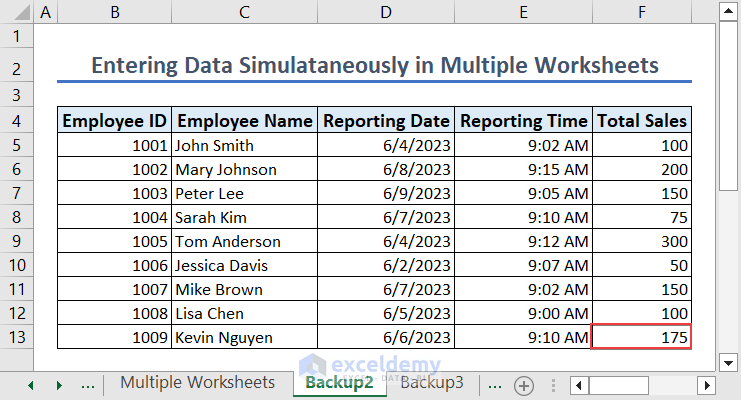
- Now we can check the worksheet named Backup2 and see that cell F13 has 175. The same goes for the Backup3 worksheet.
How to Change Worksheet Settings and Cell Formats in Excel
We need to change the default worksheet settings and cell formats according to our use cases. This includes changing the direction of the ENTER key and changing the cell’s width. Also, we need to wrap text and format numbers sometimes.
1. Change Direction for ENTER Key
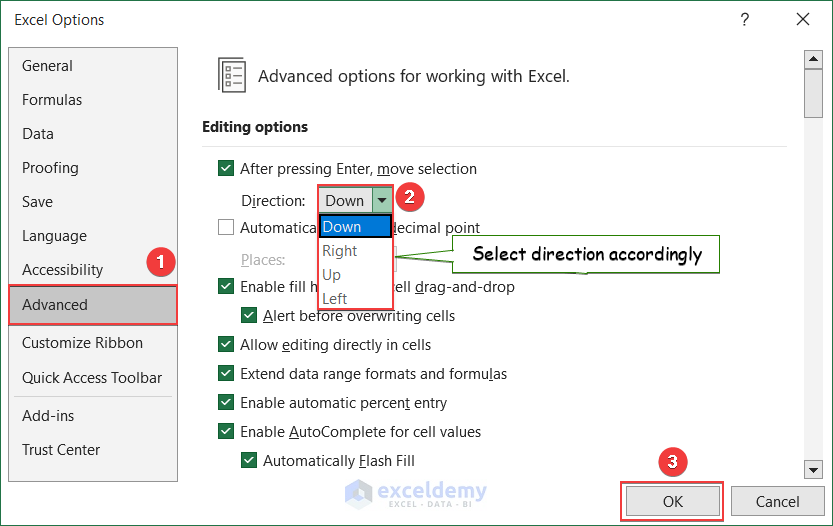
- Select File.

- Go to Options.
- Go to Advanced, click on the drop-down option, and select the direction of the ENTER key accordingly.
- Finally, click on OK.
2. Change the Width of a Column
- Values are displayed as “####” in cells where the width of the cell is not enough to display the content of the cell. Cell F13 is such an example.
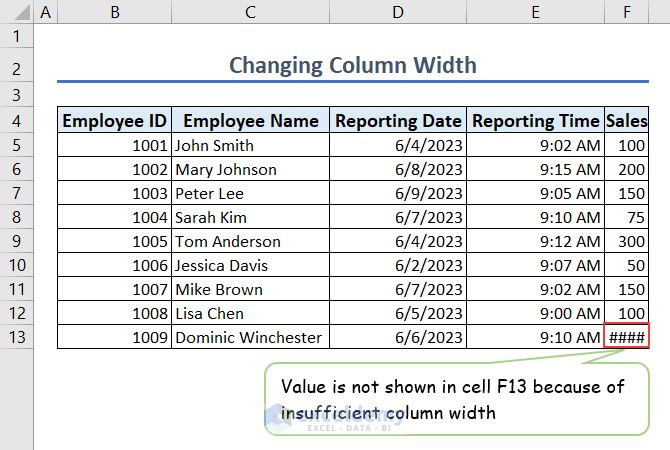
- We need to apply Autofit Column Width to display the full content of the cell.
- Select cell F13, navigate to Home >> Format and select Autofit Column Width.
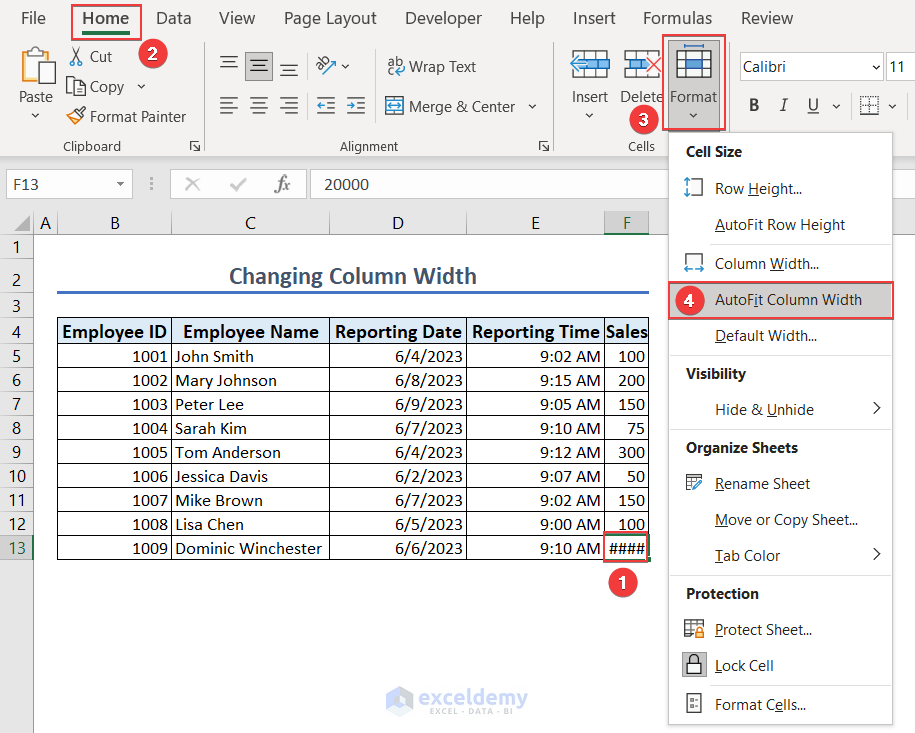
- Cell F13 displays the full content as the column width is autofitted.

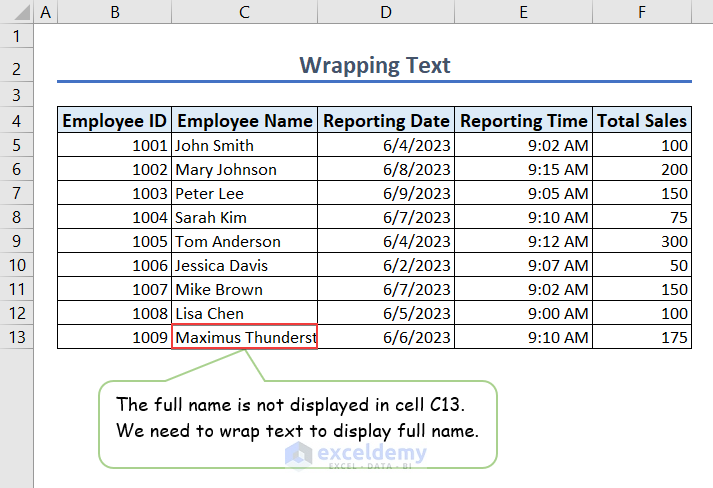
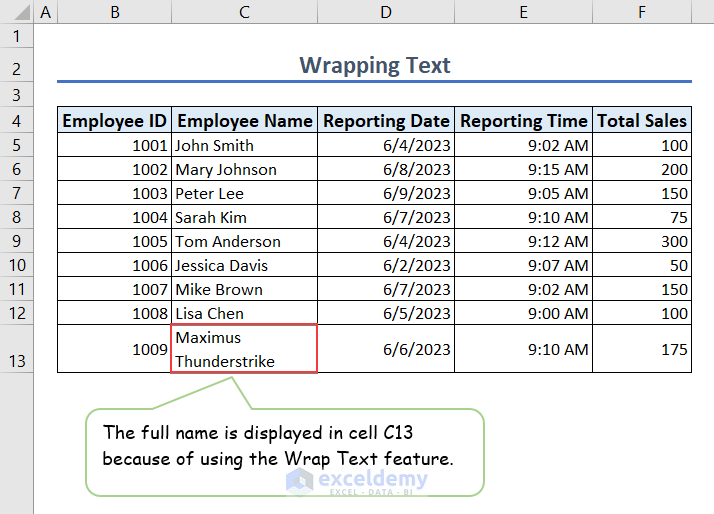
3. Wrap Text in a Cell
- We need to wrap a text to display the full text in the cell when the text is longer than the cell dimensions.
- We will use this feature in cell F13.
- Select cell C13 and select Wrap Text.
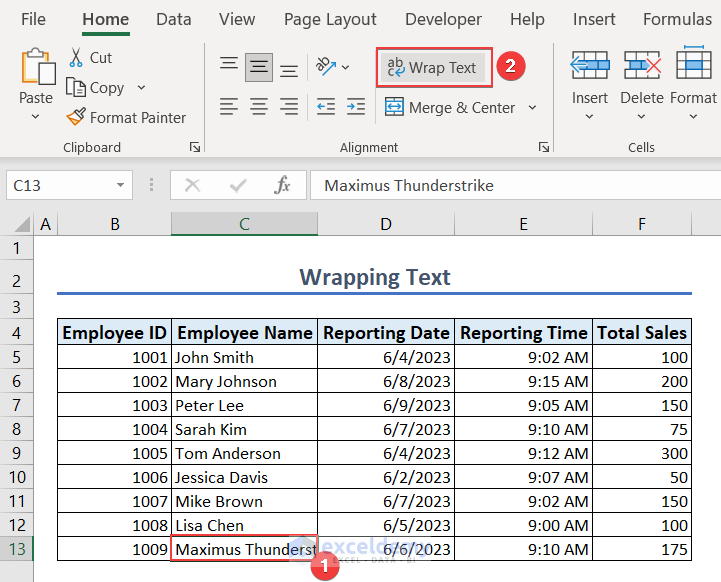
- As a result, we can see the full name in cell C13.
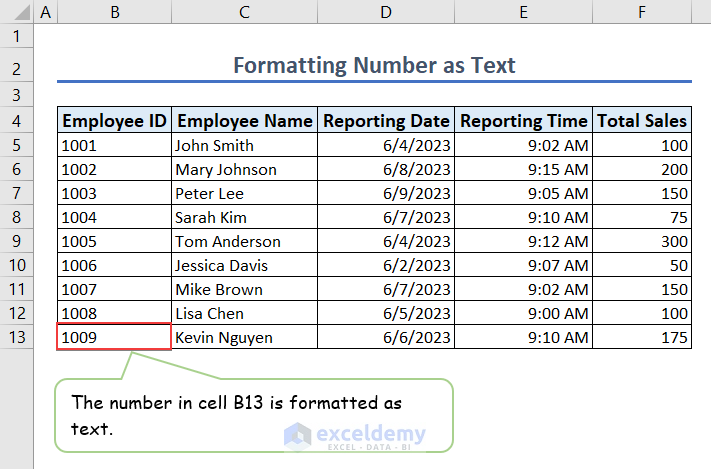
4. Format a Number as Text
- Sometimes we need to format numbers as text. In the following case, our Employee ID should be treated as text although it looks like a number.
- Select cell B13 and click on the drop-down as shown in the following image.

- Select Text as the data type.

- Now if we type 1009 in cell B13, it will be formatted as text.
How to Create an Excel Data Entry Form
We need to use a data entry form for a smooth data entry experience. This enables faster data entry and significantly reduces data entry time, especially if we are working with a large dataset.
What Is Excel Data Entry Form?
The data entry form is a type of form that Excel automatically generates to ease the data entry task. We can automate data entry in Excel to increase productivity. In this case, all the column headers appear as labels in a single dialogue box. We will learn the step-by-step procedure here.
1. Add Excel Data Entry Form to Quick Access Toolbar
- If the data entry form is not added to the quick access toolbar, we need to click on the Customize Quick Access Toolbar and select More Commands.
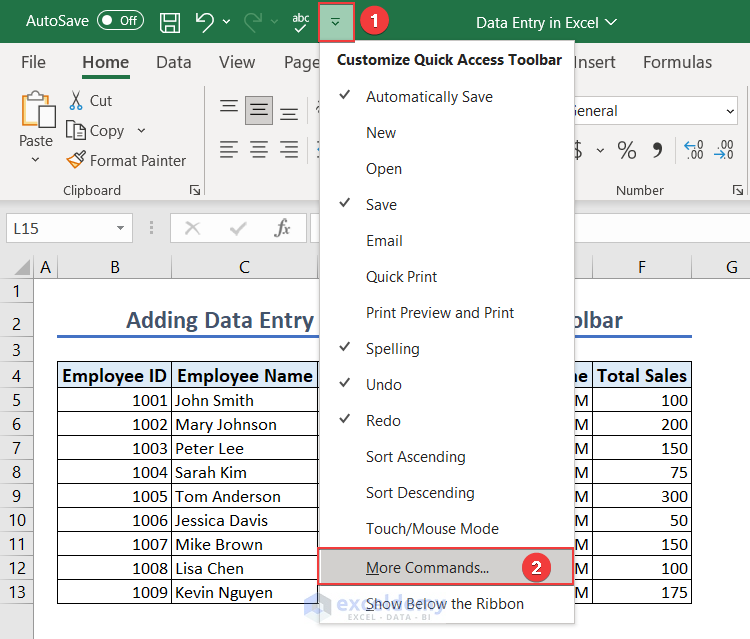
- Add Form to Quick Access Toolbar as shown in the following image and click on OK.

- As a result, a data entry form is added to the Quick Access Toolbar.
![]()
2. Create a Data Entry Form
- To create a data entry form, we need to create a table first. Select any cell in the dataset (B12 in this case).

- Click on OK as the Create Table window pops up.
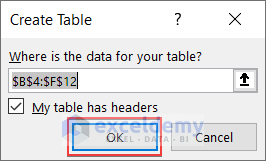
- As a result, a table will be created.

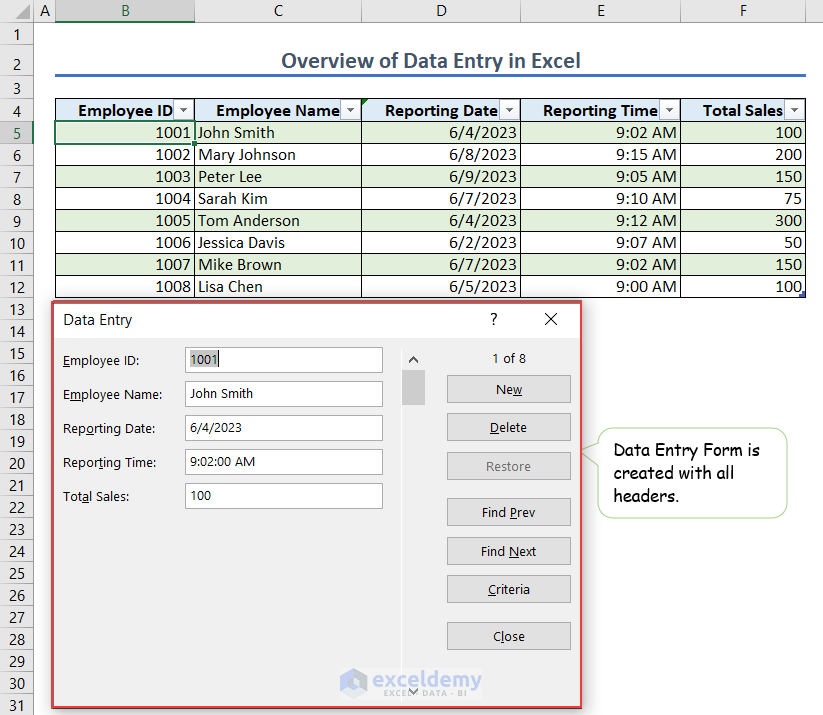
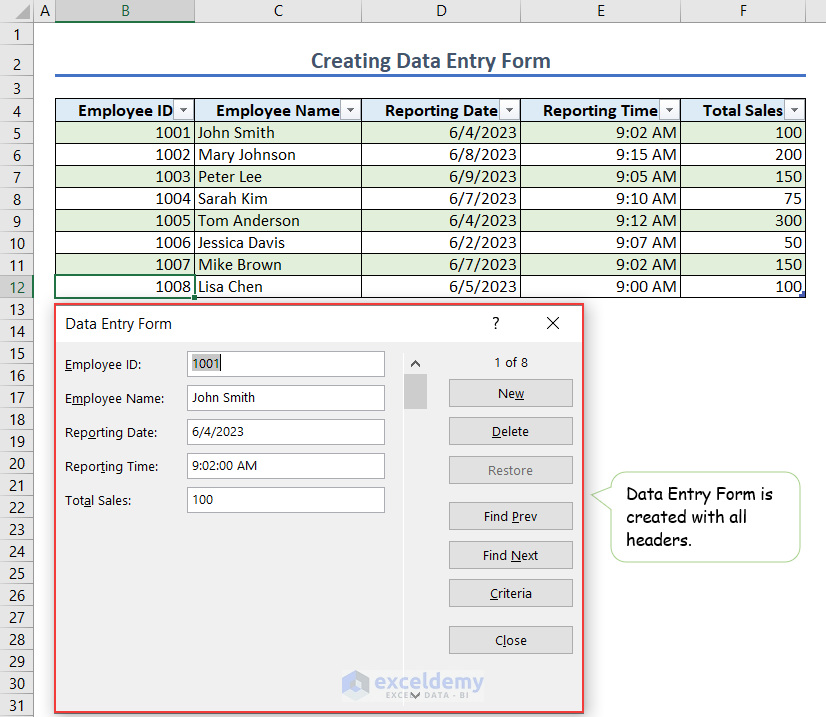
- Click on any cell of the table (cell B12 in this case) and click on the Form icon as shown in the following image.
- As a result, a data entry form will be created with column headers as the labels of the form.
3. Add, Search, Update, or Restore Records in Excel
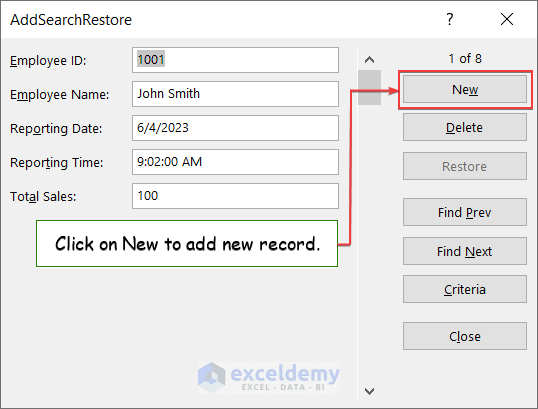
- Click on New in the data entry form to add a new entry.
- Type the necessary information in the appropriate fields and finally press ENTER to add the new record to the worksheet.
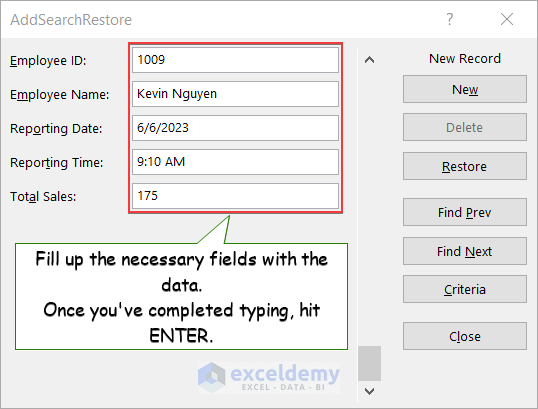
- We can see, the new record is added to the worksheet using the data entry form.

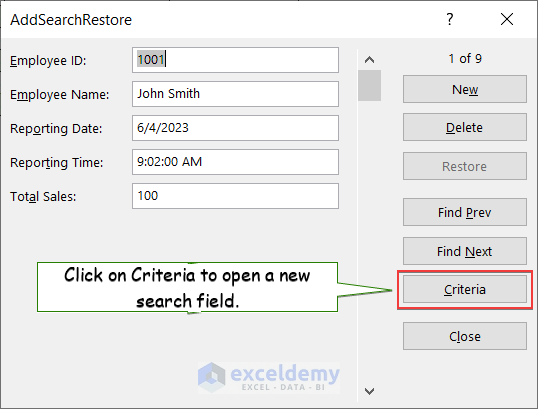
- We can search in the worksheet using the data entry form.
- Click on Criteria to open a new search field.
- Type the search keyword (1007 in this case) and click on Find Next.
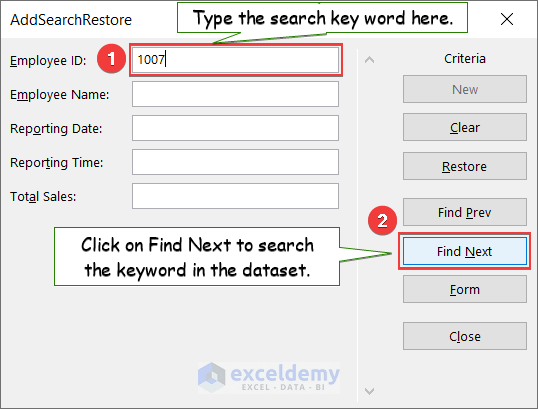
- As a result, we can see the search result in the data form which is an exact match with the worksheet dataset.

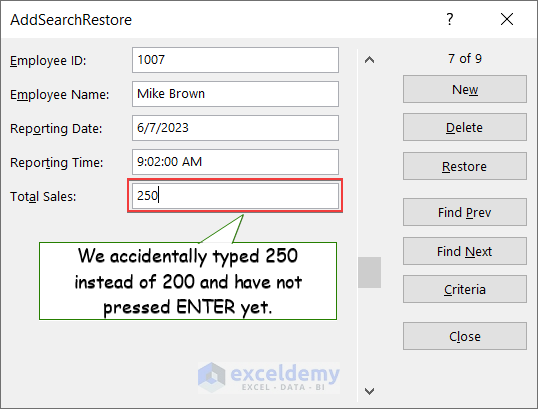
- We can update the cell values of the worksheet using the data entry form.
- For example, we need to update the Total Sales value against the Employee ID 1007.
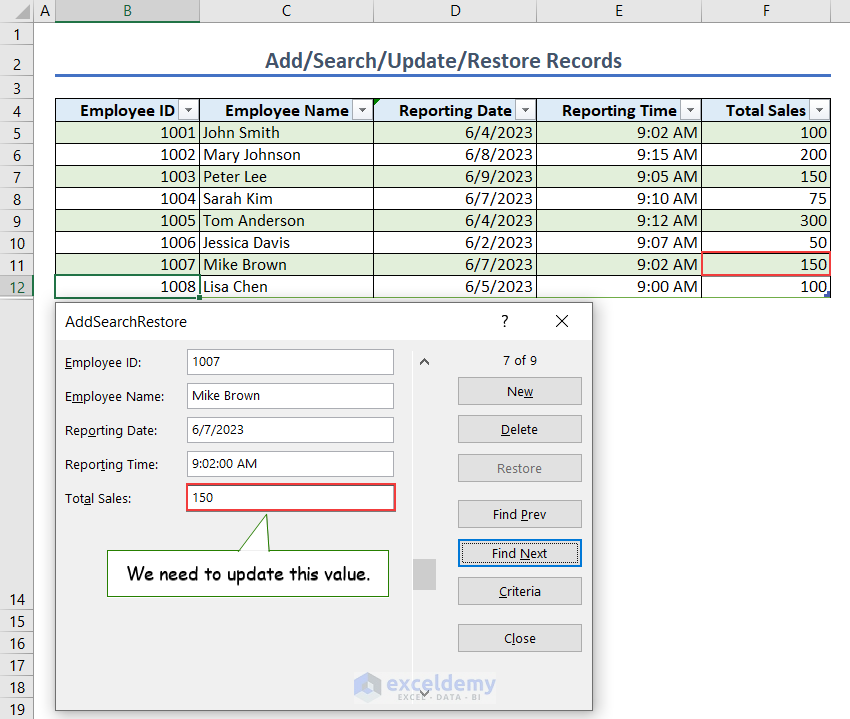
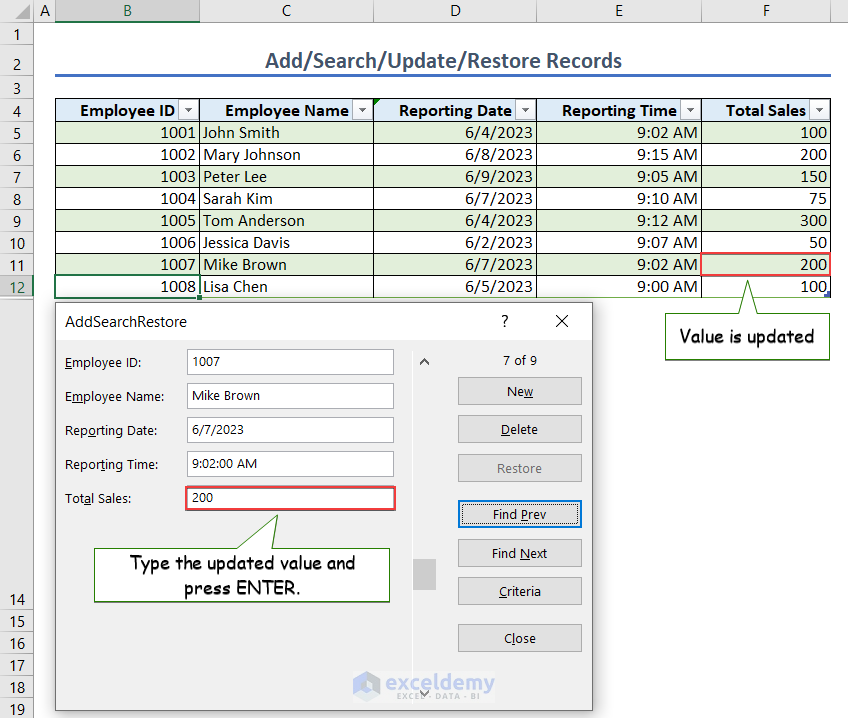
- Select the old value, type the new value and press ENTER to update the value in the worksheet.
- We can see that the value is updated in the worksheet.
- We can also restore the previous value if we need unless we have pressed the ENTER key.
- Click on Restore to restore the initial value.
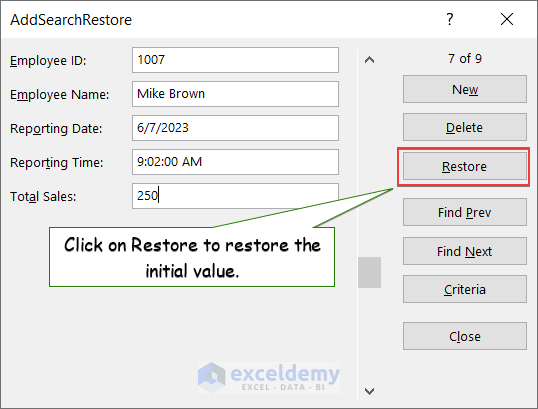
- As a result, the initial value is restored.

4. Data Validation in Data Entry Form
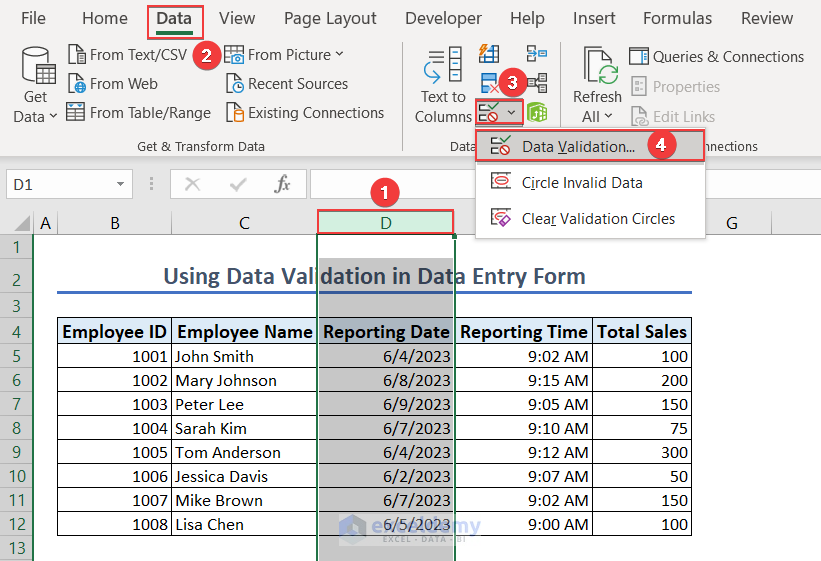
We can use data validation in a data entry form. But to do so, we need to add the data validation before even turning the dataset into a table.
- Select the column where we need to add the data validation (column D in this case), navigate to Data, and select Data Validation as shown in the following image.
- We need to restrict the date to the year 2023 only.
- So, select Settings accordingly as shown in the following image, and finally navigate to Input Message.
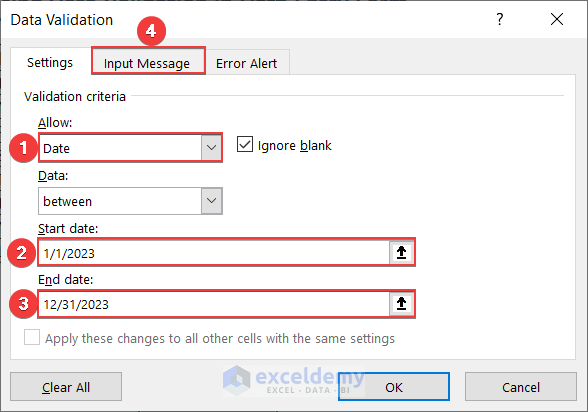
- Type the Title and the Input message properly and go to Error Alert.
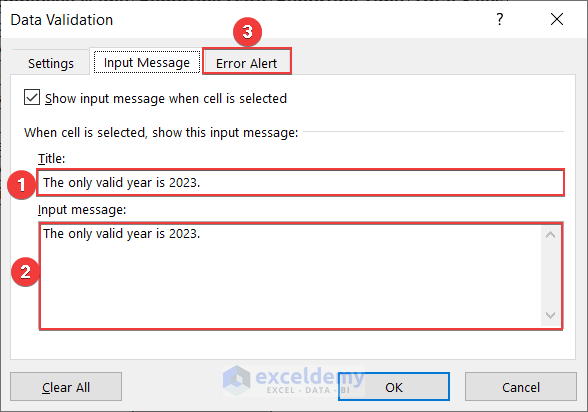
- Type the Title and Error message here too and click on OK to add the data validation.

- Now create a data entry form following the steps we have described before.
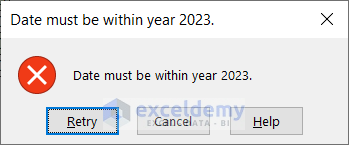
- After that, to check whether the data validation is working or not, change the year of a record to 2022 and press ENTER.
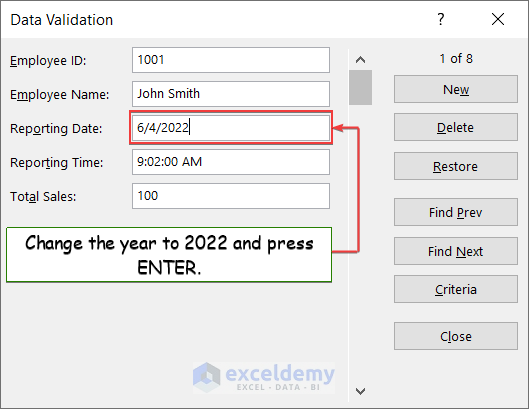
- As the year is not 2023, so an error message popped up.
- This means the data validation is working properly.
5. Formulas in Data Entry Form
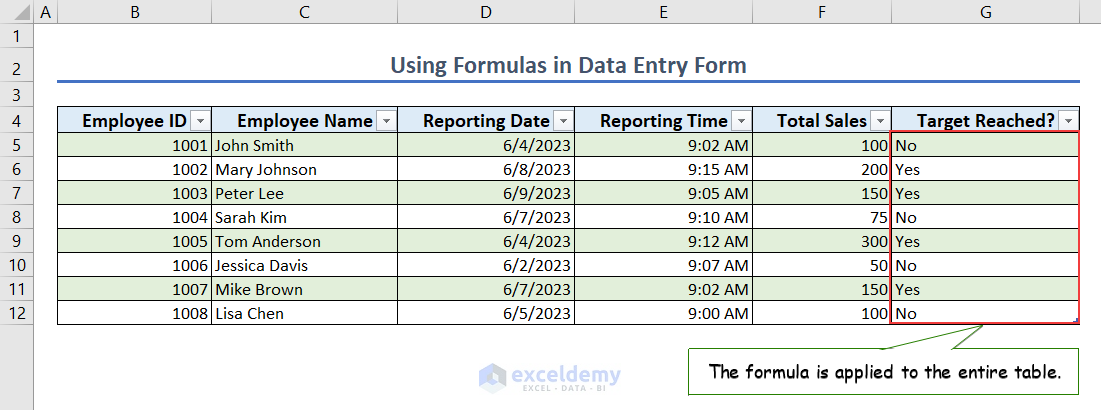
We can use formulas in the data entry form. For example, the sales target is greater than 100 and we want to check whether the employees reached the sales target or not.
- Type the following formula in cell G5 and press ENTER.
=IF([@[Total Sales]]>100,"Yes","No")
- As a result, the whole “Target Reached” column will have the same formula.
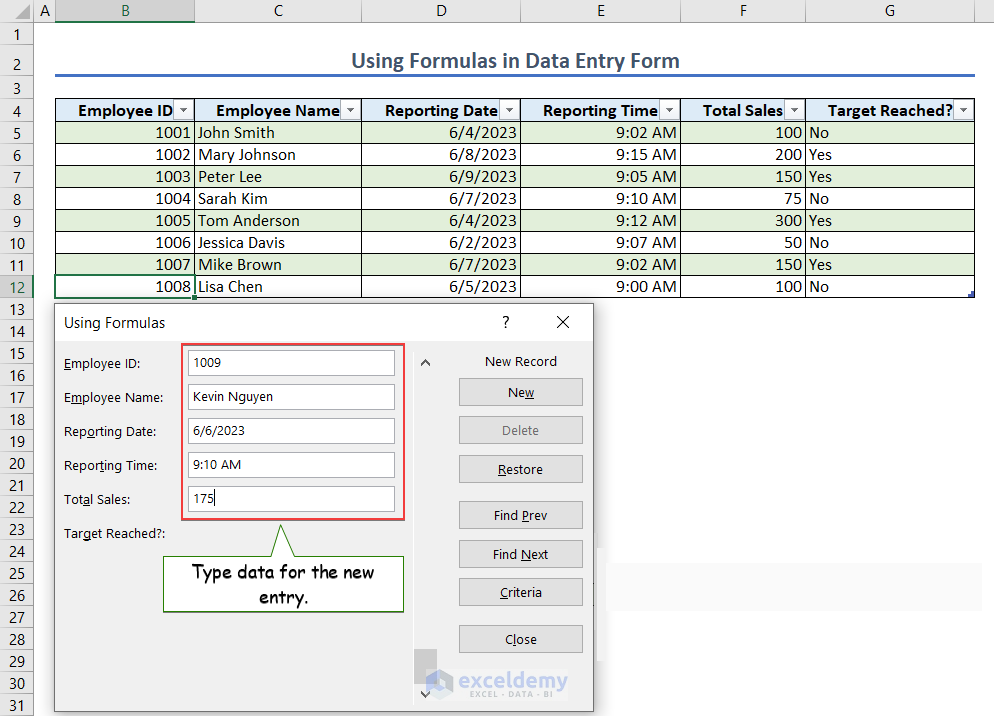
- Now select cell B12 and click on Form to open the data entry form.
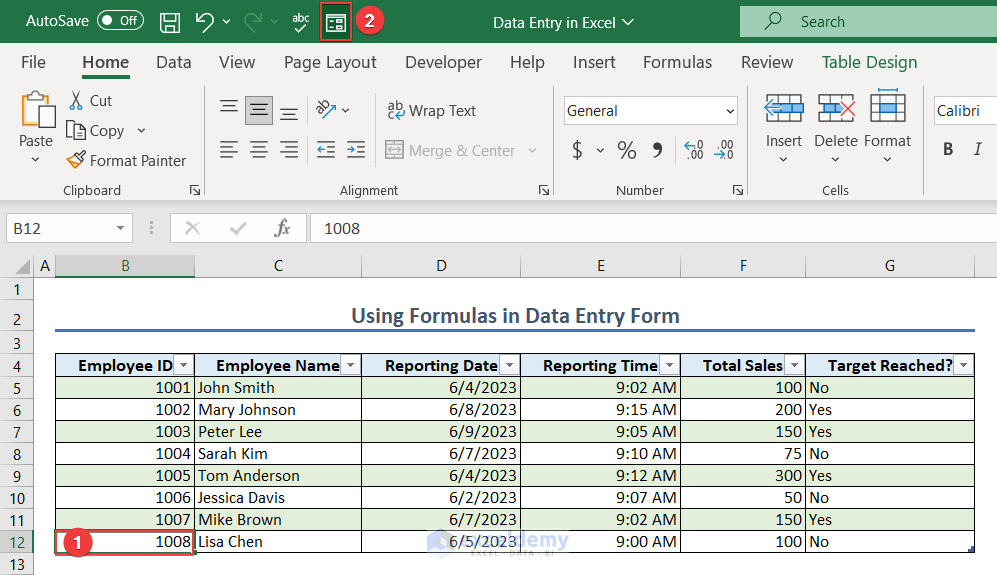
- Click on New so that we can insert new data.

- Type the data for the new entry and press ENTER.
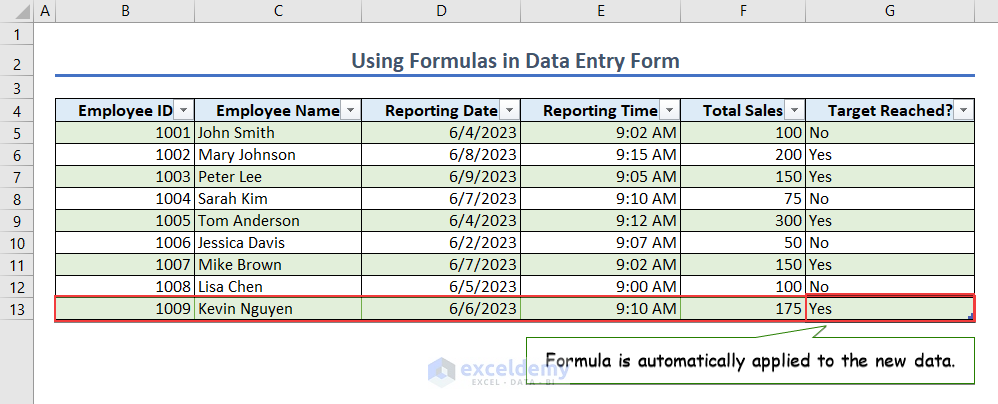
- As a result, the new data is inserted in the worksheet, and Target Reached is calculated automatically using the formula.
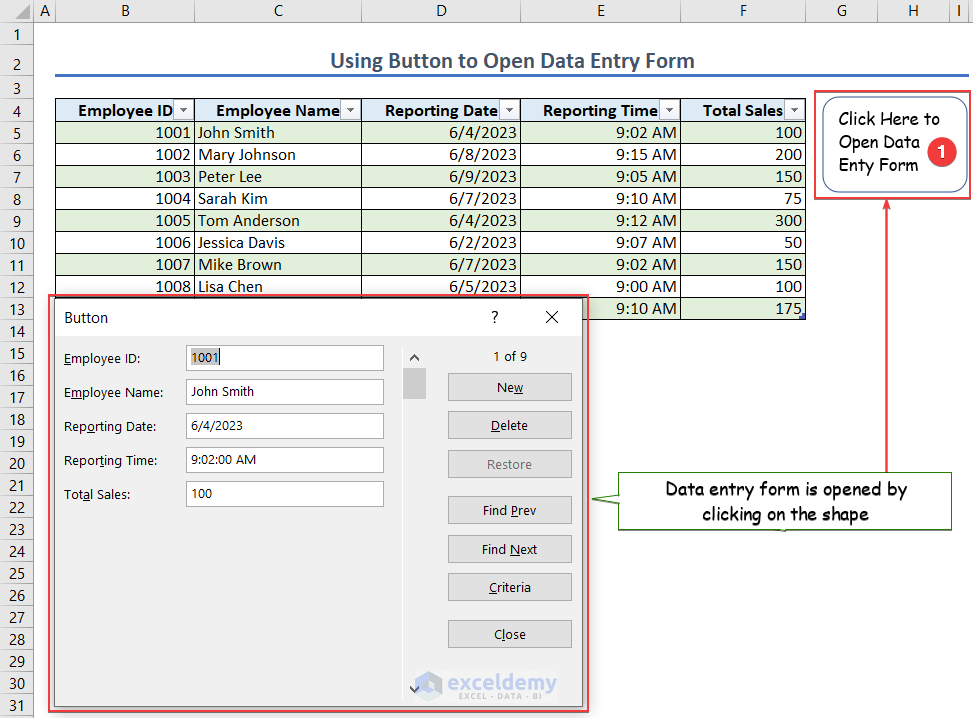
6. Open the Data Entry Form Using a Button
To open the data entry form, we need to click on any cell of the dataset and then select the Form option. This process works, but it will be more convenient if we assign a button so that whenever we click on that button, the data entry form opens.
- Right-click on the worksheet named Button and select View Code to open the code window.
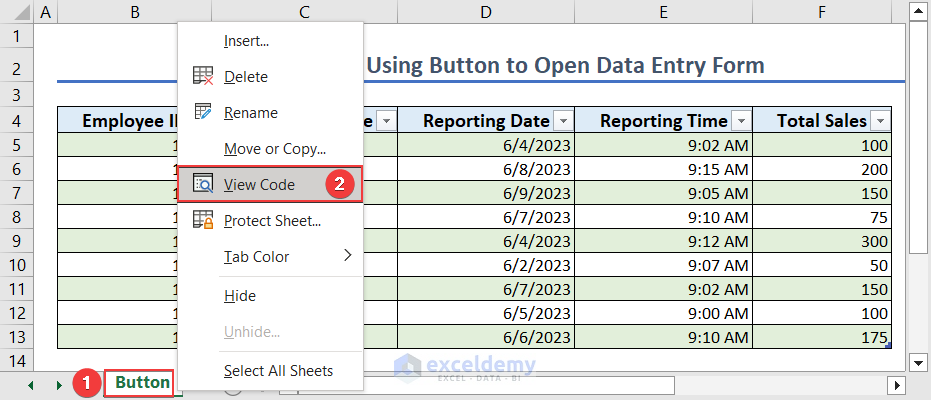
- Type the following code in the code window to open the data entry form.
Sub DataEntryFormOpening()
Dim namedRange As Range
Dim nameObj As Name
Set namedRange = Range("B4").CurrentRegion
ThisWorkbook.Names.Add Name:="Database", RefersTo:=namedRange
ActiveSheet.ShowDataForm
For Each nameObj In ThisWorkbook.Names
If nameObj.Name = "Database" Then
nameObj.Delete
Exit For
End If
Next nameObj
End Sub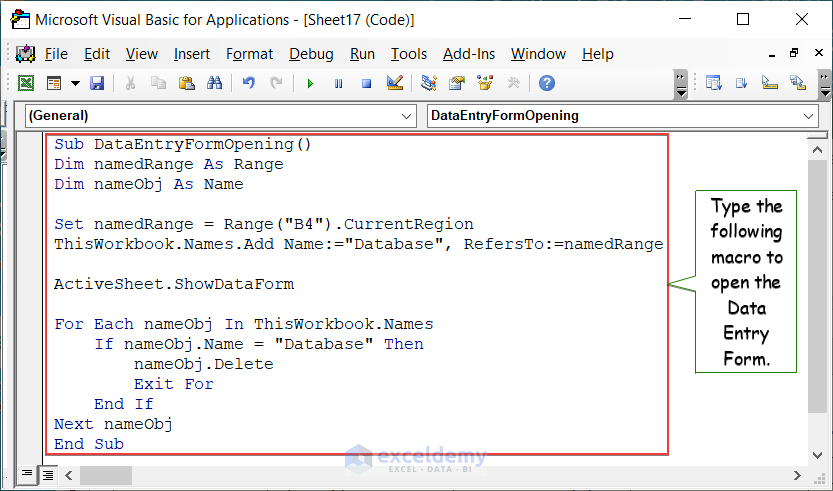
- Note this macro works when we assign Database as the namedRange.
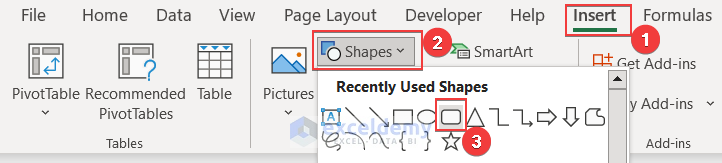
- Now go to Insert >> Shapes and select a shape as shown in the following image to insert a shape in the worksheet.
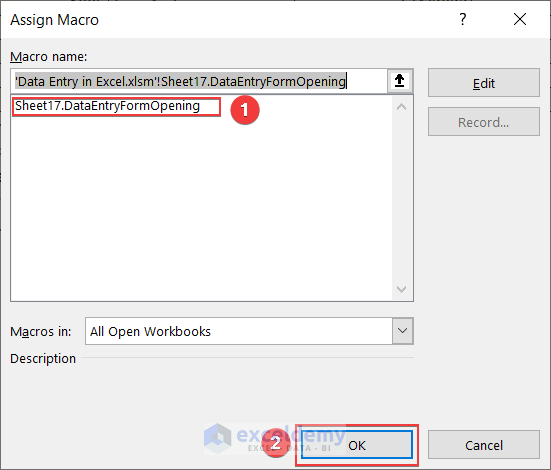
- Right-click on the shape and select Assign Macro.
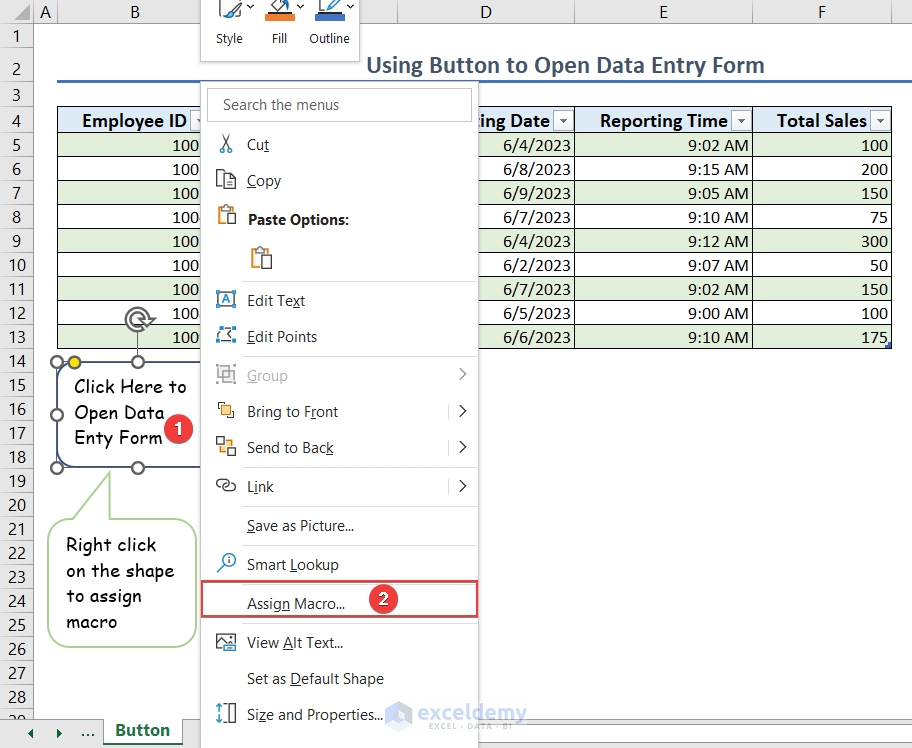
- Select the macro name and click on OK so that whenever we click on the shape, the data entry form opens.
- Click on the shape now to check if it works properly.
- We can see from the following image that it is working perfectly and the data entry form is opened.
7. Issues Regarding Data Entry Form
There are some issues regarding the data entry form. We will discuss how to check for data entry errors and the fixes here.
- Too Many Fields in Data Form
If there are more than 32 column headers in the dataset, then when we try to add a data entry form, this error message pops up.
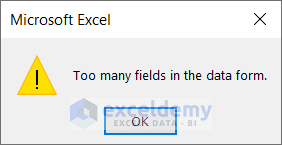
Solution: We can use the dataset with a maximum of 32 column headers to fix this issue.
- Cannot Extend Table or Database
If there is data immediately where the table ends, and if we try to add new data using the data entry form, this error message shows up.
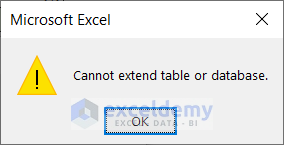
Solution: We need to keep at least one blank row after the table ends to fix this issue.
- Wrong Cursor Positioning
If we select a cell outside the table and click on Form, then this error happens.
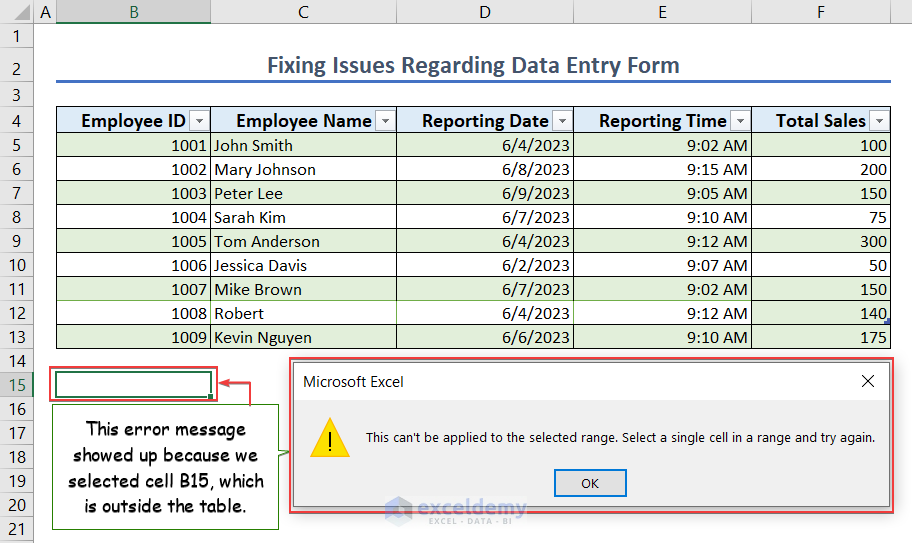
Solution: We need to select a cell of the table and then click on the Form to avoid this error.
- Database or Table Range is Not Valid
This error happens if there is a named range in the workbook named database.
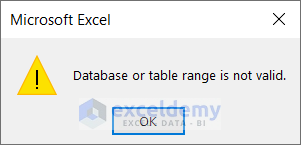
Solution: We need to change the named range name to anything but the database to fix this error.
How to Create Microsoft Forms
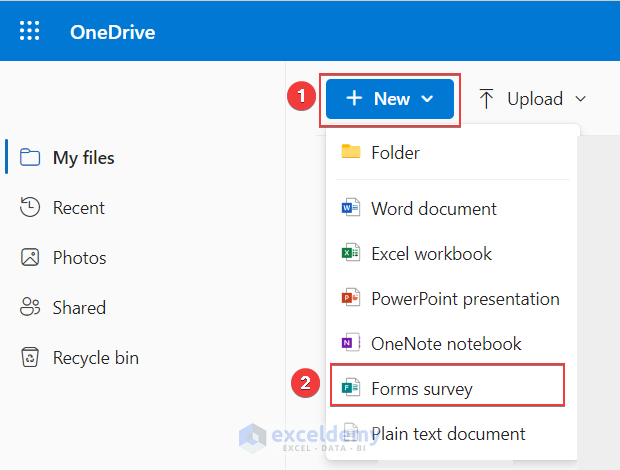
We can create Microsoft Forms for a seamless data entry experience. If we need to collect data from a group of people, we can create a Microsoft Form and share the form link with the set of people.
- In OneDrive, go to New >> Forms survey.
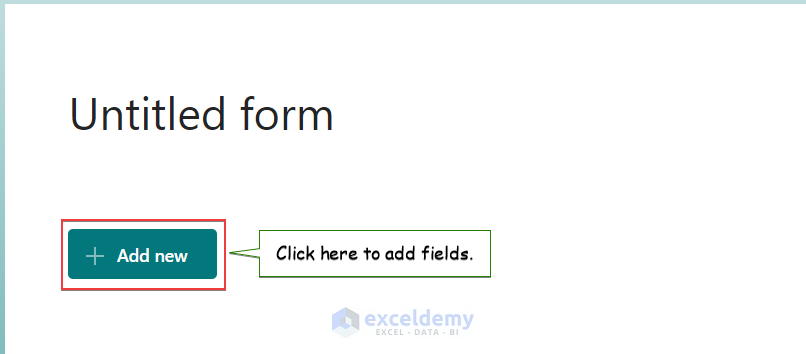
- Click on Add new to add fields.
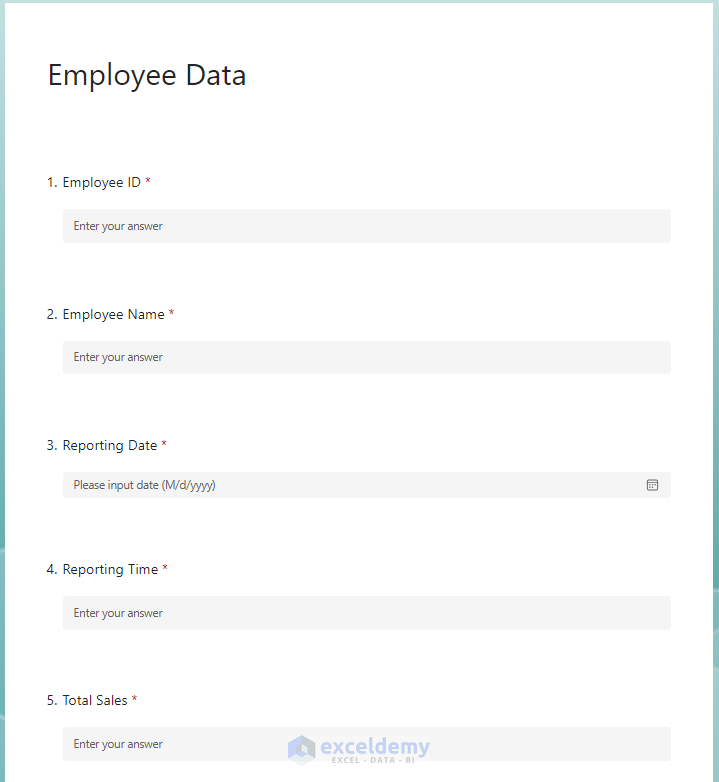
- Create the forms accordingly. The form looks like this.
- Click on the Collect responses option and Copy link to copy the link so that you can share them with the concerned group of people.

- Click on Responses to view the responses.

- We can see the response details. Click on Open in Excel to open the responses in an Excel file.
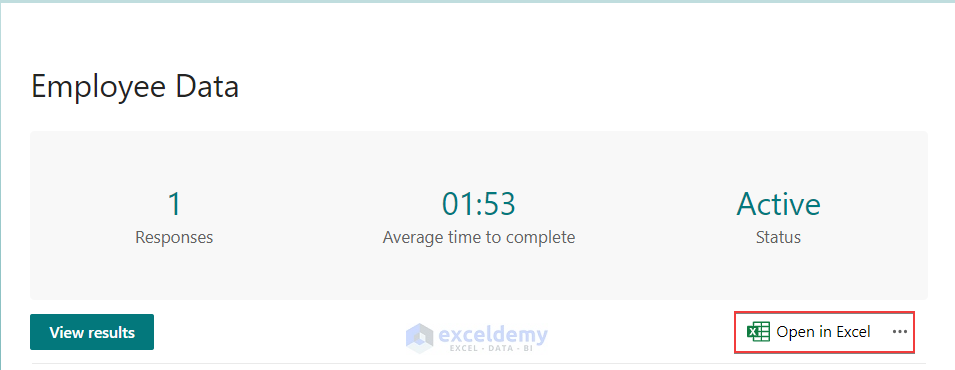
- We can see the collected response in the Excel file.

In this manner, we can create and use Microsoft Forms for data entry purposes.
Things to Remember
- Create a table including all the column headers of the dataset.
- Apply formulas before creating the table.
- Use “database” or “Database” as the named range in the VBA code.
Frequently Asked Questions
1. What are the types of entries in Excel?
There are four types of data entry in Excel. They are text, number, logic, and error.
2. How many entries are in Excel?
You can use the COUNT function to get the count of entries in a dataset.
3. How many cells are in Excel?
There are 17,179,869,184 cells per worksheet in Excel.
Conclusion
In this article, we have discussed everything about data entry in Excel. We have covered the popular data types and various kinds of formatting. We also discussed the Data Entry Form in detail here. The discussion also includes the fixes of issues with the data entry form. With a little bit of practice, we believe, you can master data entry in Excel if you have properly followed this article. If you face any difficulties implementing this, please let us know in the comment section. Team Exceldemy will be there to help you out. Have a good day!
Data Entry in Excel: Knowledge Hub
- How to Automatically Insert Timestamp Data Entries in Excel\
- How to Create a Data Log in Excel
- How to Record Time of Data Entry in Excel
<< Go Back to Learn Excel

