In this Excel tutorial, you will learn
– About the default options in the status bar that appear whenever you open the Excel application
– How to customize the status bar according to your needs
– About other lesser-known options of the status bar
– To solve the problem of the status bar not showing
I have used Microsoft 365 to show you this Excel feature. However, you can find the features used in this tutorial in Excel 2021, Excel 2019, Excel 2016, Excel 2013, Excel 2010, and Excel 2007 versions as well.
The status bar in Excel provides essential information and quick insights into the worksheet. It comes in very handy in the case of monitoring cell modes, performing quick calculations, keeping track of keyboard lock status, etc.
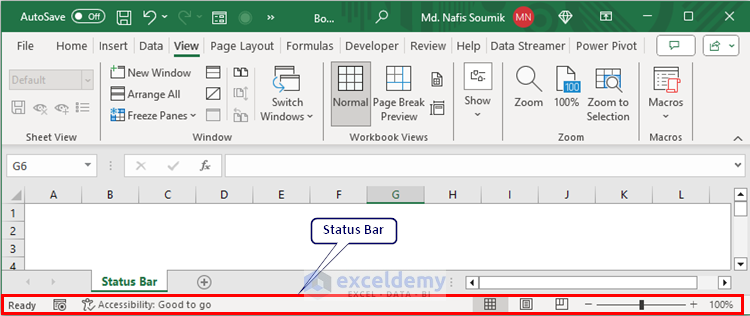
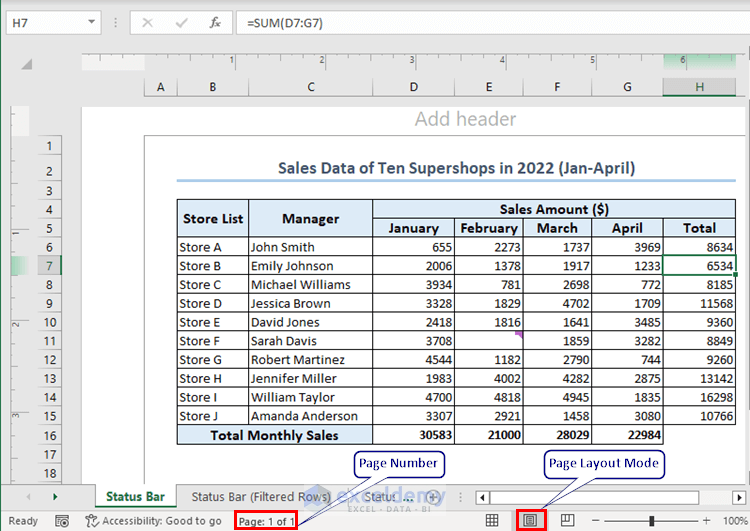
The following overview image shows the location of the status bar in an Excel workbook.
⏷Excel Status Bar and Its Location
⏷Default Options in Excel Status Bar
⏵Cell Mode
⏵Macro Recording Icon
⏵Accessibility Check
⏵Workbook Views
⏵Zoom-in Zoom-Out Icons and Zoom Slider
⏵Page Number
⏵Statistical Data for the Selected Range
⏷Customize Status Bar
⏷Other Options in Excel Status Bar
⏵Workbook Statistics
⏵Sheet Number
⏵Caps Lock, Num Lock, Scroll Lock
⏵Summary Statistics for the Selected Range
⏵Number of Flash Fill Changed Cells
⏵Number of Filtered Rows
⏵Comment Location & Author Name
⏷Copy Sum from Excel Status Bar
⏷Causes and Solutions for Excel Status Bar Not Showing
⏷Things to Remember
⏷Frequently Asked Questions
⏷Knowledge Hub
What Is Status Bar in Excel and Where It Is Located?
The status bar is a horizontal bar, located at the bottom of the Excel window. It displays useful information and quick access to settings and features in Excel. Its location may vary depending on the Excel version and your computer setup.
What Are the Default Options in Excel Status Bar?
The default options in the Status Bar are mentioned below:
1. Cell Mode
Cell Mode indicates the editing mode in Excel. There are four types of cell modes. We’ll explain them below.
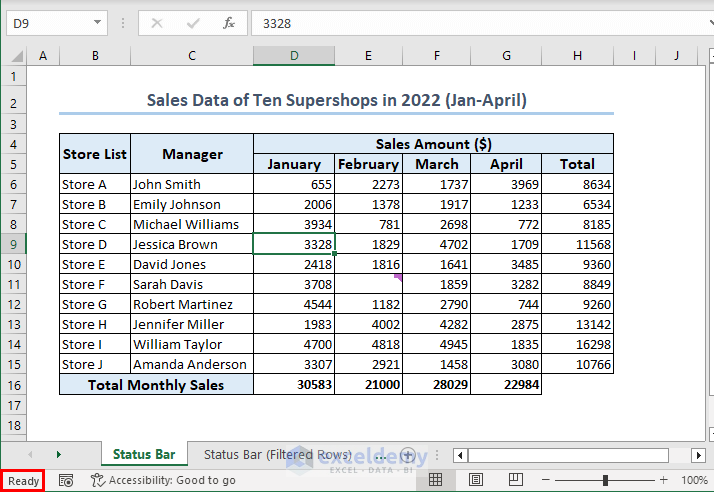
1.1. Ready
In Excel’s Ready mode, the status bar indicates that you’re in the standard navigation state. This mode is the default cell mode. This allows you to move around the spreadsheet, select cells, and perform various tasks without directly modifying cell content.
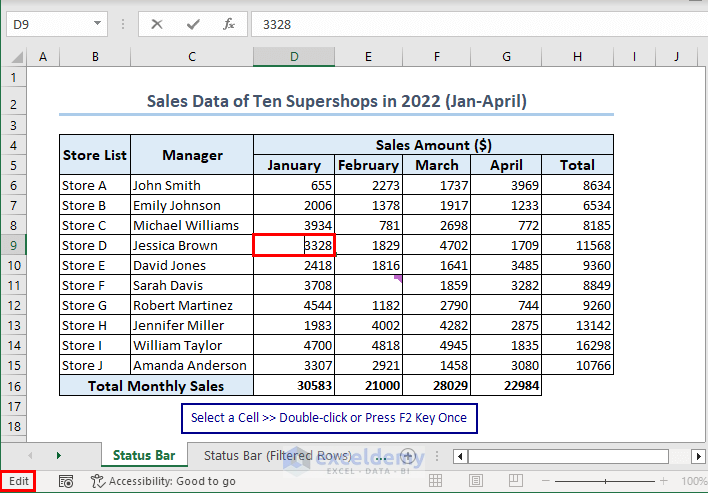
1.2. Edit
When the status bar shows Edit, you’re in a mode where you can directly modify the content of the selected cell. This is useful for quickly updating cell values or entering text without navigating to the formula bar.
- To enable this mode, select any cell >> Double-click on it or press the F2 key once. This enables Edit mode.
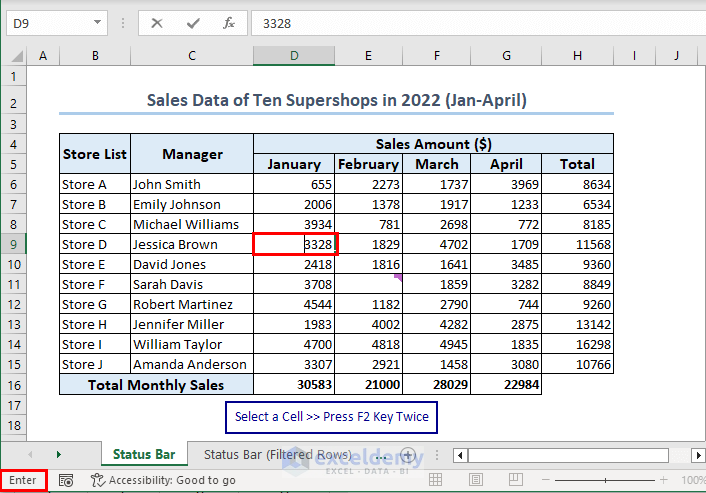
1.3. Enter
Similar to the Edit mode, Enter mode allows cell modification. However, a slight distinction arises when using arrow keys:
In Edit mode, they navigate within the cell, while in Enter mode, they move to neighboring cells. Double press the F2 key to activate Enter mode.
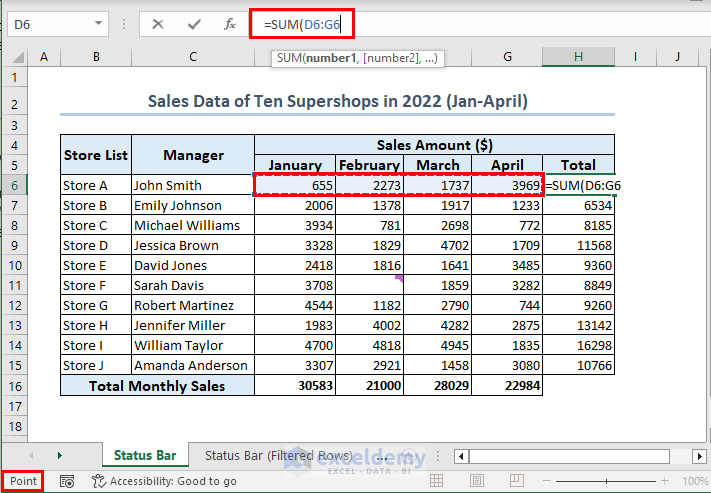
1.4. Point
The Point mode becomes visible on the status bar when you input a formula into a cell that references another cell within that formula.
2. Macro Recording Icon
The macro recording icon in the Excel status bar signifies the availability of the macro recording feature. When this icon is active, Excel can record your actions and translate them into VBA (Visual Basic for Applications) code, enabling automation and repetition of tasks.
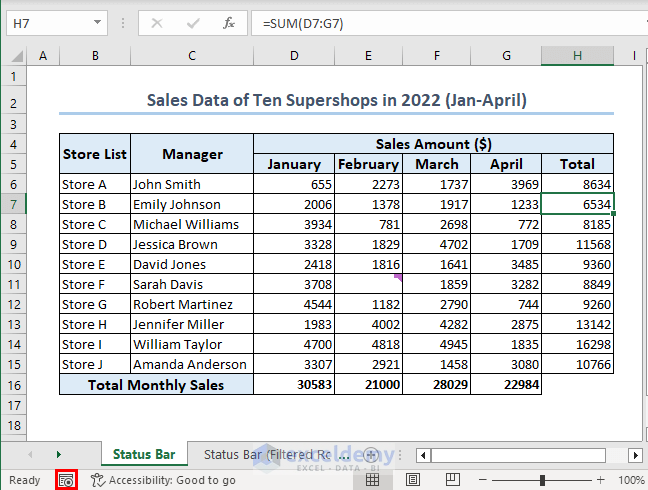
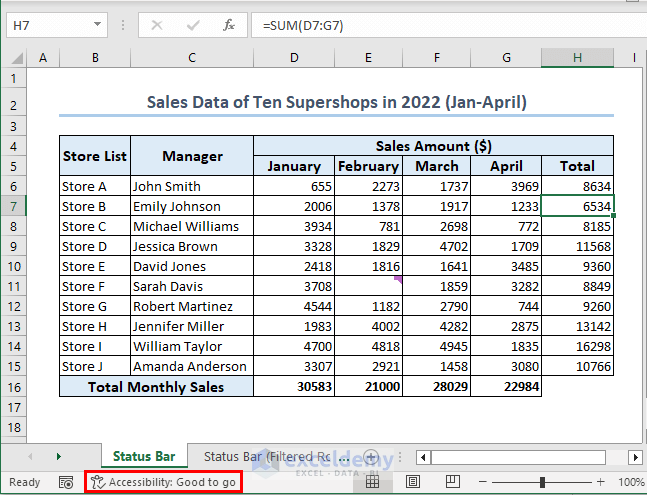
3. Accessibility Check
The Accessibility Check feature in the status bar serves as a powerful tool to enhance inclusivity and usability. It enables users to identify and address potential accessibility issues in their spreadsheets, ensuring that the content is usable by a wider audience.
When you click on the Accessibility feature on the status bar, a panel named Accessibility opens on the right side of the workbook. If no issue is found, it will display the information shown below:
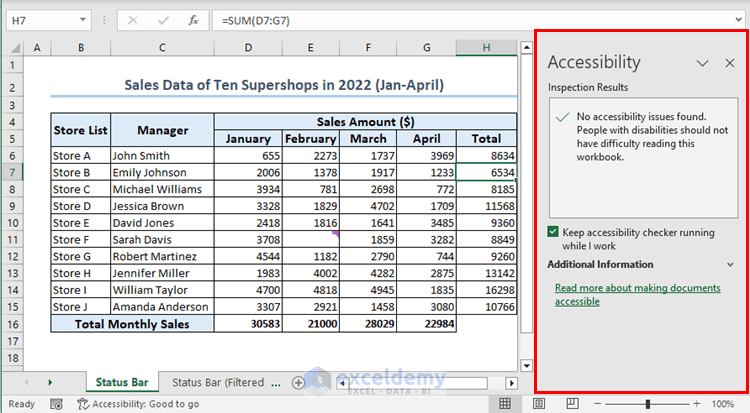
There could be 2 outcomes of the accessibility test for any Excel workbook. They are:
1. Accessibility: Investigate – The Investigate state is triggered when the Accessibility Check identifies potential accessibility issues in the workbook. You should review and address these issues to improve accessibility and ensure compliance with accessibility standards.
2. Accessibility: Good to go – This state occurs either when the Accessibility Check finds no significant accessibility issues or the previous issue(s) is solved in the workbook. It means the document is in compliance with accessibility standards and is considered accessible for users with disabilities.
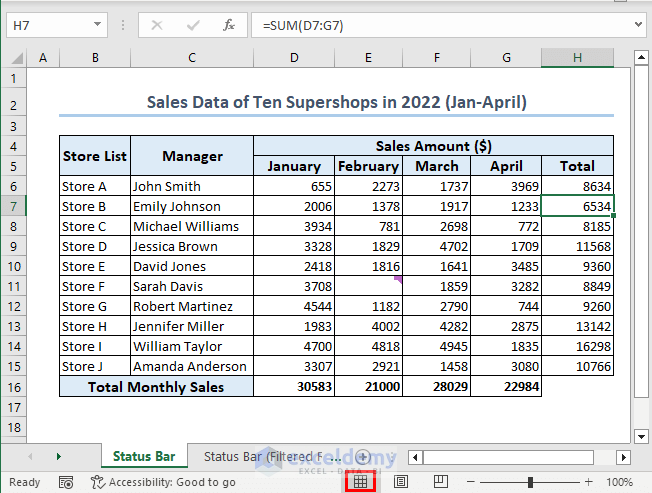
4. Workbook Views
Excel offers three different workbook views. They are:
4.1. Normal
Normal view is the standard workbook view that most users are familiar with. It displays the worksheet with cells, columns, and rows. This view is optimal for general data entry, formatting, and calculations.
4.2. Page Layout
Page Layout view provides a more accurate representation of how the content will appear when printed. It allows users to adjust page margins, headers, footers, and other layout elements to ensure that the printed document looks as intended.

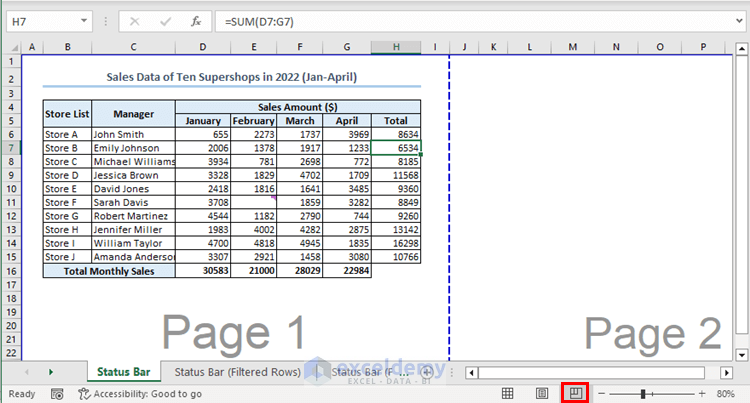
4.3. Page Break Preview
Page Break Preview offers a visual representation of page breaks, helping users optimize the layout for printing. It allows you to adjust row and column heights to fit content onto printed pages more effectively.
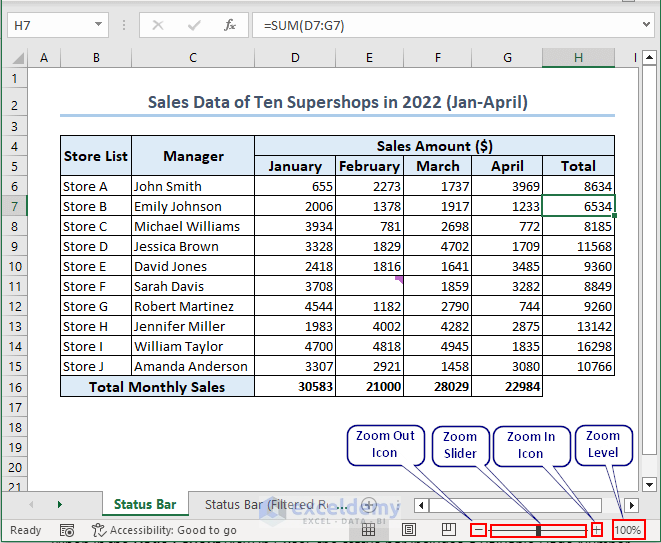
5. Zoom-in Zoom-Out Icons and Zoom Slider
We have a few zoom options available in the Excel status bar.
5.1. Zoom Out Icon
The Zoom Out icon, often represented as a minus (-) sign, is a tool in Excel that allows users to decrease the magnification level of the worksheet. Clicking on this icon helps fit more content on the screen when dealing with larger datasets.
5.2. Zoom In Icon
The Zoom In icon, often represented as a plus (+) sign, serves the opposite purpose of the Zoom Out icon. It lets users increase the magnification level of the worksheet, making it easier to focus on specific details or fine-tune formatting.
5.3. Zoom Slider
The Zoom Slider is a dynamic tool located in the status bar that permits users to adjust the magnification level of the worksheet. By dragging the slider left or right, users can smoothly zoom in to see more detail or zoom out to get a broader view of their data.
5.4. Zoom Level
The Zoom Level indicates the current magnification percentage of the worksheet. It’s displayed on the right side of the status bar. Users can click on the Zoom Level value to access a dropdown menu and select predefined zoom percentages, or they can directly input a specific percentage to quickly adjust the view.
6. Page Number
When in the Page Layout view in Excel, the status bar includes a valuable Page Number indicator. This indicator displays the current page number you’re viewing within the layout, giving you immediate feedback on your position in the document.
This feature is particularly useful for navigating lengthy worksheets that are intended for print. It also ensures precise control over content placement and alignment across different pages.
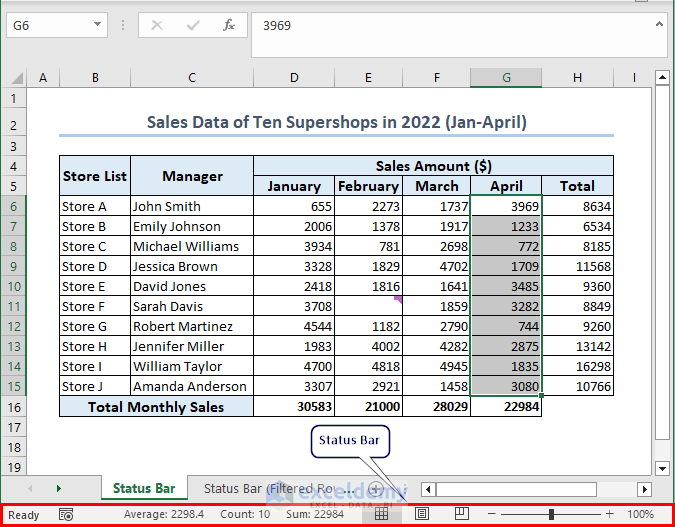
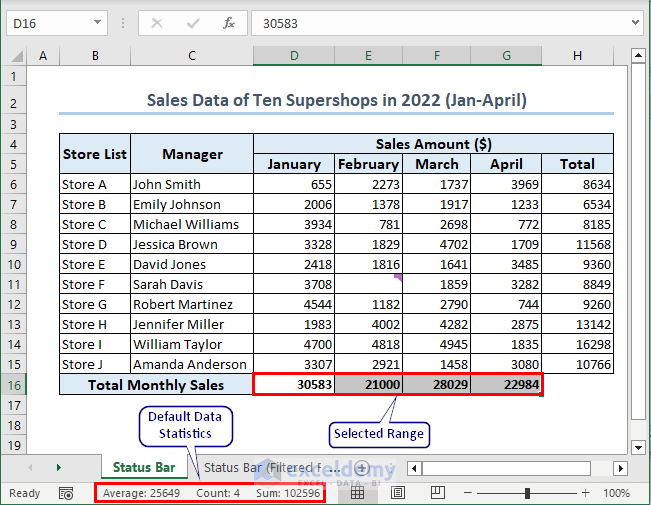
7. Data Statistics for the Selected Range
Whenever you select a range of cells, Excel will show basic data statistics related to the range.
7.1. Average
The Average statistic displayed on the Excel status bar shows the arithmetic mean of the selected numerical values within the active range. It provides a quick insight into the central tendency of the data, helping users understand its typical value.
7.2. Count
The Count statistic indicates the total number of cells that contain values within the selected range. This gives an immediate overview of the quantity of data points present.
7.3. Sum
The Sum statistic showcases the total sum of numerical values within the selected range. It’s useful for quickly calculating the cumulative value of a set of numbers.
How to Customize Status Bar in Excel?
To customize the status bar,
- Right-click anywhere on the Status Bar.
- A context menu titled Customize Status Bar will pop up. There you can see various options.
If you click on an already checked option, it gets unchecked and will not appear on the status bar. Similarly, if you click on an option that is not checked, it gets checked and will appear on the status bar.
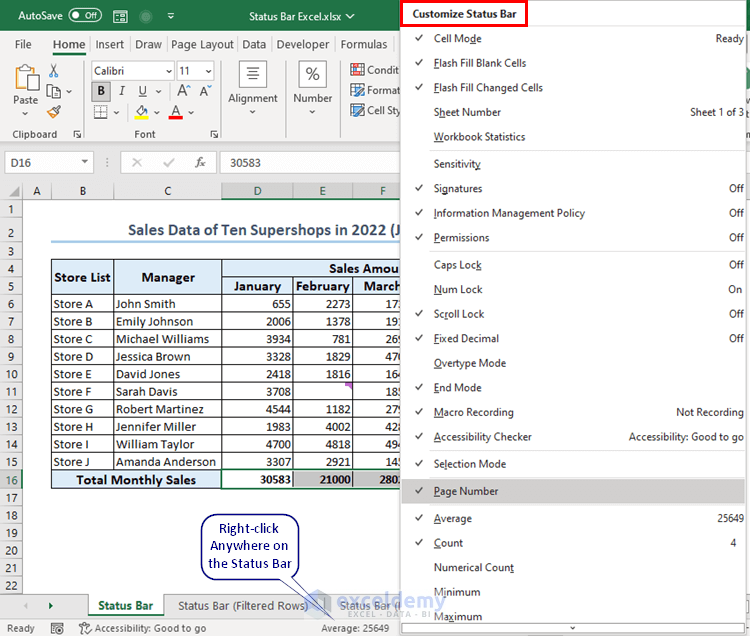
Now let us check some of the unchecked options that are essential in most of the cases while using Excel.
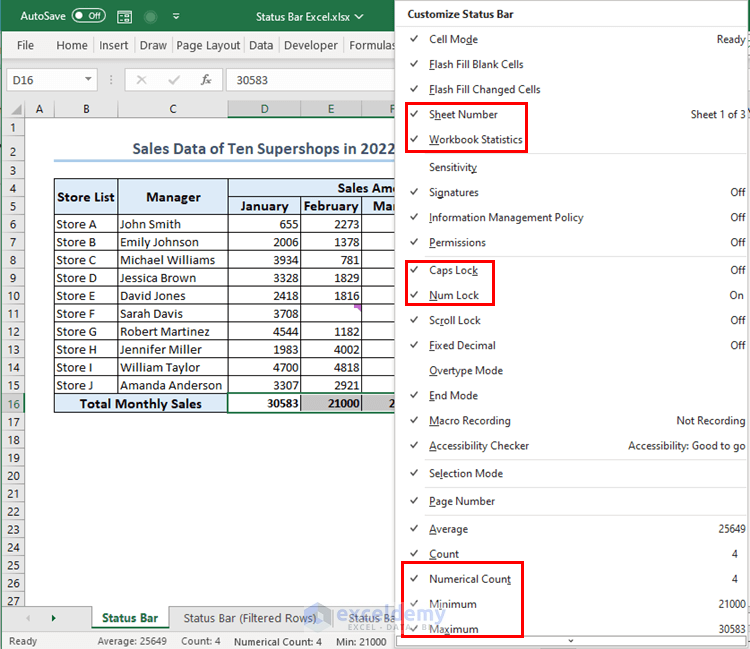
What Are Some Other Options of Excel Status Bar?
There are multiple options in the status bar that are worth mentioning for their contribution to making your work easier. Some of them are:
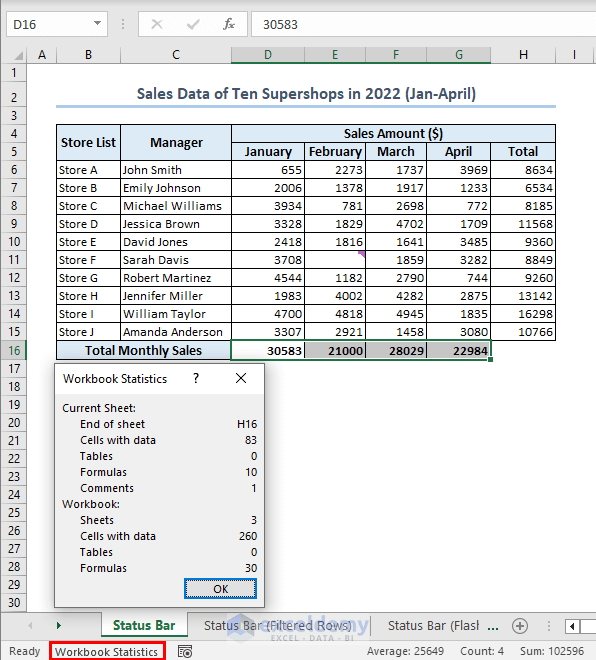
1. Workbook Statistics
Excel allows you to personalize the status bar by showing specific statistics related to the entire workbook.
- Click on the Workbook Statistics button inside the status bar.
A new window will pop up holding different information regarding the current worksheet & workbook such as Sheets, Cells with data, Tables, Formulas, etc. This customization provides immediate insights into workbook-level details without the need for extensive navigation.
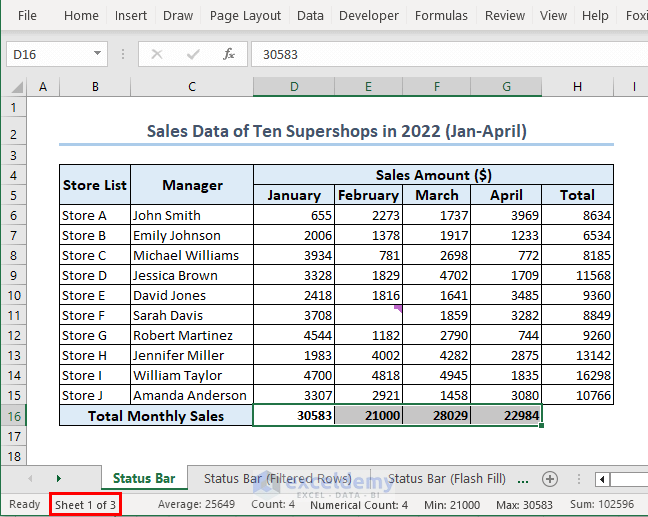
2. Sheet Number
Users can opt to display the sheet number on the status bar. This feature is particularly useful when working with multiple sheets within a workbook as it helps to track your position.
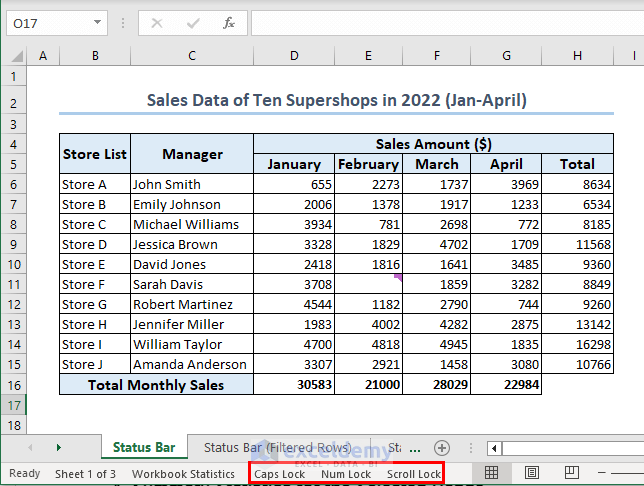
3. Caps Lock, Num Lock, Scroll Lock
The status bar also includes indicators for keyboard locks, including Caps Lock, Num Lock, and Scroll Lock. These indicators are useful reminders to ensure the correct input settings while working on your spreadsheets.
- Caps Lock: When checked, the letters are typed in the uppercase only.
- Num Lock: When turned on, you can use the number keypad of the keyboard. Otherwise, the number keypad will function as the navigation arrow.
- Scroll Lock: Locks the screen and thus you can’t scroll. Turn this on from your keyboard, and if your keyboard lacks the key, use the on-screen keyboard.
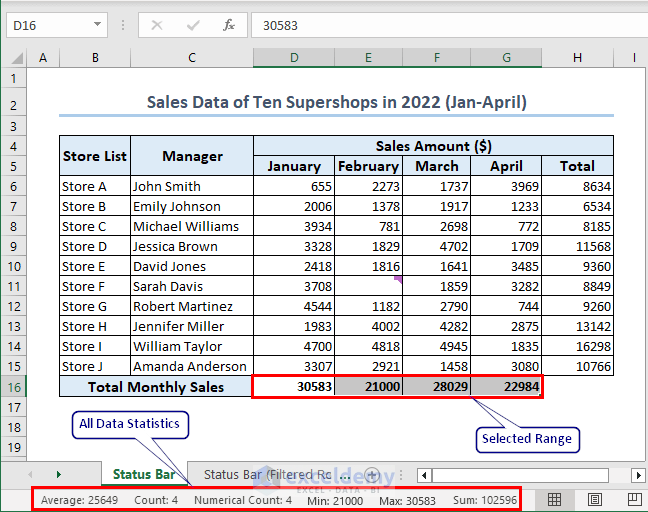
4. Summary Statistics for the Selected Range
We have a few statistical indicators in the Excel status bar that can help summarize the active dataset. Among these statistical indicators, we have described the Average, Count, and Sum indicators in the previous section. Here, we will discuss the remaining indicators.
4.1. Numerical Count
Numerical Count is similar to the standard Count, but it specifically tallies cells that contain numerical values. This helps users quickly assess the extent of numeric data without including non-numeric entries.
4.2. Min
The Min statistic, short for “Minimum”, reveals the lowest numerical value within the selected range. It’s beneficial for identifying the smallest data point in a dataset.
4.3. Max
The Max statistic, short for “Maximum”, displays the highest numerical value within the selected range. This assists in identifying the largest data point in the dataset.
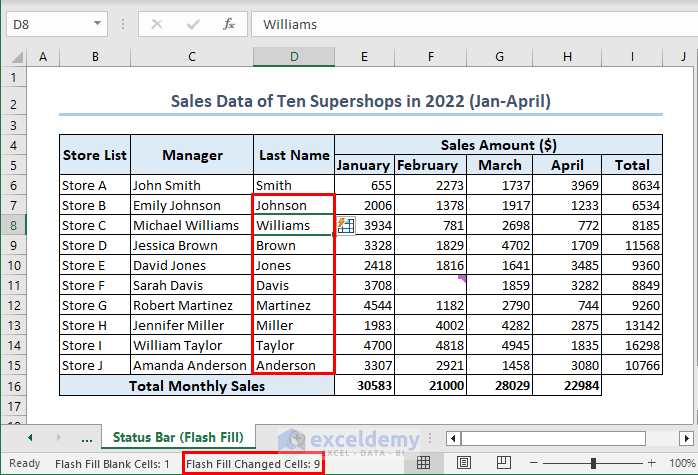
5. Number of Flash Fill Changed Cells
The Excel Status Bar can display the count of cells that have been automatically modified by the Flash Fill feature.
To show you this feature, we’ll extract the last names of the managers:
- Write the last name of the first manager manually in cell D6.
- Then, inside cell D7, type the first letter (J) of the second manager’s last name.
You can see that all the cells inside the D column are ready to be filled with corresponding last names.

- Press ENTER.
Range D7:D15 are now filled with corresponding last names. At the same time, you can see the number of Flash Fill Changed Cells inside the status bar.
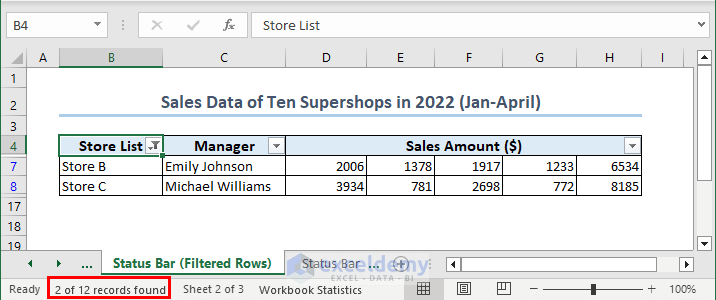
6. Number of Filtered Rows
When data is filtered in Excel, the Status Bar indicates the number of rows that match the filter criteria.
After adding filters to the dataset,
- Click on the filter icon beside any of the cells containing column names.
- Keep the required fields checked and uncheck the rest of the fields.
- Click on OK.
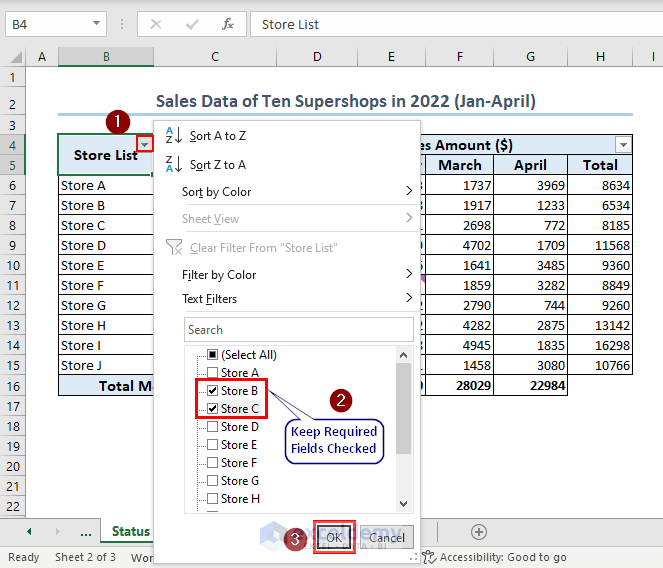
Only the rows containing information about store B and store C are now visible. And you can see the number of filtered rows inside the status bar.
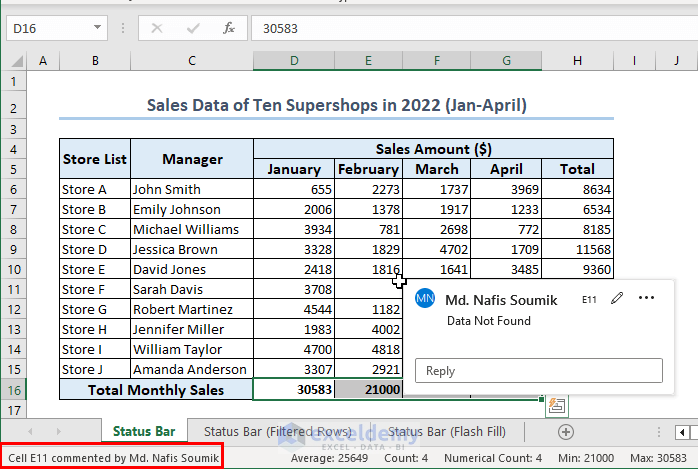
7. Comment Location & Author Name
In Excel, when you hover over a cell containing a comment, the Status Bar reveals the author’s name and the cell location of the comment. This assists in attributing comments to specific individuals, making collaborative work and communication more organized and transparent.
Now let us look at the table below to see some other miscellaneous options of the Excel Status Bar:
| Option Name | Status: Checked | Status: Unchecked |
|---|---|---|
| Signatures | Indicates that the active workbook has been digitally signed. | Does not show anything. |
| Information Management Policy | Indicates that Information Rights Management (IRM) has been used to restrict permission to content in the active workbook. | Does not show anything. |
| Permissions | Displays an icon next to the Cell Mode indicator that you can click to view the current read and edit document permissions. (Restricted document) | Does not show anything. |
| End Mode | Displays End Mode to indicate that END was pressed to activate end mode. | Does not show anything. |
| Selection Mode: Extend Selection | Displays Extend Selection when you press F8 to extend the cell selection by using the arrow keys. | Does not show anything. |
| Selection Mode: Add or Remove Selection | Displays Add or Remove Selection when you press SHIFT+F8 to add a nonadjacent cell or range to a selection of cells by using the arrow keys. | Does not show anything. |
| Upload Status | Indicates the upload status of the spreadsheet to the web. | Does not show anything. |
| View Shortcuts | Displays the Normal view, Page Layout view, and Page Break Preview buttons. You can click these buttons to change the current view. | Does not show anything. |
| Fixed Decimal | Displays Fixed Decimal to indicate that all numerical values that you enter on the worksheet will be displayed with fixed decimals if it is turned on. | Does not show anything. |
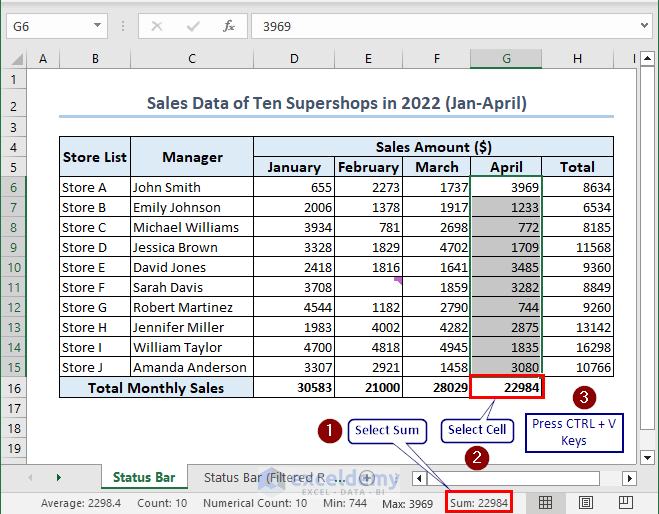
How to Copy Sum from Excel Status Bar?
To copy the sum that you see inside the status bar:
- Click on the Sum button inside the status bar.
- Select a cell to place the sum value.
- Press CTRL + V.
The desired sum is visible inside the cell of your choice. Similarly, you can copy other statistical data from the Excel status bar as well.
What Causes Status Bar from Not Showing in Excel and How to Fix It?
Possible Causes
- Full-Screen Mode: The status bar may have vanished because your workbook is set to full-screen mode. To give you more screen space, Excel conceals the status bar in this mode.
- Status Bar Hidden: The status bar being hidden is another potential contributing factor.
- Full-Screen Reading View: Another potential reason could be that Excel is in full-screen reading view if you’re using Excel 2013 or later versions. The status bar is by default hidden in this view.
Solutions
- Exit Full-Screen Mode: Simply hit the “Esc” key on your keyboard to leave full-screen mode.
- Unhide Status Bar: If the status bar gets hidden somehow, press CTRL + SHIFT + F1 keys to unhide it.
- Exit Full-Screen Reading View: Click the “Close Full Screen Reading” button in the top-right corner of the screen to leave the full-screen reading mode.
- Restart Excel: Try closing Excel and then opening it again. Problems with the software, such as the status bar disappearing, can occasionally be resolved by doing this.
- Repair Office Installation: Restart your Excel, but if it doesn’t help, consider fixing Office installation. Go to “Control Panel” >> choose “Programs and Features” >> Locate Microsoft Office >> choose “Change” from the context menu >> Select “Repair” and then follow the instructions.
- Update Excel: Updating your Excel to the most recent version if available to fix the problem.
What Are the Things to Remember?
- The default settings of the status bar may vary in different versions of Microsoft Excel.
- Some options are only applicable when working with numeric data, such as Average, Sum, Minimum, and Maximum.
- Some options are effective with both numeric and string (character) data, such as Count.
- If you want to display a larger area of your Excel worksheet at a time, you can always hide the status bar to free up space. Press the CTRL + SHIFT + F1 keys simultaneously to hide both the ribbon and the status bar.
- The zoom slider feature is helpful when you want to focus on specific details or get a broader view of your data without having to navigate through the ribbon or menu options to change the zoom level.
Frequently Asked Questions
1. What is the default status of the status bar in Excel?
Answer: The following are some of the standard options you can find on each worksheet’s status bar by default: Cell mode, Macro recording icon, Accessibility check, Worksheet views, Page number, Some data statistics, and Zoom options.
2. What are the title bar and status bar in Excel?
Answer: The title bar is the topmost horizontal bar in the Excel window that displays the name of the workbook or spreadsheet file. The status bar is a horizontal bar located at the bottom of the Excel window. It provides information and quick access to certain settings and features, such as cell modes, summary statistics, and the status of certain keys.
3. What is the difference between the status bar and the formula bar?
Answer: The status bar in Excel provides basic information about the worksheet’s state and displays indicators like “Caps Lock.” It doesn’t directly affect cell content. On the other hand, the formula bar is where you input, edit, and view formulas, functions, or text within cells.
Download Practice Workbook
Conclusion
By going through this article, I hope you have gained in-depth knowledge regarding the Status Bar in Excel. We have shown all the default options and how to customize them if necessary. This article also covers the causes of Excel status bar not showing and how to to fix this issue.
The Status Bar is a powerful and versatile tool that provides valuable information and functionality to enhance your experience with Microsoft Excel. We can see common calculations in the status bar by avoiding formulas. It will make our work efficient.
Status Bar in Excel: Knowledge Hub
- How to Hide and Unhide Status Bar in Excel
- How to Copy Sum from Status Bar in Excel
- Excel Status Bar Not Showing Sum
- [Fixed!] Excel Status Bar Not Showing Count
<< Go Back to Excel Parts | Learn Excel

